


Rev.102212
‐
J
3.
The
M
reen.
sc
U
should
be
4.
Insert
t
hexagona
to
the
hei
they
will
h
5.
Push
th
ceiling.
Th
use
the
nu
firmly
tigh
JA
8expanding
Use
the
Socke
e
firmly
tighte
the
threaded
r
al
screws
with
ight
of
the
scr
hold
the
weig
he
screen
up
i
he
hexagonal
uts
(F)
to
ens
htened.
bolts
(G)
mo
et
wrench
(D
ened
and
test
rods
(C)
throu
h
the
washer
reen’s
housin
ght
of
the
scre
into
the
space
screws
(E)
w
ure
a
firm
co
Pus
ount
into
thic
D)
to
attach
t
ed
to
make
s
ugh
the
M8
ex
(E).
Last
put
t
ng.
Once
they
een.
e.
Use
the
th
will
connect
th
nnection.
Use
Ceiling
Ceiling
sh
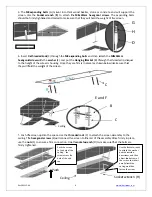
Push
the
screen
to
the
hole
of
t
ceiling
,
the
screw
across
th
hole
of
the
end
cap.
8
ck
wood
beam
the
M8x40m
ure
that
they
xpanding
bol
the
Hanging
B
y
are
firmly
in
readed
rods
he
screen
to
t
e
the
socket
w
n
he
he
d
ms,
stone
or
mm
hexagona
y
will
hold
the
ts
and
then
a
Bracket
(B)
th
place
(as
sho
(C)
to
attach
the
rest
of
the
wrench
(D)
to
E
a
concrete
an
al
screws
.
Th
e
weight
of
th
attach
the
M8
hrough
the
th
own
below)
m
the
screen
as
e
assembly.O
o
make
sure
th
nd F
B
C
www.elitescree
d
will
suppor
e
expanding
he
screen.
8x40mm
hreaded
rod
e
make
sure
tha
ssembly
to
th
Once
firmly
in
hat
the
bolts
Socket wr
C
Use
the
S
to
attach
and
the
o
hexscrew
adjust
the
the
scree
parallel
w
ceiling,
an
fasten
the
ens.com
D
H
G
rt
the
bolts
equal
at
e
place,
are
rench (H)
Socket
wrench
the
washer
outside
ws,
and
then
e
bottom
of
n
to
m
it
ake
with
the
nd
then
e
screw.


