background image

42

English

11.5 

Maintenance after 20 hours of operation

11.5.1    Changing the engine oil

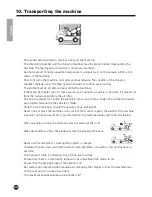
•  Ensure that the engine is on an even surface and turned off.
•  At the rear of the engine, below the engine base, a plug is screwed into the crankcase (see the 

engine manual).

•  Get a one litre collection reservoir before unscrewing the plug.
•  Empty the full contents (approx. 1.1 l) from the engine.
•  Replace the plug. Wipe away any spilled oil with a clean cloth.
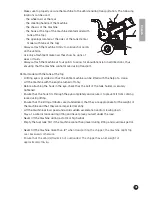
•  Refill the engine with fresh 4 stroke oil. ELIET recommends a top quality high-detergent oil: 

SUNOCO DENALUBE SAE 20W50 API SF / CC.

•  Fill approx. 1.1 litres of oil into the oil filler opening. Remove any spilled oil after filling. For 

an accurate dipstick reading of the oil level, allow sufficient time for the oil to settle in the 
crankcase.

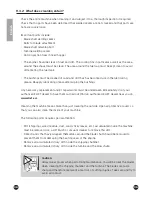
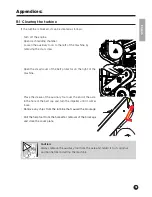
•  Place the dipstick in the filler opening without fastening it. After pulling it out again, the oil 

attached to the dipstick should reach the maximum mark. If not, more oil must be added.

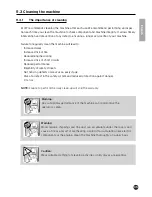
Warning:

Oil shortage causes severe engine damage.

11.5.2    Checking and/or changing the spark plug

ELIET suggests the following spark plugs:

B&S Vanguard 10 hp

Champion QC 12 YC

Honda GX 270 9 hp

NGK BPR 6 ES

Subaru EX27 9 hp

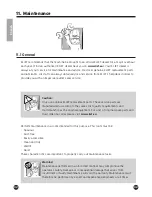
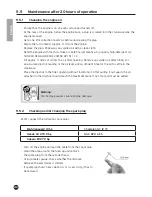
•  Turn off the engine and pull the cable from the spark plug.
•  Clean the area around the fuel cap and remove 

  the spark plug from the cylinder head.

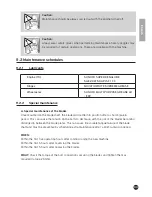
•  Using a feeler gauge, check whether the distance 

  between the electrodes is 0.8 mm.

•  If sparkplug shows heavy deposits or is very dirty, it has to 

  be replaced.

Summary of Contents for Major 4S

Page 1: ...Major 4S M A N U A L...

Page 2: ...serious consequential damage to your new machine and the operator is at risk of injuries or even death ELIET cannot be held liable for any consequences of this negligence and it also voids any relate...

Page 3: ...number Year of Manufacture 20 2 Warranty 2 1 Warranty card For the warranty to be valid the completed warranty card must be mailed to the address below within one month of the date of purchase ELIET E...

Page 4: ...continually being updated and improved and therefore the specification of your machine may differ slightly in terms of shape technology and accessories The descriptions and technical data in this man...

Page 5: ...instructions 11 7 1 Safety messages 11 7 2 Safety features 13 7 3 Safety instructions 14 7 3 1 General safety instructions 14 7 3 2 Careful and proper use 15 7 3 3 Operator s responsibilities 16 7 3...

Page 6: ...eck 37 11 4 3 Cleaning the air filter 38 11 4 4 Grinding the blades 38 11 4 5 Belt tension check 41 11 5 Maintenance after 20 hours of operation 42 11 5 1 Changing the oil 42 11 5 2 Checking and or ch...

Page 7: ...information and highlight dangers 5 1 For your information For your information This symbol is used to draw your attention to specific information and or actions or to indicate where you can find addi...

Page 8: ...u take the time to study the machine prior to its use for a better understanding of the descriptions provided in this operating manual 6 1 Overall view 8 1 Emergency stop bracket 2 Feed hopper 3 Handl...

Page 9: ...g 2 Exhaust 3 Silencer 4 Air filter 5 Petrol tank 6 Petrol cap 7 Speed control 8 Kickback starter 9 Starter handle 10 Choke 11 Fuel tap 12 Fuel supply 13 Carburettor 14 Engine axis 15 Oil dipstick and...

Page 10: ...r advice ensuring your ELIET machine is always in perfect condition You can contact him for original ELIET parts and lubricants at any time These service parts are manufactured according to the same s...

Page 11: ...the machine It provides a summary of the general safety regulations by using icons 1 The manual should be read and understood before operating the machine 2 Suitable safety clothing must be worn when...

Page 12: ...zkontrolujte funk nost bezpe nostn ho syst mu BQ 505 010 391 12 English This sticker is affixed on the cover of the driving belt It indicates the potential danger arising when the cover is removed whi...

Page 13: ...from the blades when the engine is running The engine stops as soon as the star knob on the cover plate is loosened to open the cover Safety shield The steel plate located in the feed opening protect...

Page 14: ...r Eliet dealer for further explanation In addition the ELIET helpdesk is at your service during office hours to answer any queries you may have EU 32 56 77 70 88 Read the chapter meant for the dealer...

Page 15: ...eline no more than 10 of the material to be processed should exceed a diameter of 40 mm Never attempt to shred frozen branches Never feed burning objects into the machine e g burning cigarettes charco...

Page 16: ...should only be operated by persons who are in a good physical condition Take a rest if you become tired whilst operating the machine The machine should not be operated after the consumption of alcohol...

Page 17: ...operation 3 M 3 M 3 M 10 M OPERATOR POSITION Contact with moving parts may cause injury or damage Make sure that your hands feet or any loose clothing are well away from moving parts Only operate the...

Page 18: ...sult of wear or breakage always contact your ELIET dealer and demand genuine ELIET service parts This is of key importance for your own safety Find an authorised ELIET dealer near you on www eliet eu...

Page 19: ...SAFETY REASONS ALL THE BLADE BOLTS MUST BE RE TIGHTENED AFTER THE FIRST 5 OPERATING HOURS TORQUE 25 NM Failure to do this may cause serious injury and even lead to death In addition to damaging the ma...

Page 20: ...onto the wheel axes Before doing so a little grease Sunoco Multipurpose LR EP2 may be applied to the roller bearings Finally the wheels are tightened to the axes using the supplied Starlock caps Moun...

Page 21: ...Machines do not contain any oil or fuel when they are packed The dealer will fill the oil and petrol tanks according to the instructions in this manual or the engine manual The rpm will be set at 3 20...

Page 22: ...s full If it is not add fuel see 9 2 Refuelling 4 Check that the air filter is not heavily soiled if necessary read 11 4 3 Cleaning the air filter 5 Check that the cover plate at the back of the machi...

Page 23: ...k Keep it out of reach of children Never refuel at the location where the machine will be operated Keep a distance of at least 10m from the selected work area Doing so will avoid creating a fire hazar...

Page 24: ...ctly by the motor The blades are never discon nected and therefore the machine becomes dangerous as soon as the engine starts running In any situation that could lead to loss of control over the opera...

Page 25: ...put the handle or turn the switch into the ON position Set the choke handle to Close Open full throttle represented by the image of a hare Slightly pull the starter handle until you feel some resista...

Page 26: ...MERGENCY STOP BRACKET BACKWARDS ENGINE OFF To stop the engine switch the throttle or turn the knob into the OFF position The machine can also be stopped by pushing the emergency stop bracket backwards...

Page 27: ...ection zone of the blow chute while transporting green waste The engine should not be started before having arrived at the work site Never run a petrol engine in a closed environment as there is a ris...

Page 28: ...ogged up switch off the machine to remove the blockage Make sure to wait for the blades to come to a complete standstill before carrying out any operation on the machine Do not forget that the impelle...

Page 29: ...s with a tool and then remove them 6 Remount the cover plate and check that it is done properly 7 In the event that a wood chip is blocking the impeller in the turbine the turbine must be cleared Try...

Page 30: ...railer Ensure that the planks are properly fastened to the vehicle or trailer Under no circumstances should the upwards slope exceed 25 Never drive or place the machine on any surface that cannot supp...

Page 31: ...ith the help of a crane Lift the machine with the engine turned off only Before attaching the hook in the eye check that the bolt of the tank holder is securely tightened Ensure that the hook fits thr...

Page 32: ...ese service parts are manufactured according to the same strict quality requirements and craftsmanship as the original equipment For a list of original spare parts and their ordering codes please visi...

Page 33: ...the blades Once mounted on the blade shaft the blades will settle into position after a short break in period This can cause the tension on the bolts to decrease with the risk of the blades becoming d...

Page 34: ...il level see 11 4 2 Oil level check Cleaning the air filter see 11 4 3 Cleaning the air filter Check the machine for signs of abnormal wear or fractures Check that the bolts are securely tightened bla...

Page 35: ...of short circuits Reduced performance Illegibility of safety stickers Not noticing defects or wear at an early stage Risk of a defect in the safety system and reduced protection against danger Fire r...

Page 36: ...undertaken immediately Visit your authorised ELIET dealer to have them carried out find an authorised ELIET dealer near you on www eliet eu Cleaning the machine means more than just cleaning the outsi...

Page 37: ...re to protect you 11 4 Routine check prior to any operation 11 4 1 Visual inspection Check that no parts have been deformed that welded seams are not cracked and that parts are not excessively loose I...

Page 38: ...the machine has toppled over for some reason check the air filter immediately The unusual position of the engine may have caused oil to seep from the crankcase via the carburettor onto the air filter...

Page 39: ...the bevelled side Ensure that the cut retains its original angle The top of the blade suffers most during chipping Grind it as little as possible to avoid weakening Correct and timely grinding of the...

Page 40: ...gle and grinding at a blunt angle 4 or an interrupted cutting angle 5 will slow down the blades on the timber resulting in a loss of capacity Too sharp a cut ting angle 6 7 will lead to a weakened cut...

Page 41: ...t down with one s thumb applied force ap proximately 7 5 kg it should not move more than 1 cm In that case the tension is sufficient Place back the rubber cap after checking the belt tension If the be...

Page 42: ...led oil after filling For an accurate dipstick reading of the oil level allow sufficient time for the oil to settle in the crankcase Place the dipstick in the filler opening without fastening it After...

Page 43: ...anging the air filter This procedure is exactly the same as for cleaning the air filter see 11 4 3 Cleaning the air filter New suitable air filters are available from your ELIET dealer or an authorise...

Page 44: ...the hinge on the safety bracket the hinge on the base and the hinge on the deflector valve of the blow chute Start by spraying some penetrating oil into the hinges Leave it to work for a few minutes...

Page 45: ...lock nut The two belt pulleys can now be lined up by screwing back the bolt at the front of the engine The pulleys are aligned if a slat held against the pulleys touches the four indicated points see...

Page 46: ...on the right hand disc The blade from the right hand disc is rotated 180 and placed into the vacated hole in the left hand disc This procedure is repeated until all the blades from zone A have been e...

Page 47: ...done with with a stripping knife Tightly fasten the bolts after refitting the chipping blades Check that all the bolts are tight ened before remounting the sieve Always make sure to refit the bolts i...

Page 48: ...see 11 5 2 Checking and or replacing the spark plug Spray some MoS2 based penetrating oil into the cylinder Pull the starter cord until the piston is in its uppermost position Replace the spark plug...

Page 49: ...teel reversible 4 double steel blade discs Chipping technology ELIET Chopping PrincipleTM Chipping width 250 mm Feed opening 250 x 250 mm Feed height 1 060 mm Blow height 1 160 mm Wheels x W material...

Page 50: ...he machine Based upon this knowl edge the necessary steps have been taken in line with Machine Directive 2006 42 EEC in order to ensure full operator safety when the machine is used correctly The valu...

Page 51: ...he belt protector on the right of the machine Place the sleeve of the auxiliary tool over the end of the axle in the hole of the belt cap and turn the impeller until it comes loose Remove any chips fr...

Page 52: ...e parts and securely tighten the bolts Depending of the operating set up the blow direction of the chute may be adjusted by giving the blow chute a quarter turn left or right from its standard positio...

Page 53: ...hat the Major 4S hangs flat The white ring on the propeller shaft s connection slides back Until the propeller shaft has been clicked into place it has not been connected properly If the Major 4S is c...

Page 54: ...spanners 10 mm and 13 mm are required for this In order to check the exact belt tension a weight of 7 5 kg must be hung on the V belt If the belt sags 1 cm the belt tension is correct Tension the bel...

Page 55: ...10 49 72 M12 85 125 M14 135 200 M16 210 310 M18 300 430 M20 425 610 M22 580 820 M24 730 1050 M27 1100 1550 M30 1450 2100 Fine thread M8 x 1 27 39 M10 x 1 25 52 76 M12 x 1 5 89 130 M14 x 1 5 145 215 M1...

Page 56: ...ng injuries to hands when disassembling the blade shaft Cutting injuries due to the blade shaft falling after being disassembled Strangulation or constriction due to loose clothing getting caught in m...

Page 57: ...or rental use after twelve months or 100 hours of operation for semi professional and or professional use after twelve months or 100 hours of operation To apply for this warranty the customer must reg...

Page 58: ...the purchase invoice and sent to ELIET or an importer agent of ELIET Step 6 ELIET sends the parts ordered to the dealer under the regular delivery and payment conditions Step 7 The defective part wil...

Page 59: ...59 English...

Page 60: ......

Reviews: