


5
ELECTRICAL & INSTALLATION REQUIREMENTS
IMPORTANT
Observe all governing codes and ordinances.
It is the customer’s responsibility:
• To contact a qualified electrical installer.
• To assure that the electrical installation is adequate and in
conformance with National Electrical Code, ANSI/NFPA 70
— latest edition*, or CSA Standards C22.1-94, Canadian
Electrical Code, Part 1 and C22.2 No.0-M91-latest edition**
and all local codes and ordinances.
• If codes permit and a separate ground wire is used, it is
recommended that a qualified electrician determine that
the ground path is adequate.
• Do not ground to a gas pipe.
• Check with a qualified electrician if you are not sure range
hood is properly grounded.
• Do not have a fuse in the neutral or ground circuit.
IMPORTANT
• Save Installation Instructions for electrical inspector’s use.
• The range hood must be connected with copper wire only.
• The range hood should be connected directly to the fused
disconnect (Or circuit breaker) box through metal
electrical conduit.
• Wire sizes must conform to the requirements of the
National Electrical Code ANSI/NFPA 70 — latest edition*,
or CSA Standards C22.1-94, Canadian Electrical Code Part
1 and C22.2 No. 0-M91 - latest edition** and all local codes
and ordinances.
• A U.L.- or C.S.A.-listed conduit connector must be
provided at each end of the power supply conduit (at the
range hood and at the junction box).
Copies of the standards listed may be obtained from:
* National Fire Protection Association Batterymarch Park Quincy,
Massachusetts 02269
** CSA International 8501 East Pleasant Valley Road Cleveland,
Ohio 44131-5575
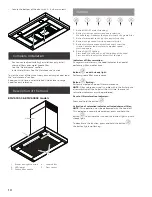
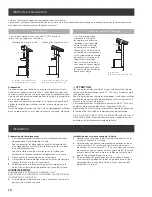
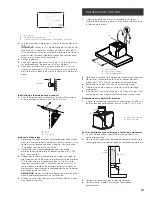
BEFORE INSTALLING THE HOOD
1
For the most efficient air flow exhaust, use a straight run
or as few elbows as possible.
CAUTION: Vent unit to outside of building, only.
2
At least two people are necessary for installation.
3
Fittings material is provided to secure the hood to most
types of walls/ceilings, consult a Qualified Installer,
check if they perfectly fit with your cabinet/wall.
4
Do not use flex ducting.
5
COLD WEATHER installations should have an additional
backdraft damper installed to minimize backward cold air
flow and a nonmetallic thermal break to minimize
conduction of outside temperatures as part of the
ductwork. The damper should be on the cold air side of
the thermal break.
The break should be as close as possible to where the
ducting enters the heated portion of the house.
6
Make up air: Local building codes may require the use of
Make-Up Air Systems when using Ducted Ventilation
Systems greater than specified CFM of air movement.
The specified CFM varies from locale to locale. Consult
your HVAC professional for specific requirements in your
area.
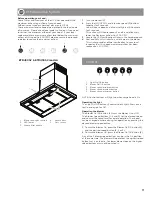
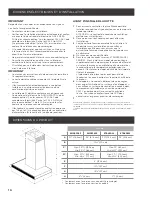
PRODUCT DIMENSIONS
C
D
E
F
A
H
B
G
Models
EMZ630S3
EMZ636S3
ETB430S2
ETB436S2
A
30” (76.2 cm)
36” (91.4 cm)
30” (76.2 cm)
36” (91.4 cm)
B
19
11
⁄
16
” (50 cm)
C*
Max: 54
11
⁄
64
” (139 cm)
Min: 33
11
⁄
32
” (86 cm)
Max: 35” (89 cm)
Min: 20
3
⁄
4
” (52.7 cm)
D**
Max: 50
5
⁄
16
” (129 cm)
Min: 29
11
⁄
16
” (77 cm)
Max: 31
3
⁄
16
” (79.2 cm)
Min: 20
1
⁄
2
” (52.2 cm)
E
6” (15.24 cm)
F
10
3
⁄
4
” (27 cm)
G
13
1
⁄
32
” (33 cm)
H
2
6
⁄
16
” (6 cm)
1
5
⁄
8
” (4 cm)
* Ductless (Recirculating) version
** Ducted version


