


dark again.
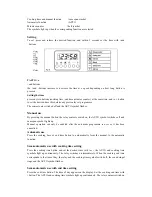
It is possible to adjust the time-of-day by pressing the mode button until L4 flashes, then the
time-of-day can be adjusted.
Minute minder (interval time)
In order to set the interval time, the “Mode” button has to be pressed repeatedly until LED L3 is
flashing. Then the interval time can be set between 0.01 and 2.30 h by using the plus and minus
buttons. After setting the interval time, it remains displayed and the LED L3 is now illuminated
steadily. After th interval time has run down, the alarm signal sounds (2 beeps every 2 seconds)
and the LED L3 is flashing again. Pressing any of the buttons stops the signal and the flashing,
the LED goes dark and the display reverts to the time-of-day. If the alarm is not stopped
manually, it terminates automatically after 2 minutes.
The minute minder can be applied at any time while other functions are operative.
Operation period
In order to set an operation period, the mode button has to be pressed repeatedly until the LED
L1 is flashing. Then the desired operation period (time frame between 0.01h and 10.00h) can be
set using the plus and minus buttons. Once adjusted, it will be stored after approx.. 5 seconds, the
LED L1 remains illuminated steadily, and the set time starts running down. The display reverts
to the time-of-day. As soon as the operation period has ended, the relay opens and the alarm
signal sounds (4 beeps every 2 seconds) and the LED L1 is flashing again. Pressing any of the
buttons stops the signal and the flashing, the LED goes dark and the relay closes again. If the
alarm is not stopped manually, it termiantes automatically after 2 minutes.
Operation stop
In order to set an operation stop, the mode button has to be pressed repeatedly until the LED L2
is flashing. Then the desired operation stop, which is limited to a ponit being maximally 23.59 h
in the future, can be set using the plus and minus buttons. Once adjusted it will be stored after
approx. 5 seconds, and the LED L2 remains illuminated steadily. The display reverts to the
time-of-day. As soon as the operation stop has been reached, the relay opens and the alarm signal
sounds (4 beeps for 2 minutes) and the LED L2 is flashing. Pressing any of the buttons stops the
signal and the flashing, the LED goes dark and the relay closes again.
It is possible to combine the duration and end time in order to program a delayed mode. To do
this, both the operation period and operation stop time have to be set (set above). LED L1 and L2
are illuminated and the baking process will start at a point in time “operation stop minus
operation period”. If a baking process ought to be finished at 12.00 and shall last 1.30 h, both
times have to be set in the respective modes, and the timer will switch on the oven at 10.30.
The timer is capable to avoid conflicts during the programming. (E. g. with an operation period
of 60 minutes resp. 1.00 hr set, and the time-of-day being 11.34 o’clock, then the operation stop
can be earliest at 12.34 o’clock.)
Please note:
A running program can be checked and corrected at any time. In order to avoid conflicts, it is not
possible to set the time of day when an automatic program is active.