background image

GB-24  

www.elero.com 

Approaching the intermediate position 

Requirement 

The transmitter/transmitter channel has been programmed. The 
blind is at its upper end position. 


1. Press the 

DOWN

 button briefly twice. The status display lights 

up briefly. 

2.  The blind travels to the stored intermediate position. In the case 

of venetian blinds, after reaching the intermediate position, the 
slats turn automatically. If no intermediate position has been 
programmed the blind travels to the lower end position. 


Approaching the ventilation/tilting position 

Requirement 

The transmitter/transmitter channel has been programmed. The 
blind is at its lowest end position. 


1. Press the 

UP

 button briefly twice. The status display lights up 

briefly. 

2.  The blind travels to the stored ventilation / tilting position. If no 

ventilation/tilting position has been programmed the blind travels 
to the upper end position. 


Deleting positions/deleting transmitter  
Deleting the intermediate position in the receiver 

1.  Press both the 

STOP

 button and the 

DOWN

 button. 

2.  Hold down this button combination for approx. 3 seconds. 

The status display lights up briefly. 


Deleting the ventilation/tilting position in the receiver 

1.  Press both the 

STOP

 button and the 

UP

 button. 

2.  Hold down this button combination for approx. 3 seconds. 

The status display lights up briefly. 


Deleting the transmitter channel in the receiver 

1.  Press both the 

STOP

 button and the programming button 

P


(on the back of the device). 

2.  Hold down this button combination for approx. 6 seconds until 

the status display lights up orange briefly and then red. In 

Summary of Contents for TempoTel 2

Page 1: ...182020001 0810 DE GB TempoTel 2 Nr 282650001 282660001 282670001 0682 Original Bedienungsanleitung Operating instructions translation ...

Page 2: ...betriebnahme 8 Werkseinstellungen 9 Betriebsmodus 12 Menüstruktur 13 Menümodus 14 Menü EINSTELLUNGEN 16 Globale Einstellungen 16 Kanalbezogene Einstellungen 17 Menü FUNKTION 20 Sender einlernen 20 Weitere Sender einlernen 21 Endlagen anfahren Rollladen Markise Jalousie 22 Zwischenpositionen für Rollladen Markise Jalousie 23 Positionen löschen Sender löschen 24 Batteriewechsel 25 Reinigung 25 Entso...

Page 3: ...eise beziehen sich auf das Gerät und nicht auf das Zubehör und den Antrieb VORSICHT Das Nichtbeachten kann zu Verletzungen führen Alle Sicherheitshinweise beachten Niemals beschädigte Produkte installieren oder in Betrieb nehmen Nur unveränderte Originalteile verwenden Bei unzulässigem Öffnen vom Gerät unsachgemäßem Einsatz falscher Installation oder falscher Bedienung besteht die Gefahr von Perso...

Page 4: ...nger keine Gefahr für Personen Tiere oder Sachen ergibt oder dieses Sicherheitsrisiko durch andere Sicherheitseinrichtungen abgedeckt ist Der Betreiber genießt keinerlei Schutz vor Störungen durch andere Fernmeldeanlagen und Endeinrichtungen z B auch durch Funkanlagen die ordnungsgemäß im gleichen Frequenzbereich betrieben werden Die Reichweite vom Funksignal ist durch den Gesetzgeber und die baul...

Page 5: ... solchen Fällen ausgeschlossen Lieferumfang TempoTel 2 Batterien sind im Gerät enthalten Wandhalterung 2 Dübel 2 Schrauben Technische Daten Gerätebezeichnung TempoTel 2 Betriebsspannung 3 V DC Batterietyp 2 x LR06 AA Mignon Schutzart IP 20 Zulässige Umgebungstemperatur 0 bis 55 C Funkfrequenz 868 MHz Band Maße in mm Handsender L 150 x B 51 x H 26 Gewicht in Gramm inkl Batt 140 Für USA Kanada Austr...

Page 6: ... Bohrlöcher keine elektrischen Leitungen treffen Vor der Montage an der gewünschten Montageposition die einwandfreie Funktion von Sender und Empfänger prüfen Die Halterung mit den beigelegten Dübeln und Schrauben an der Wand befestigen Das Oberteil vom Wandhalter ist verschiebbar ...

Page 7: ... 7 Geräteerklärung Gerätevorderseite 1 Display 2 Linke Menütaste 3 Rechte Menütaste 4 Joystick 5 Betriebsmodus Anzeige 6 AUF Taste 7 STOPP Taste 8 Statusanzeige 9 AB Taste 10 Auswahltaste Geräterückseite 11 Lerntaste P ...

Page 8: ...l aus und schickt eine Bestätigung an den Sender zurück Unidirektionales Funksystem Unidirektionales Funksystem bedeutet die Übertragung eines Funksignals an einen Funkempfänger Jedoch kann der Funkempfänger im Vergleich zum bidirektionalen Funksystem keine Rückmeldung an den Sender zurückschicken Auch eine Weitergabe des Funksignals von Funkempfänger zu Funkempfänger ist nicht möglich Inbetriebna...

Page 9: ...in Zwischenposition ohne Laufzeitvorgabe Lüftungsposition ohne Laufzeitvorgabe Programmposition Endlage bei Schaltbefehl AB Priorität Aus keine Priorisierung automat Schaltbefehle Beschattung Aus keine Deaktivierung der Beschattungsautomatik bei auto matischem Zeitschaltbefehl AB Einstellungen Produktwahl Rollladen HINWEIS Kanalbezogene Einstellungen sind nur verfügbar wenn mindestens ein Kanal ei...

Page 10: ... Leuchtet die Statusanzeige bei Tastendruck nicht mehr müssen die Batterien erneuert werden siehe Batteriewechsel Gruppensteuerung Unter einer Gruppe versteht man die Steuerung mehrerer Empfänger zum gleichen Zeitpunkt Die ausgewählte Gruppe wird mit einem Fahrbefehl angesteuert In jedem Kanal können beliebig viele Empfänger eingelernt werden Alle Funkkanäle können zur Steuerung von mehreren Empfä...

Page 11: ...omatik für Zeitschaltfunktionen ausgeschaltet Das bedeutet der Empfänger reagiert nicht auf automatische Zeitschaltbefehle Die Beschattungsautomatik bleibt in unidirektionalen Empfängern eingeschaltet Bei bidirektionalen Kanälen werden im manuellen Modus alle Automatikfunktionen in den Empfängern ausgeschaltet Der Empfänger reagiert dann nicht auf automatische Zeitschaltbefehle und Beschattungskom...

Page 12: ...lay eine Raumzuordnung angezeigt falls der Kanal im Editiermenü einem Raum zugeordnet wurde Bei Nicht Benutzen der Tasten wird das Display nach 2 Minuten ausgeschaltet Display im Betriebsmodus Raumzuordnung optional Bidirektional Unidirektional Kanal Nr Bezeichnung Betriebsmodus Zustands symbol Schaltzeitart nächste Schaltzeit Durch Drücken der Menütaste Timer kann die Aktivierung der automatische...

Page 13: ...www elero com DE 13 Menüstruktur ...

Page 14: ...ch unten Scrollfunktion abwärts oder Wertänderung Bewegung nach oben Scrollfunktion aufwärts oder Wertänderung Bewegung nach links rechts Wechsel von Einstellbereichen oder Feldaktivierung HINWEIS Wenn sich der Handsender im Menümodus befindet und die Tasten mehr als 90 Sek nicht benutzt werden wird das Menü automatisch wieder in den Betriebsmodus verlassen Menü DATUM UHRZEIT Datum und Uhrzeit ein...

Page 15: ...t die Auf und Abfahrt nach Astrofunktion entsprechend dem Sonnenaufgang bzw Sonnenuntergang Einstellbare Sperrzeiten verhindern ein zu frühes Auf bzw Abfahren Eine individuelle der örtlichen Gegebenheit angepasste Schaltzeit für das Auf und Abfahren kann durch das Einstellen einer Astroverschiebung siehe Einstellungen erreicht werden Die Astrozeit bezieht sich auf Kassel Deutschland Astro Abend St...

Page 16: ...em Anlegen von Räumen mit individueller Bezeichnung können dem ausgewählten Raum Kanäle oder Gruppen zugeordnet werden und Raumbezeichnungen geändert werden Gruppen Für 2 auswählbare Gruppen können individuell Kanäle oder Räume zugeordnet werden und die Gruppenbezeichnung geändert werden HINWEIS Die Gruppenzuordnung ist nur verfügbar wenn mindestens 2 bidirektionale Funkkanäle bestehen Für unidire...

Page 17: ...ch Schwedisch Dänisch Polnisch Beleuchtung Die Display Hintergrundbeleuchtung ein oder ausschalten Wird 5 s keine Taste betätigt wird automatisch ausgeschaltet Werkseitig ist die Beleuchtungsfunktion eingeschaltet So Wi Zeit So Wi bezeichnet die automatische Sommer Winterzeit Umschaltung Werkseitig ist die Funktion eingeschaltet die Zeitschaltuhr passt sich automatisch an Kanalbezogene Einstellung...

Page 18: ...schenposition einstellbar Nach Auswahl von einem Kanal kann eine Laufzeit für das Anfahren einer Zwischenposition aus der oberen Endposition in 1 s Schritten eingestellt werden Anfahren der Zwischenposition nach der eingestellten Laufzeit kurze Doppelbetätigung der AB Taste Werkseitig ist die Zwischenpositions Laufzeit 0 Lüftungs Wende Tuchstraffungs Pos Zwischenposition 2 Der Sender kann pro Kana...

Page 19: ... zur unteren Endposition und dann zur Wendeposition Tuchstraffungs Pos Markise fährt bis zur unteren Endposition und dann zur Tuchstraffungs Position Priorität Nach Auswahl von einem Kanal kann mit einer aktivierten Priorität festgelegt werden dass automatische Schaltbefehle des Handsenders in allen Empfängern priorisiert behandelt werden und auch in dem Betriebsmodus MANUELL des Empfängers akzept...

Page 20: ...halten und nach einigen Sekunden wieder einschalten Der Empfänger befindet sich jetzt für ca 5 Minuten in Lernbereitschaft 2 Die Lerntaste P auf der Geräterückseite kurz ca 1 Sek drücken Die Statusanzeige leuchtet kurz auf Der Behang fährt ca 2 Minuten lang auf und ab und zeigt damit dass sich der Empfänger im Lernmodus befindet 3 Sofort max 1 Sek nach Beginn einer Auffahrt die AUF Taste drücken D...

Page 21: ...lernt werden sollen 1 An einem bereits auf den Empfänger eingelernten Sender gleichzeitig für 3 Sek die AUF AB und die Lerntaste P drücken Geräterückseite Die Statusanzeige leuchtet kurz auf Der Empfänger ist nun in Lernbereitschaft 2 Auf dem einzulernenden Sender die Lerntaste P drücken bis die Statusanzeige kurz aufleuchtet Der Empfänger ist nun im Lernmodus Auf Abfahrten 3 Sofort max 1 Sek nach...

Page 22: ...n die untere Endlage die Markise fährt aus Untere Endlage anfahren Jalousie Die AB Taste so lange drücken bis die Statusanzeige kurz aufleuchtet Der Behang fährt in die untere Endlage Die AB Taste nur kurz Tippbetrieb drücken der Behang fährt kurz an und stoppt wieder Obere Endlage anfahren Rollladen Markise Die AUF Taste kurz drücken Der Behang fährt in die obere Endlage die Markise fährt ein Obe...

Page 23: ...ste gedrückt halten 2 Die STOPP Taste zusätzlich drücken Der Behang stoppt Die Statusanzeige leuchtet kurz auf Die Zwischenposition ist programmiert Lüftungs Wendeposition im Empfänger programmieren Voraussetzung Der Sender Kanal des Senders ist eingelernt Die Endlagen des Antriebs sind eingestellt Der Behang ist in der unteren Endlage 1 Den Behang mit der AUF Taste soweit in AUF Richtung fahren b...

Page 24: ...drücken Die Statusanzeige leuchtet kurz auf 2 Der Behang läuft auf die gespeicherte Lüftungs Wendeposition Ist keine Lüftungs Wendeposition programmiert fährt der Behang in die obere Endlage Positionen löschen Sender löschen Zwischenposition im Empfänger löschen 1 Die STOPP Taste und zusätzlich die AB Taste drücken 2 Diese Tastenkombination ca 3 Sek gedrückt halten Die Statusanzeige leuchtet kurz ...

Page 25: ...m Sender ist gelöscht Im unidirektionalen Funkbetrieb leuchtet die Statusanzeige während der 6 Sek zweimal kurz grün und dann rot auf Batteriewechsel HINWEIS Batterien nur durch identischen Typ ersetzen 1 Das Gerät an der Unterseite aufschrauben und das Gehäuse öffnen 2 Die Batterien entnehmen 3 Die neuen Batterien lagerichtig einlegen 4 Das Gerät wieder zusammenbauen Verbrauchte Batterien fachger...

Page 26: ...einlernen Antrieb läuft in die falsche Richtung Richtungen sind falsch zugeordnet Sender löschen und neu einlernen Gewünschter Antrieb läuft nicht Falsche Gruppe ausgewählt Richtige Gruppe auswählen Endpositionen werden ungenau angefahren Endlagenpositionen nicht eingestellt Endpositionen nach Produkt anweisung einstellen vom Fachmann Handsender führt eingestellte Schaltbefehle nicht aus 1 Datum u...

Page 27: ...hie bung anpassen Nach Batterie wechsel keine Zeitschaltfunktion für automatische Schaltbefehle Spannungsversor gung zu lange unterbrochen Datum und Uhrzeit einstellen Hinweise zur Reparatur Bei Rückfragen wenden Sie sich bitte an Ihren Fachbetrieb Bitte immer folgendes angeben Artikelnummer und Artikelbezeichnung auf Typenschild Art des Fehlers Vorausgegangene ungewöhnliche Vorkommnisse Begleitum...

Page 28: ...er zur Steuerung von Rollläden Markisen und Jalousien Die Übereinstimmung der s bezeichneten Produkte s mit den wesentlichen Schutzanforderungen wird durch Einhaltung folgender Richtlinien und Normen nachgewiesen EMV Richtlinie 2004 108 EG RoHS Richtlinie 2002 95 EG R TTE Richtlinie 1999 5 EG ETSI EN 301489 1 3 ETSI EN 300220 3 Beuren 29 12 2009 Ulrich Seeker CE Beauftragter Bevollmächtigter Adres...

Page 29: ...182020001 0810 DE GB TempoTel 2 Nr 282650001 282660001 282670001 0682 Operating instructions translation ...

Page 30: ...tings 9 Operating mode 12 Menu structure 13 Menu mode 14 SETTINGS Menu 16 Global settings 16 Settings for specific channels 17 FUNCTION menu 20 Programming the transmitter 20 Programming additional transmitters 20 Approaching limit positions of roller shutter awning venetian blind 22 Intermediate positions for roller shutters awnings venetian blinds 23 Deleting positions deleting transmitter 24 Ba...

Page 31: ...allation instructions apply to the device and not to the accessories and drive CAUTION Failure to observe these can cause physical injury Observe all safety instructions Never install or commission devices which are damaged Only use unmodified original parts If the device is opened without permission or used in an improper manner or if it is incorrectly installed or operated there is a risk of dam...

Page 32: ...nce e g hospitals airports The remote control is only approved for devices and systems for which any malfunction of the transmitter or receiver would not result in a risk for persons animals or property or if such a risk is covered by other safety equipment The operator has no protection whatsoever from interferences by other radio emitters and local terminals e g also from radio installations tha...

Page 33: ...e to observe the instructions Liability for material defects is excluded in such cases Scope of supply TempoTel 2 batteries supplied with device wall bracket 2 dowels 2 screws Technical data Name of device TempoTel 2 Operating voltage 3 V DC Battery type 2 x LR06 AA Mignon Degree of protection IP 20 Permitted ambient temperature 0 to 55 C Radio frequency 868 MHz frequency band Dimensions in mm man...

Page 34: ...t the drill holes do not touch any electrical cables Before installing the unit in the required position check that the transmitter and receiver are functioning perfectly Attach the bracket to the wall with the dowels and screws provided The top part of the wall bracket can be moved ...

Page 35: ...explanation Front of device 1 Display 2 Left menu button 3 Right menu button 4 Joystick 5 Operating mode display 6 UP button 7 STOP button 8 Status display 9 DOWN button 10 Selection button Back of device 11 Programming button P ...

Page 36: ...ommand and sends a confirmation back to the transmitter Unidirectional radio system A unidirectional radio system transmits radio signals to a radio receiver However the radio receiver cannot send back a reply to the transmitter unlike in a bidirectional radio system It is also not possible to pass on the radio signal from one radio receiver to another Initial operation Press a button to switch on...

Page 37: ...pecifying run time Ventilation position without specifying run time Program position End position for switching command DOWN Priority Off automatic switching commands not prioritised Shading Off automatic shading system not deactivated with automatic timed switching command DOWN Settings Product selection Roller shutter NOTE Settings according to channels are only available if at least one channel...

Page 38: ...the reduction in the performance of the battery If the status display no longer lights up when you press a button you must replace the batteries see battery replacement Group control unit A group is understood to mean the control of several receivers at the same time The selected group is controlled by a travel command You can program any number of receivers in each channel You can use all the rad...

Page 39: ... off when these are in manual mode This means the receiver does not respond to automatic timed switching commands The automatic shading system stays switched on in unidirectional receivers In bidirectional channels all the automatic functions in the receivers are switched off in manual mode This means the receiver does not respond to automatic timed switching commands and shading commands from pro...

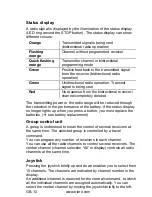
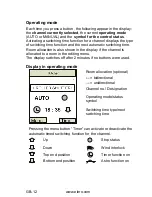
Page 40: ...location is also shown in the display if the channel is allocated to a room in the editing menu The display switches off after 2 minutes if no buttons were used Display in operating mode Room allocation optional bidirectional unidirectional Channel no Designation Operating mode status symbol Switching time type next switching time Pressing the menu button Timer can activate or deactivate the autom...

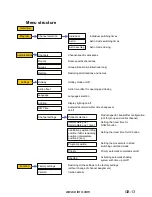
Page 41: ...al only Restoring all allocations and names Holiday mode on off Setting the travel time for DOWN button Setting the travel time for UP button Setting the movements in timed switching command mode Astro time offset for opening and closing Language selection Display lighting on off Automatic summer winter time changeover on off Restoring all the settings to the factory settings without change of cha...

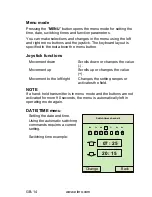
Page 42: ...ons Movement down Scrolls down or changes the value Movement up Scrolls up or changes the value Movement to the left right Changes the setting ranges or activates the field NOTE If a hand held transmitter is in menu mode and the buttons are not activated for more 90 seconds the menu is automatically left in operating mode again DATE TIME menu Setting the date and time Using the automatic switching...

Page 43: ...d days Astro Controls up and down movement according to Astro function and sunrise or sunset Programmable lock times prevent up and down movement occurring too soon Individual switching times adjusted to local conditions for movement up and down can be achieved by setting an Astro offset see settings The Astro time refers to Kassel Germany Astro evening This controls movement up according to the s...

Page 44: ...groups to selected rooms and change the room designations Groups You can select two groups allocate individual channels or rooms to them and change their group designation NOTE Group allocation is only available if at least 2 bidirectional radio channels exist Group allocation is not possible for unidirectional radio transmissions SETTINGS Menu Adjusting the functions as required A scrollbar highl...

Page 45: ...d off automatically if you do not activate the buttons for 5 seconds The lighting function is switched on at the factory Su Wi Time Su Wi describes the automatic summer winter time changeover The function is switched on at the factory the timer adjusts automatically Settings for specific channels The following settings apply to each channel Possible run time for intermediate position from 0 to 360...

Page 46: ... unidirectional channels Once you have selected a channel you can set a run time for approaching an intermediate position from the top end position in 1 second steps Approaching the intermediate position according to the set run time touch the DOWN button briefly twice The intermediate position run time is set at 0 at the factory Ventilation position tilting position fabric tensioning position int...

Page 47: ... to intermediate position 2 Tilting position Roller shutter moves to lower end position and then to tilting position Fabric tautening pos Awning moves to lower end position and then to fabric tautening position Priority Once you have selected a channel you can set an activated priority which means that automatic switching commands from the hand held transmitter are given priority in all receivers ...

Page 48: ...gramming mode for about 5 minutes 2 Press the programming button P on the back of the device briefly approx 1 second The status display lights up briefly The blind moves up and down for approx two minutes showing that the receiver is in programming mode 3 Press the UP button as soon as the blind starts moving up within 1 second at the most The status display lights up briefly The blind stops brief...

Page 49: ...e status display lights up briefly The receiver is now in programming mode 2 Press the programming button P on the transmitter to be programmed until the status display lights up briefly The receiver is now in programming mode movements up and down 3 Press the UP button as soon as the blind starts moving up within 1 second at the most The status display lights up briefly The blind stops briefly st...

Page 50: ... the DOWN button until the status display lights up briefly The blind approaches the lower end position Only press the DOWN button briefly jogging mode and the blind moves a short distance and stops again Approaching the upper end position roller shutter awning Press the UP button briefly The blind approaches the upper end position the awning retracts Approaching the upper end position venetian bl...

Page 51: ... position with the DOWN button Keep pressing the DOWN button 2 In addition press the STOP button The blind will stop The status display lights up briefly The intermediate position is programmed Programming the ventilation tilting position in the receiver Requirement The transmitter transmitter channel has been programmed The end positions of the drive have been set The blind is at its lowest end p...

Page 52: ...status display lights up briefly 2 The blind travels to the stored ventilation tilting position If no ventilation tilting position has been programmed the blind travels to the upper end position Deleting positions deleting transmitter Deleting the intermediate position in the receiver 1 Press both the STOP button and the DOWN button 2 Hold down this button combination for approx 3 seconds The stat...

Page 53: ... twice followed by red The channel in the transmitter is also deleted In unidirectional radio operation the status display lights up for 6 seconds first green briefly twice and then red Battery replacement NOTE Replace batteries only with batteries of the identical type 1 Unscrew the underside of the device and open the housing 2 Remove the batteries 3 Insert the new batteries in the correct posit...

Page 54: ...n Directions are incorrectly allocated Delete transmitter and reprogram Desired drive does not run Wrong group selected Select the right group End positions are approached inaccurately End positions not yet set Have the end positions set by a trained specialist in accordance with the product instructions The hand held transmitter does not carry out the set switching commands 1 The date and time ar...

Page 55: ... There is no timed switching function for automatic switching commands after the batteries have been replaced Power supply interrupted for too long Setting the date and time Notes on repair Please contact your dealer if you have any queries Please provide the following information Item number and name on the type plate Type of fault Previously occurring unusual events Accompanying conditions Own p...

Page 56: ...vers to control roller shutters awnings and venetian blinds The conformity of the indicated product s with the most important safety requirements is verified by the conformation to the following guidelines and standards EMC Directive 2004 108 EC RoHS Directive 2002 95 EC R TTE Directives 1999 5 EC ETSI EN 301489 1 3 ETSI EN 300220 3 Beuren 29 12 2009 Ulrich Seeker CE Officer Representative Address...

Reviews: