background image

1. DVD menu setting

Press the SETUP button on the remote controller, the SETUP 

MENU (main) will be displayed.

1. After accessing the SETUP Menu, press the direction 

buttons for up and down movement to select an item 

desired, then press the ENTER button to confirm your 

entry and move to the sub-menu. Use the left and right 

direction buttons to move the pointer, and the up and 

down  direction  buttons  to  select  the  option  desired. 

Also, press the ENTER button to confirm your selection. 

Now, setup of this current function is completed.

2. To end the setup press the SETUP button again. In 

the SETUP MENU, you may choose any of the following 

options, as you like.

1.1 GENERAL SETUP

This option is used to set up TV screen format, video functions and 

DVD functions, with options of “TV DISPLAY”, “ANGLE MARK”, “OSD 

LANG”, “SPDIF Output” “CAPTIONS”, “SCREEN SAVER”, “HDCD”.
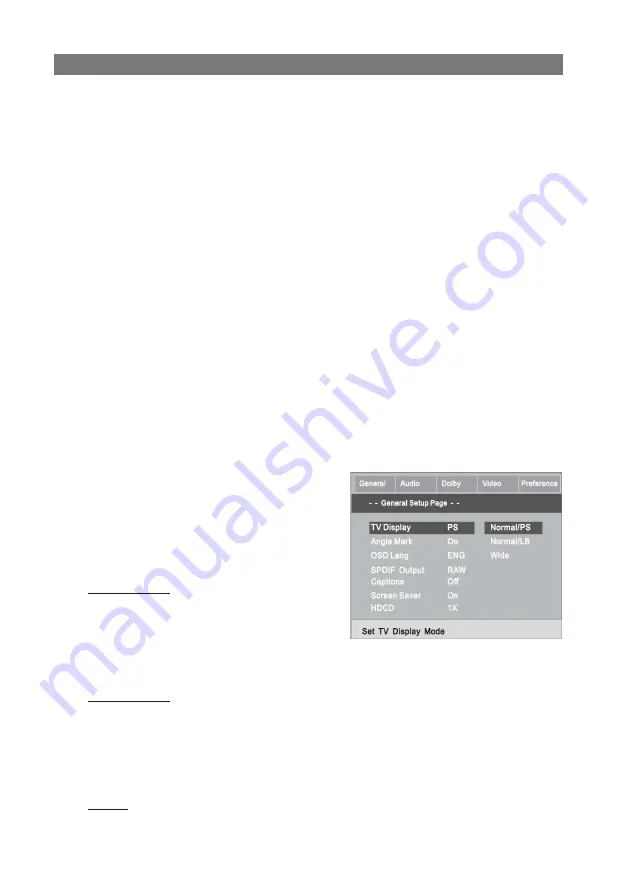
1.1.1 TV DISPLAY

Follow  the  operating  instructions 

stated  in  “DVD  MENU  SETUP”  in 

combination with the desired op-

tion in the following figure.

TV TYPE

Normal/PS:  Choosing  this  setting 

if your DVD player is connected to 

a normal ratio TV. You can fill the 

movie to the entire screen of your 

TV. This might mean that parts of the picture (the left and right 

edges) won’t be seen.

Normal/LB: Choose this setting if your DVD player is connected 

to  a  normal  ratio  TV.  Connector  you’ll  see  the  movies  in  their 

original aspect ratio (height-to-width ratio). You’ll see the entire 

frame of the movie, but it will take up a smaller portion of the 

screen vertically. The movie might appear with black bars at the 

top and bottom of the screen.

Wide: Choose this setting if your DVD player is connected to a 

SYSTEM SETUP

28

Summary of Contents for DVDP-2410

Page 1: ...DVD DVDP 2410...

Page 2: ...3 4 5 6 7 8 10 14 17 18 2...

Page 3: ...DVD PCM MPEG DVD Hi Fi 96 24 108 12 DVD DVD R DVD R DVR RW DVD RW SVCD CVD VCD DVCD CD CD R MP3 KODAK PIC TURE CD 3...

Page 4: ...4...

Page 5: ...8 30 DVD AC 3 SVCD MP3 VCD CD DA Kodak Picture CD 5...

Page 6: ...1 2 3 4 1 YUV 2 3 4 VIDEO S VIDEO 5 VGA 7 SCART 6...

Page 7: ...AV S Video S video YUV 3 VGA SCART SCART 21 7...

Page 8: ...AV 1 2 3 PBC 4 5 A B 6 7 8 9 10 11 12 13 14 15 16 17 18 19 20 21 22 10 23 24 25 26 27 28 29 30 31 32 33 34 35 OSD 8...

Page 9: ...9...

Page 10: ...1 1 2 1 1 GENERAL SETUP DVD 1 1 1 TV DISPLAY TV TYPE Normal PS Normal LB Wide 1 1 2 ANGLE MARK 10...

Page 11: ...LANGUAGE 1 1 4 SPDIF SPDIF OUTPUT Dolby digital DTS DOL BY DIGITAL DTS MPEG SPDIF RAW PCM PCM 1 1 5 CAPTIONS DVD 1 1 6 SCREEN SAVER 1 1 7 HDCD SETUP 1 2 AUDIO SETUP 1 2 1 DOWN MIX MODE 1 2 2 KARAOKE...

Page 12: ...1 3 DOLBY DIGITAL 1 3 1 DUAL MONO 1 3 2 DYNAMIC RANGE COMPRESS 1 4 VIDEO SETUP 1 4 1 COMPONENT 1 4 2 COL OR SETTING 1 5 PREFERENCE SETUP 1 5 1 TV TYPE NTSC PAL M MULTI 1 2 12...

Page 13: ...1 5 2 AUDIO 1 5 3 SUBTITLE 1 5 4 DISC MENU LANGUAGE 1 5 5 PARENTAL 1 5 6 PASSWORD 136900 1 5 7 DEFAULT 13...

Page 14: ...14 MP3 JPEG STANDBY TITLE MENU V MODE YUV RGB VGA PBC VCD AUDIO SUBTITLE AN GLE L R ST S VCD VCD 1 10 10 STOP Play PAUSE PLAY STEP F FWD...

Page 15: ...1 AV AC 3 DVD 2 DISC LOADING No DISC F BWD N P PAL NTSC AUTO REPEAT GO TO ZOOM VOL MUTE OSD 15...

Page 16: ...2 AUDIO PICTURE CD 45 4 5 MP3 ENTER 3 TITLE 16...

Page 17: ...V MODE PAL NTSC 17...

Page 18: ...100 240 50 60 20 PAL NTSC 650 780 DVD 4 22 48 PCM 4 44 96 PCM CD 4 20 90 90 0 400 C 1 0 P P 75 S Video Y 1 0 P P 75 C 0 286 P P 75 2 0 rms 18 35 3 08 2 4 2 3...

Page 19: ...DVD player DVDP 2410 User Manual...

Page 20: ...Features 21 For your Attention 22 Accessories 23 Panel and display 24 Connection 25 Remote Control 26 System Setup 28 Play 33 Troubleshooting 37 Speci cation 38 CONTENT 20...

Page 21: ...me theatre sys tem it will give you the uppermost enjoyment PCM MPEG etc digital audio decoder Hi Fi 96kHz 24 bit audio digital processor 108MHz 12 bit video digital to Analog processor the picture is...

Page 22: ...t may cause malfunction lean the cabinet with soft cloth Detergent or alcohol is forbidden This book is only a guide for user s operation not a criterion for con guration The lightning ash is intended...

Page 23: ...nts at remote sensor within 8 meters and within 30 de gree at left or right side Take the battery out of the controller if it is not used for a long time This unit can play the following types of disc...

Page 24: ...PANEL AND DISPLAY Front panel 1 POWER 2 OPEN CLOSE 3 PLAY PAUSE 4 STOP Rear panel 1 YUV 2 L R CHANNEL 3 COAXIAL 4 VIDEO S VIDEO OUTPUT 5 VGA 7 SCART Front display 24...

Page 25: ...ect the component output terminals of this unit to the corresponding TV monitor input VGA Option Use a VGA cable to connect the VGA output to the TV monitor VGA input terminal SCART Option Use a 21_pi...

Page 26: ...al coaxial cable to connect the coaxial output of this unit to the coaxial input of power ampli er Notes The physical connection should accord with audio output setup of this unit Please refer to Audi...

Page 27: ...27...

Page 28: ...deo functions and DVD functions with options of TV DISPLAY ANGLE MARK OSD LANG SPDIF Output CAPTIONS SCREEN SAVER HDCD 1 1 1 TV DISPLAY Follow the operating instructions stated in DVD MENU SETUP in co...

Page 29: ...on 1 1 3 OSD LANGUAGE The user may use this item to set the language of the setup menu and screen display to English etc Follow the operating instructions stated in DVD MENU SETUP in combination with...

Page 30: ...e following gure LT RT output the front Left and right channel audio signal the center channel is outputted to L and R LS and RS are outputted to R and L STEREO output the front left and right signal...

Page 31: ...st each item in the Color Set ting to get the suitable color out put of the TV screen 1 5 PREFERENCE SETUP During stop mode or open sta tus press the SETUP button to ac cess the PREFERENCE SETUP menu...

Page 32: ...as the built in subtitle language When a DVD is played the user may hide the subtitle or choose any of them as the preset subtitle language Follow the operating instructions stated in DVD MENU SETUP i...

Page 33: ...combination with the desired op tion in the following gure PLAY Basic operation Symbol Text Symbol Text Symbol Text open close play pause stop fast backward fast forward standby previous next Once al...

Page 34: ...etc PBC When playing VCD disc press PBC button turn on PBC the VCD is played by menu press PBC button again turn off PBC then VCD is played in sequence AUDIO When playing DVD with more than one audio...

Page 35: ...ess REPEAT button con tinually the TV screen shows chapter repeat title repeat all repeat repeat cancel in turn When playing SVCD VCD CD disc the turn is track repeat all repeat repeat cancel When pla...

Page 36: ...xample press 4 5 two digit buttons to select 45th picture and press the ENTER button to play the selected picture PLAY CD MP3 DISC When playing a CD or MP3 disc there is a menu screen on TV press the...

Page 37: ...wind mode Sometimes the tiny distor tion appears It s normaly Luminance un steady or picture with noise Anti copy circuit in u ence Connect the DVD unit to TV directly Unable to play Without disc Put...

Page 38: ...ynamic range 90dB Operating conditions Temperature 0 400 C opiration at horizontal Video output 1 0V P P 75 S Video output Y 1 0V P P 75 C 0 286V P P 75 Audio output analog audio 2 0V rms Address to s...

Reviews: