


RW873 User Manual
6
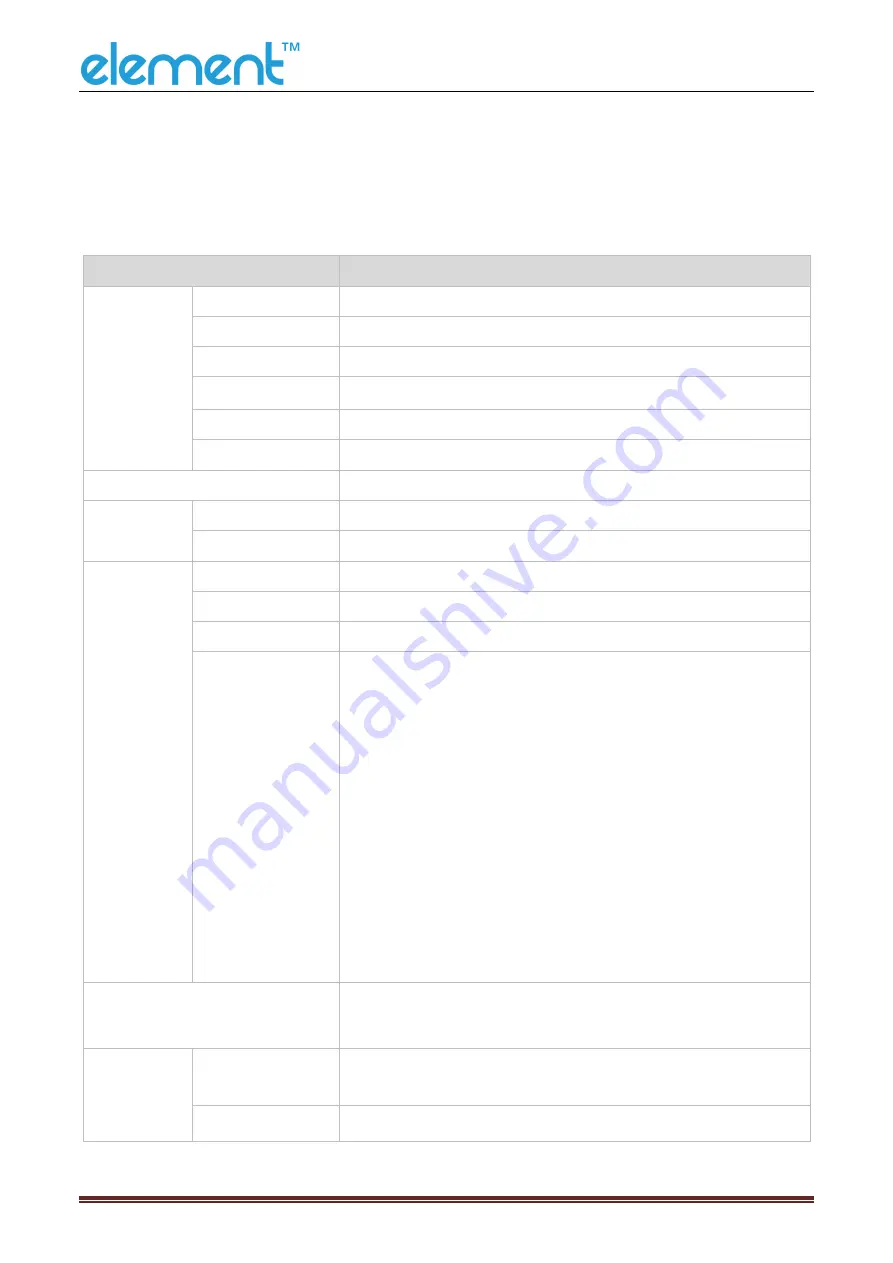
3 SPECIFICATION
3.1 Printer Specification
Table3-1 General Specification
(1/2)
Model
Parameter
Printing
Parameter
Print method
Direct thermal line printing
Resolution
203dpi, 8dots/mm
Printing width
72mm
Print speed
200
~
300mm/s
Interface
USB, Serial, Ethernet, Cash drawer
Print density
Adjustable from level 1 to level 4
Page Mode
Support
Memory
RAM
16Mb
Flash
32Mb
Fonts
Chinese
GBK 16×16, 24×24dots
Alphanumeric
ASCII 9×17, 12×24dots
User-defined
Support
Code page
Optional international character sets : PC437(std.Europe),
Katakana, PC850(Multilingual), PC860(Portuguese),
PC863(Canadian), PC865(Nordic), PC857(Turkish),
PC737(Greek), ISO08859-7(Greek), WPC1252, PC866(Cyrillic
#2), PC852(Latin 2), PC858(Euro), KU42(Thai), TIS11(Thai),
TIS18(Thai), PC720(Arabic), WPC775(Baltic Rim),
PC855(Cyrillic), PC862(Hebrew), PC864(Arabic), ISO8859-
2(Latin2), ISO8859-15(Latin9), WPC1250(Latin 2),
WPC1251(Cyrillic), WPC1253(Greek), PC1254(Turkish),
WPC1255(Hebrew), WPC1256(Arabic), WPC1257(Baltic Rim),
WPC1258(Vietnamese), MIK(Cyrillic), PC755(Latin 2), Iran, Iran
II, Latvian, ISO-8859-1(WestEur), ISO-8859-3(Latin 3), ISO-
8859-4(Baltic), ISO-8859-5(Cyrillic), ISO-8859-6(Arabic), ISO-
8859-8(Hebrew),ISO-8859-9(Turkish), PC856,
PC3848(ABICOMP), MONGOLIAN, VISCII
Graphics
Support varied density bitmap as and download bitmap
printing
Max size of each bitmap is 40K, the total size of bitmap is 256k
Barcode
1D
UPC-A, UPC-E, EAN8, EAN13, CODE39, ITF, CODEBAR,
CODE128, CODE93
2D
PDF417, QR code
Summary of Contents for RW873
Page 1: ...RW873 User Manual ...
Page 8: ...RW873 User Manual 5 2 2 Appearance and Components Front Back Inside Bottom ...
Page 12: ...RW873 User Manual 9 3 2 3 Cutting Position Type Paper Cutting Position L1 RW873 14 5mm ...
Page 22: ...RW873 User Manual 19 5 5 Ethernet Interface PIN NO Signal Name 1 TX 2 TX 3 RX 4 5 6 RX 7 8 ...
Page 29: ...RW873 User Manual 26 4 Click Next 5 Select start menu folder Click Next ...
Page 30: ...RW873 User Manual 27 6 Click Install 7 Click Finish Utility Tool is installed successfully ...
Page 45: ...RW873 User Manual 42 8 2 2 3 Manage Images ...
Page 47: ...RW873 User Manual 44 Note Total memory 256K each bitmap should be below 40K ...
Page 52: ...RW873 User Manual 49 Function Setting ...
Page 74: ...RW873 User Manual 71 Cut Paper ...
Page 75: ...RW873 User Manual 72 Feed Paper Cash Drawer ...
Page 77: ...RW873 User Manual 74 Open the utility and click Manage Images ...
Page 78: ...RW873 User Manual 75 Click Download Click Add to add a logo BMP format is recommended ...
Page 80: ...RW873 User Manual 77 Select Printer properties in Devices and Printers then click Preference ...
Page 81: ...RW873 User Manual 78 Click the Advanced then click Logo ...
Page 83: ...RW873 User Manual 80 Then click OK ...
Page 84: ...RW873 User Manual 81 Click Print Test Page to view the printing effect ...
Page 85: ...RW873 User Manual 82 Buzzer Code Page ...
Page 86: ...RW873 User Manual 83 3 Click Watermark Set watermark to print ...
Page 87: ...RW873 User Manual 84 4 Click Halftone to set the halftone ...
Page 89: ...RW873 User Manual 86 ...
Page 91: ...RW873 User Manual 88 Add Barcode firstly ...
Page 92: ...RW873 User Manual 89 Set the Font Name and the Barcode Option ...
Page 93: ...RW873 User Manual 90 Click the Printer Setting Choose the Display Language for Properties ...
Page 95: ...RW873 User Manual 92 ...
Page 96: ...RW873 User Manual 93 ...
Page 97: ...RW873 User Manual 94 ...
Page 99: ...RW873 User Manual 96 Set the Printing preferences ...
Page 100: ...RW873 User Manual 97 Click the Printer Setting Choose the Display Language for Properties ...
Page 101: ...RW873 User Manual 98 Turn on the Font Substitution ...
Page 102: ...RW873 User Manual 99 Select the System Font for example Arial ...
Page 103: ...RW873 User Manual 100 Select the font to that you want to replace ...
Page 104: ...RW873 User Manual 101 Click Set ...
Page 105: ...RW873 User Manual 102 ...
Page 108: ...RW873 User Manual 105 3 Click Port to choose another port or add port ...
Page 109: ...RW873 User Manual 106 2 Click Advanced to set the available time for printing ...
Page 111: ...RW873 User Manual 108 3 Choose RW873 click Next 4 Click Yes then it is complete to uninstall ...


