RW60 User Manual
13
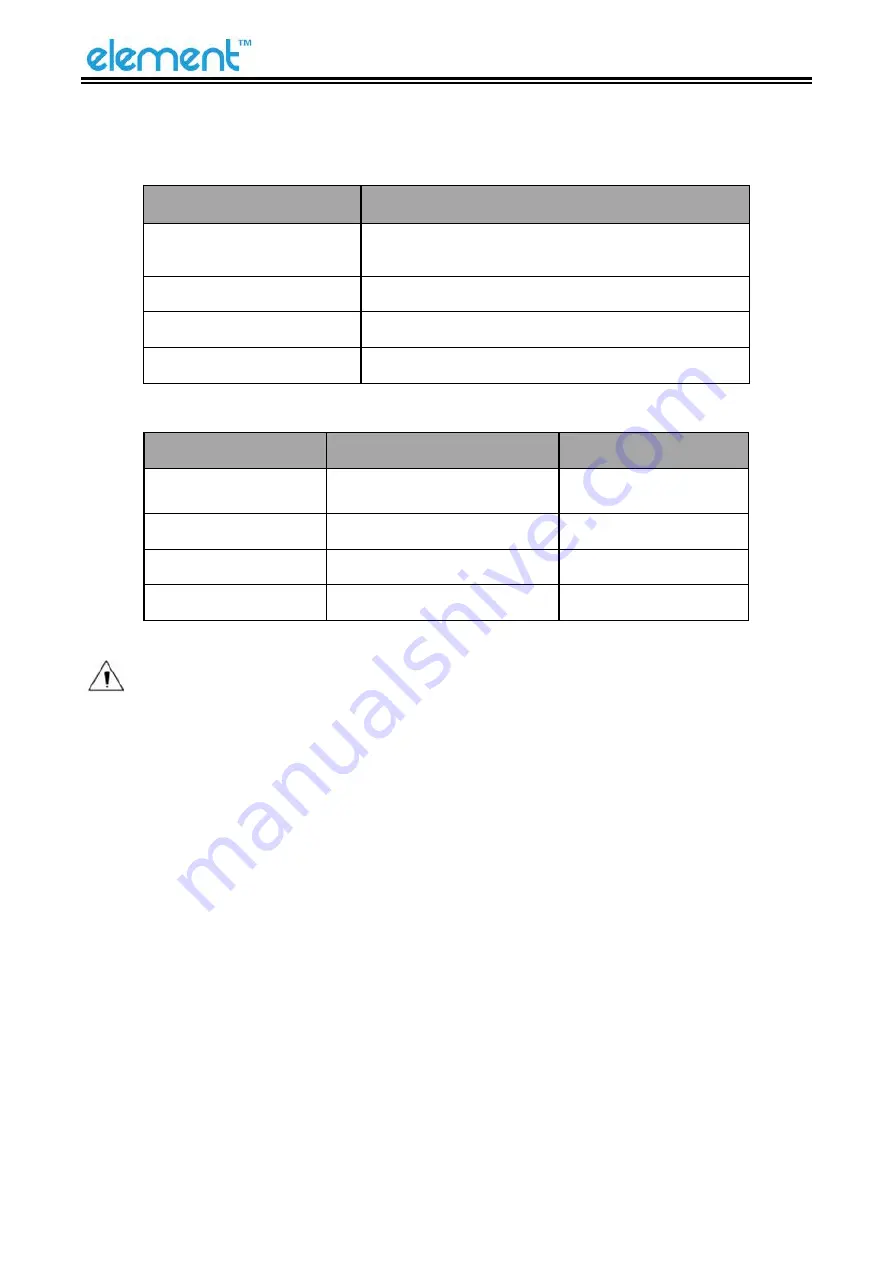
4.2 LED Indicator and Beeper
Function specification of indicator light and beeper.
Status LED
Description
Red (Flashing)
Wrong status (cutter jam, over temperature,
paper end and so on)
Purple (Constant Light)
Paper near end / printer is in normal status
Blue (Constant Light)
Printer is busy
Green (Constant Light)
Printer is ready and in idle condition
Note: The printer uses a thermistor to detect the temperature of the print head. If the
temperature of print head is higher than 65° C, printer will send a warning. If the temperature of
print head is higher than 80° C, printer will stop working until the temperature is lower than 60°
C.
Description
LED
Beeper
The printer cover is
open
Red (Flashing)
“Beep, Beep—, Beep”
Paper Sufficient
Green
Silent
No Paper
Red (Flashing)
“Beep Beep Beep”.
Cutter Jam
Red (Flashing)
”Beep—, Beep—”
Summary of Contents for RW60
Page 1: ...RW60 User Manual ...
Page 2: ...RW60 User Manual REVISION RECORDS REV DATE DESCRIPTION 1 0 2020 09 24 ...
Page 10: ...RW60 User Manual 6 2 2 Appearance and Components Front Rear Inside ...
Page 32: ...RW60 User Manual 28 4 Click Next 5 Select start menu folder Click Next ...
Page 33: ...RW60 User Manual 29 6 Click Install 7 Click Finish Utility is installed successfully ...
Page 49: ...RW60 User Manual 45 8 2 2 3 Manage Images ...
Page 56: ...RW60 User Manual 52 Function Setting ...
Page 70: ...RW60 User Manual 66 8 3 Firmware Update 1 Click FW Update ...
Page 78: ...RW60 User Manual 74 Cut Paper ...
Page 79: ...RW60 User Manual 75 Feed Paper ...
Page 80: ...RW60 User Manual 76 Cash Drawer ...
Page 82: ...RW60 User Manual 78 Open the utility and click Manage Images ...
Page 83: ...RW60 User Manual 79 Click Download Click Add to add a logo BMP format is recommended ...
Page 85: ...RW60 User Manual 81 Select Printer properties in Devices and Printers then click Preference ...
Page 86: ...RW60 User Manual 82 Click the Advanced then click Logo ...
Page 88: ...RW60 User Manual 84 Then click OK ...
Page 89: ...RW60 User Manual 85 Click Print Test Page to view the printing effect ...
Page 90: ...RW60 User Manual 86 Buzzer Code Page ...
Page 91: ...RW60 User Manual 87 3 Click Watermark Set watermark to print ...
Page 92: ...RW60 User Manual 88 4 Click Halftone to set the halftone ...
Page 94: ...RW60 User Manual 90 ...
Page 96: ...RW60 User Manual 92 Add Barcode firstly ...
Page 97: ...RW60 User Manual 93 Set the Font Name and the Barcode Options ...
Page 98: ...RW60 User Manual 94 Click Printer Setting Choose Display Language for Properties ...
Page 100: ...RW60 User Manual 96 1 ...
Page 101: ...RW60 User Manual 97 2 ...
Page 102: ...RW60 User Manual 98 3 ...
Page 103: ...RW60 User Manual 99 ...
Page 105: ...RW60 User Manual 101 Set the Printing preferences ...
Page 106: ...RW60 User Manual 102 Click the Printer Setting Choose the Display Language for Properties ...
Page 107: ...RW60 User Manual 103 Turn on the Font Substitution ...
Page 108: ...RW60 User Manual 104 Select the System Font for example Arial 1 ...
Page 109: ...RW60 User Manual 105 Select the font that you want to replace 2 ...
Page 110: ...RW60 User Manual 106 Click Set 3 ...
Page 111: ...RW60 User Manual 107 ...
Page 113: ...RW60 User Manual 109 3 Click Port to choose another port or add port ...
Page 114: ...RW60 User Manual 110 4 Click Advanced to set the available time for printing ...
Page 116: ...RW60 User Manual 112 3 Choose RW60 click Next Then it is complete to uninstall ...


