background image

Warning!

  Do not use standard bulbs! These

develop too much heat and may damage the

machine!
Before replacing the bulb, disconnect the mains
plug; with a permanent connection: fully unscrew
or deactivate the fuse.

1. Unscrew cover above the bulb (this can be

found directly behind the loading aperture, at
the top; refer to “Description of machine” sec-
tion.)

2. Replace defective bulb.
3. Screw cover back down.
Check the correct positioning of o-ring gasket be-
fore screwing back the door light cover. Do not
operate the dryer when missing o-ring gasket on
door light cover.

Warning!

  For safety reasons, the cover must

be screwed down tightly. If this is not done,

the dryer must not be operated.

Technical specifications

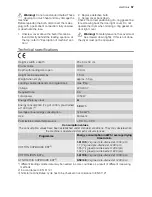
Height x width x depth

85 x 60 x 58 cm

Drum volume

108 l

Depth with loading door open

109 cm

Height can be adjusted by

1.5 cm

Weight when empty

approx. 56 kg

Loading volume (depends on programme)

1)

max. 

7

 kg

Voltage

220-230 V

Required fuse

6 A

Total power

1050 W

Energy efficiency class

A

Energy consumption (7 kg of cotton, pre-drained
at 1000 rpm) 

2)

1.9

 kWh

Average annual energy consumption

126.2 kWh

Use

Domestic

Permissible ambient temperature

+ 5°C to + 35°C

Consumption values

The consumption values have been established under standard conditions. They may deviate when

the machine is operated in domestic circumstances.

Programme

Energy consumption in kWh / average drying

time in min.

COTTON CUPBOARD DRY

3)

1.9/ 135


(7 kg load pre-drained at 1000 rpm)

1.7 

(7 kg load pre-drained at 1200 rpm)

1.65 

(7 kg load pre-drained at 1400 rpm)

1.42 

(7 kg load pre-drained at 1800 rpm)

COTTON IRON DRY

3)

1.4/ 106


(7 kg load pre-drained at 1000 rpm)

SYNTHETICS CUPBOARD DRY

3)

0.59/ 48


(3 kg load pre-drained at 1200 rpm)

1) different loading volume data may be needed in some countries as a result of different measuring

methods

2) in accordance to EN 61121
3) hints for test institutes: cycle has to be checked in accordance to EN 61121

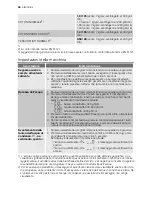
electrolux 

 57

Summary of Contents for TW SL EEV

Page 1: ...ice d utilisation istruzioni per l uso user manual Kondensationstrockner mit Wärmepumpe Sèche linge à condensation avec pompe à chaleur Asciugabiancheria a condensa con pompa di calore Condenser dryer with heat pump TW SL6 E ...

Page 2: ...knet werden Ziehen Sie nach dem Trocknen und zum Reini gen und Warten des Gerätes immer den Netz stecker Versuchen Sie unter keinen Umständen das Gerät selbst zu reparieren Reparaturen durch unerfahrene Personen können zu Verletzungen und schweren Funktionsstörungen führen Wenden Sie sich an Ihren lokalen Kundendienst Bestehen Sie immer auf Original Ersatzteilen Wäschestücke die mit Speiseöl versc...

Page 3: ... niemals wenn das Stromkabel die Bedienblende die Arbeitsplatte oder der Sockel beschädigt ist so dass das Geräteinnere frei liegt Weichspüler oder ähnliche Produkte dürfen nur entsprechend den Herstelleranweisungen be nutzt werden Achtung heiße Oberfläche Berühren Sie bei eingeschalteter Innenbeleuchtung nicht die Abdeckung der Glühlampe Betrifft nur Trockner mit Innenbeleuchtung Einsatzbereich D...

Page 4: ...urückfließen kann Andernfalls könnte der Kompressor beschädigt werden Aufstellen der Maschine Aus praktischen Gründen sollte der Trockner neben der Waschmaschine aufgestellt werden Der Wäschetrockner muss in einem sauberen und staubfreien Raum installiert werden Am Gerät muss genügend Freiraum für die Luft zirkulation vorhanden sein Die vorderen Lüf tungsgitter und die hinteren Lufteinlassgitter d...

Page 5: ...D D F F Die Abdeckplatten D von der Gerätefrontseite abschrauben um 180 drehen und auf der gegenüber liegenden Seite anschrauben 8 Das Türschloss E abschrauben etwas nach unten drücken und von der Gerätefrontseite abnehmen 9 Den Rastknopf F nach innen hinein drücken die Abdeckung etwas nach unten drücken und aus der Gerätefrontseite herausnehmen 10 Das Türschloss E auf die entgegen gesetzte Seite ...

Page 6: ...ätebeschreibung 1 4 5 11 8 10 2 3 7 9 12 6 1 Bedienblende 2 Wasserbehälter 3 Trommelbeleuchtung 4 Feinflusenfilter 5 Grobflusenfilter 6 Flusenfilter 7 Typenschild 8 Einfülltür Türanschlag wechselbar 9 Wärmetauschertür Flusenfilter Wärmetau scher 10 Taste zum Öffnen der Sockeltür 11 Lüftungsschlitze 12 Einstellbare Füße 6 electrolux ...

Page 7: ...ngrad Maximaler Trockengrad Schleuderdrehzahl Standard Minimale Schleuderdrehzahl Schleuderdrehzahlbereich in Schritten von 200 U min Maximale Schleuderdrehzahl Bügeltrocken Trockenpha senanzeige Leicht trocken Trockenpha senanzeige Schranktrocken Trocken phasenanzeige Sehr trocken Trockenpha senanzeige Extratrocken Trockenpha senanzeige Kühlphase Trockenphasen anzeige Knitterschutz Trockenpha sen...

Page 8: ...ives Trocknen von dicken Textilien wie z B Frotteehandtüchern Handtüchern Baum wolltextilien Alle außer Zeitwahl Schranktro cken 7 kg Intensives Trocknen von gleichmäßig dicken Textilien wie z B Frotteehandtüchern Strick waren Handtüchern Alle außer Zeitwahl Bügeltrocken 7 kg Für normal dicke Koch Buntwäsche aus Baum wolle oder Leinen z B Bett Tischwäsche Alle außer Zeitwahl Mischgewebe Extratrock...

Page 9: ...h dem Trocknen und hän gen Sie sie auf Kleiderbügel Alle außer Zeitwahl Leichtbügeln plus 1 kg oder 5 Hem den Sonderprogramm mit Knitterschutz für pflege leichte Textilien wie Hemden und Blusen das das Bügeln erheblich erleichtert Das Ergebnis hängt von der Art und der Qualität der Textilien ab Legen Sie die Textilien sofort nach dem Schleudern in den Trockner und entnehmen Sie die Textilien sofor...

Page 10: ...e Standard Knitterschutzphase am Ende des Trockengangs auf 90 Min Wenn die Funktion eingeschaltet ist erscheint das Symbol Die Wäsche bleibt mit dieser Option locker und knitterfrei Die Wäsche kann während des Knitterschutzprogramms jederzeit entnommen werden Signal Akustische Bestätigung für Programmende Beginn und Ende der Knitterschutzphase Unterbrechung der Phase Fehler Wenn die Funktion einge...

Page 11: ...art kann ein Pro gramm nicht mehr direkt geändert werden Wenn Sie den Programm Wahlschalter während des Programmablaufs trotzdem auf ein anderes Programm drehen beginnen die Programmab lauf Anzeige und die Wartungsanzeige zu blinken Wird eine Zusatzfunktion gewählt es sei denn der Signal ist gewählt erscheint Err auf dem Multidis play Dies wirkt sich jedoch nicht auf das Trocken programm aus Wäsch...

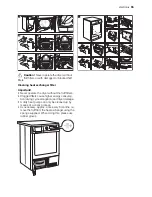
Page 12: ...ien Betrieb des Trockners zu gewährleisten 3 3c 3a 4 2b 3b 1 2 3d 2a Vorsicht Benutzen Sie den Trockner nie ohne oder mit beschädigtem oder verstopftem Flusenfilter Reinigen des Wärmetauscherfilters Wichtig Benutzen Sie den Trockner nie ohne Flusenfilter Verstopfte Filter erhöhen den Energieverbrauch da sie den Trockengang verlängern und führen zu Schäden am Trockner Eine verschmutzte Wärmepumpe k...

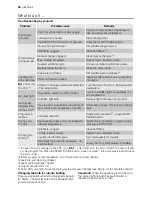
Page 13: ...en beleuchtung Programm Wahlschalter in Position AUS Drehen Sie ihn auf BELEUCHTUNG falls vorhanden oder auf ein anderes Pro gramm Lampe durchgebrannt Lampe ersetzen siehe nächsten Ab schnitt Ungewöhnli cher Zeitab lauf im LCD Display 5 Die voraussichtliche Programmdauer wird errechnet unter Berücksichtigung von Typ Menge und Feuchtigkeitsgehalt der Wäsche Automatischer Vorgang kein Gerätefeh ler ...

Page 14: ...orrekten Sitz bevor Sie die Abdeckung anschrauben Be nutzen Sie den Trockner nicht wenn die O Ring dichtung an der Abdeckung der Trommelbeleuch tung fehlt Warnung Aus Sicherheitsgründen muss die Abdeckung fest angeschraubt sein Anderenfalls darf der Trockner nicht in Betrieb genommen werden Technische Daten Höhe x Breite x Tiefe 85 x 60 x 58 cm Trommelvolumen 108 l Tiefe bei geöffneter Einfülltür ...

Page 15: ... die Taste Start Pause mehrmals hintereinander bis die ge wünschte Stufe angezeigt wird 4 Um die Einstellung abzuspeichern drücken Sie gleichzeitig die Tasten Trockengrad und Zeitwahl oder drehen Sie den Knopf in die Position Aus Kondensatbehälter leeren Warnung ausschalten 2 1 Drehen Sie den Programm Wahlschalter auf ein beliebiges Programm 2 Halten Sie gleichzeitig die Tasten U Min und Zeitwahl ...

Page 16: ... de la mousse de caout chouc mousse de latex les bonnets de bain tissus imperméables articles renforcés de caoutchouc ou vêtements et taies d oreiller rem bourrés de caoutchouc mousse ne doivent pas être séchés dans un sèche linge Débranchez toujours l appareil après utilisation nettoyage et entretien N essayez en aucun cas de réparer l appareil vous même Les réparations effectuées par du personne...

Page 17: ...soit évaporé avant d introduire les articles dans l appareil Ne tirez jamais sur le câble d alimentation pour le débrancher mais toujours au niveau de la pri se N utilisez jamais le sèche linge si le cordon d ali mentation le bandeau de commande le plan de travail ou la base sont endommagés et ouverts sur l intérieur de l appareil Les assouplissants ou autres produits similaires doivent être utili...

Page 18: ...ort de l appareil Important Inclinez l appareil vers la gauche voir illustration s il n est pas possible de le transporter verticalement Avertissement Si l appareil n a pas été transporté en position verticale laissez le pendant 12 heures en position verticale avant de le brancher de manière à ce que l huile retourne vers le compresseur Si vous ne suivez pas cette consigne le compresseur pourrait ...

Page 19: ...r le cran enlevez le et remettez le en place sur le côté opposé en le faisant tourner de 180 5 Dévissez la charnière A de la porte faites la tourner de 180 replacez la sur le côté oppo sé et revissez la soigneusement 6 Tournez les caches B de 180 et replacez les respectivement sur le côté opposé 7 E E D D F F Dévissez les caches D de la façade avant de l appareil tournez les de 180 et revissez les...

Page 20: ...in vendeur Pour placer le sèche linge à une hauteur opti male et disposer de plus d espace de range ment ex pour le linge Lisez attentivement la notice fournie avec le kit Description de l appareil 1 4 5 11 8 10 2 3 7 9 12 6 1 Bandeau de commandes 2 Bac d eau de condensation 3 Eclairage du tambour 4 Filtre fin à peluches 5 Filtre grossier à peluches 6 Filtre à peluches 7 Plaque signalétique 8 Port...

Page 21: ... par défaut vitesse d essorage minimum vitesse d essorage par palier de 200 tr min vitesse d essorage maximum prêt à repasser voyant du cy cle de séchage légèrement humide voyant du cycle de séchage prêt à ranger voyant du cycle de séchage très sec voyant du cycle de séchage extra sec voyant du cycle de séchage refroidissement voyant du cycle de séchage anti froissage voyant du cy cle de séchage v...

Page 22: ... ex linge en tissu éponge peignoirs de bain toutes à l ex ception de Temps Sec 7 kg Séchage complet des textiles épais ex linge en tissu éponge serviettes éponge coton toutes à l ex ception de Temps Prêt à Ranger 7 kg Séchage complet des textiles d une épaisseur homogène ex linge en tissu éponge serviettes éponge tricots toutes à l ex ception de Temps Prêt à Repas ser 7 kg Pour le linge en coton o...

Page 23: ...i froissage pour le linge facile d entretien comme les chemises et les chemisiers pour limiter le repassage Le résultat dépend du type de textile et de sa qualité Placez le linge dans le sèche linge immédiatement après l essorage dès qu il est sec sortez le et accrochez le sur un cintre toutes à l ex ception de Temps Facile À Re passer 1 kg ou 5 chemi ses Programme spécial doté d un mécanisme anti...

Page 24: ... le lave linge Plus la vitesse d essorage était élevée plus le cycle de séchage est court Vitesses d es sorage disponibles tr min de à par palier de 200 tr min Cette option permet d économiser du temps et de l énergie Antifroissage Prolonge la phase anti froissage standard jusqu à 90 min à la fin du cycle de séchage Lorsque cette fonction est activée le symbole est allumé Cette option évite le fro...

Page 25: ...er le nouveau programme Après le départ du programme il n est plus possible de modifier le programme directe ment Si vous tournez le sélecteur de programmes sur un autre programme lorsque l appareil est en cours de fonctionnement les voyants d affichage de déroulement de programme et les indicateurs d alarme clignotent Si vous sélectionnez une op tion à l exception de l option alarme Err s affi ch...

Page 26: ...et fin après chaque cycle de séchage 3 3c 3a 4 2b 3b 1 2 3d 2a Attention N utilisez jamais votre sèche linge sans avoir installé les filtres ou avec des filtres endommagés ou obstrués Nettoyage du filtre du condenseur thermique Important N utilisez jamais votre sèche linge sans les filtres à peluches Des filtres encrassés augmentent la consom mation d énergie en prolongeant le cycle de sé chage et...

Page 27: ...condenseur 3 Charge max dépassée Respectez le volume de charge max Fentes d aération recouvertes Dégagez les fentes d aération à la base de l appareil Résidus à l intérieur du tambour Nettoyez l intérieur du tambour Dureté élevée de l eau Sélectionnez la dureté de l eau appro priée 4 La porte ne ferme pas Les filtres ne sont pas en place Installez le filtre fin et ou fixez le filtre gros sier Err ...

Page 28: ...us au chapitre Réglages de l appareil 5 Uniquement pour les sèche linge avec écran 6 Remarque Après environ 5 heures le cycle de séchage s arrête automatiquement reportez vous au chapitre Cycle de séchage complet Remplacement de l ampoule d éclairage intérieur Utilisez exclusivement une ampoule spéciale pour sèche linge Vous pouvez vous procurer cette am poule auprès de votre service après vente I...

Page 29: ...ré à 1 400 tr min 1 42 7 kg de linge préalablement essoré à 1 800 tr min COTON PRÊT À REPASSER3 1 4 106 7 kg de linge préalablement essoré à 1 000 tr min SYNTHÉTIQUES PRÊT À RANGER3 0 59 48 3 kg de linge préalablement essoré à 1 200 tr min 1 Les charges indiquées peuvent varier d un pays à l autre en fonction des méthodes de mesure utilisées 2 Conformément à la norme EN 61121 3 Note pour les organ...

Page 30: ...les touches T Min et Temps et maintenez les appuyées pendant environ 5 secondes Le réglage actuel s affiche symbole avertissement et message d alarme désactivés symbole avertissement et message d alarme activés 1 Selon les zones géographiques l eau contient en quantité variable des sels calcaires et minéraux qui changent la valeur de la conductivité Des variations importantes de la conductivité pa...

Page 31: ... l uso per la manutenzione o la pulizia staccare sempre la spina dell alimentazione Non cercare in nessun caso di modificare o ri parare l apparecchiatura da soli Le modifiche o riparazioni eseguite da persone non esperte possono causare seri danni o malfunzionamenti Contattare il Centro di assistenza locale Richie dere sempre l installazione di ricambi originali I capi con macchie di olio da cuci...

Page 32: ...duttore Attenzione superficie molto calda non toccare il coprilampada dello sportello se la luce è accesa Solo per le asciugatrici dotate di luce interna Sicurezza bambini Questa apparecchiatura non deve essere utiliz zata da bambini o persone inferme senza su pervisione I bambini non sono in grado di riconoscere i ri schi associati alle apparecchiature elettriche È consigliabile controllare che i...

Page 33: ...ce vicino alla lavabiancheria L asciugatrice deve essere installata in luogo pulito L aria deve circolare liberamente attorno all ap parecchiatura Non ostruire la griglia di ventila zione frontale o le griglie di entrata dell aria sul retro dell apparecchiatura Per assicurare un funzionamento più silenzioso e con meno vibrazioni collocare l asciugatrice su una superficie solida e piana Quando l ap...

Page 34: ...ina e riavvitarle sul lato op posto con una rotazione di 180 8 Svitare il blocco della porta E premere leg germente e rimuoverlo dalla parte anteriore della macchina 9 Premere il pulsante a scatto F verso il basso spingere leggermente il coperchio e rimuover lo dal davanti della macchina 10 Sostituire il blocco della porta E sul lato oppo sto riavvitarlo nella porta 11 Sull altro lato inserire il ...

Page 35: ... Porta reversibile 9 Sportello scambiatore di calore filtro scam biatore di calore 10 Pulsante di apertura dello sportellino nello zoc colo 11 Griglia di ventilazione 12 Piedini regolabili Pannello comandi Pannello dei comandi 6 5 4 3 2 1 1 Selettore programmi con on off 2 Tasti funzione 3 Tasto Avvio Pausa Start Pause 4 Tasto Ritardata Partenza Zeitvorwahl 5 LED 6 Display electrolux 35 ...

Page 36: ... il condensatore avver tenza pulire i filtri avvertenza sicurezza bambini extra antipiega segnale acustico asciug a tempo ritardata partenza durata ciclo asciugatura a tempo 10 min 3h ritardata partenza Preparazione al primo utilizzo Avvertenza Se l apparecchio non è stato trasportato in posizione eretta lasciarlo in posizione verticale per 12 ore prima di connetterlo alla presa elettrica e utiliz...

Page 37: ...ia da let to tovaglie Tutti tranne Asciug a tem po Zeitwahl Normale Schranktroc ken 3 kg Per tessuti sottili da non stirare ad es camicie di tessuti misti tovaglie indumenti dei bambini calzini articoli di corsetteria Tutti tranne Asciug a tem po Zeitwahl Pronto stiro Bügeltroc ken 3 kg Per tessuti sottili da ripassare col ferro per esempio maglieria o camicie Tutti tranne Asciug a tem po Zeitwahl...

Page 38: ...iug a tem po Zeitwahl Stiro facile Leichtbügeln Plus 1 kg o 5 cami cie Programma speciale con trattamento antipiega per tessuti misti come camicie e camicette ri duce al minimo la fatica dello stiro Il risultato di pende dal tipo di tessuto e dalla finitura Inserire i capi nell asciugatrice subito dopo la centrifuga una volta asciugati toglierli immediatamente e appenderli su un appendiabiti Tutti...

Page 39: ...rgia Extra antipiega Knitterschutz Plus La fase antipiega standard alla fine del ciclo di asciugatura viene prolungata fino a 90 minuti Quando la funzione è attiva il simbolo è acce so Questa opzione consente inoltre di mantenere senza pieghe la biancheria Durante la fase anti piega la biancheria può essere estratta in qualun que momento Segnale acustico Signal Segnale acustico che indica fine cic...

Page 40: ...selettore dei programmi su Off Aus quindi reimpostare il programma Una volta avviato il programma non può più essere modificato Se si tenta di modificare il programma girando la manopola il display e i led lampeggiano Se viene premuto un tasto opzione ad esclusione del Segnale acustico nel display viene visualizzato il messaggio Err Il programma di asciugatura non viene comunque modificato protezi...

Page 41: ...zione Non mettere in funzione l asciugatrice senza i filtri o con filtri danneggiati o intasati Pulizia del filtro dello scambiatore di calore Importante Non mettere in funzione l asciugatrice senza i filtri I filtri intasati comportano un maggiore consumo di energia prolungamento del ciclo di asciuga tura e causano danni all asciugatrice Se la pompa di calore non viene pulita deve es sere sottopo...

Page 42: ... LUCE se disponibile o su un programma qualsiasi La lampadina è guasta Sostituire la lampadina vedere la sezione successiva Trascorrere del tempo anomalo sul display LCD 5 Il tempo prima del termine è calcolato sul la base di tipo volume e umidità della biancheria Si tratta di un processo automatico che non segnala un errore dell apparecchia tura Programma inattivo Serbatoio dell acqua pieno Vuota...

Page 43: ...rilampada Controllare che la guarnizione sia correttamente montata prima di riavvitare il coprilampada Non mettere in funzione l asciugatrice se non è stata montata correttamente la guarnizione del copri lampada Avvertenza Per ragioni di sicurezza il coprilampada deve essere riavvitato perfettamente Se ciò non avviene l asciugatrice non deve essere messa in funzione Caratteristiche tecniche Altezz...

Page 44: ...onduttività 300 μS cm media conduttività 300 600 μS cm alta conduttività 600 μS cm 3 Premere il tasto Avvio Pausa Start Pause in sequenza fino a impostare il livello desiderato 4 Per memorizzare l impostazione premere contemporaneamente i tasti Grado asciugatura Trockengrad e Asciug a tempo Zeitwahl oppure ruotare la manopola sulla posizione Off Aus Svuotamento della tanica dell acqua di condensa ...

Page 45: ...v ice Centre Always insist on genuine spare parts Items that have been soiled with substances such as cooking oil acetone petrol kerosene spot removers turpentine waxes and wax re movers should be washed in hot water with an extra amount of detergent before being dried in the tumble dryer Danger of explosion Never tumble dry items that have been in contact with inflammable sol vents petrol methyla...

Page 46: ...e Warning Danger of suffocation The packaging components e g plastic film polystyrene can be dangerous to children Keep them out of children s reach Keep all detergents in a safe place out of chil dren s reach Make sure that children or pets do not climb in side the drum Environment The symbol on the product or on its packaging indicates that this product may not be treated as household waste Inst...

Page 47: ...ets strips of wood or similar This might cause heat built up which would interfere with the operation of the appliance Important The hot air emitted by the tumble dryer can reach temperatures of up to 60 C The appli ance must therefore not be installed on floors which are not resistant to high temperatures When operating the tumble dryer the room tem perature must not be lower than 5 C and high er...

Page 48: ...side insert cover F and allow snap in button to lock into place 12 Insert loading door and hinges into recesses on the front of the machine and screw down Note regarding contact protection The ma chine is only secure for operations again once all plastic parts have been inserted Special accessories stack kit Available from your Service Force Centre or your specialist dealer These intermediate inst...

Page 49: ...ating plate 8 Loading door reversible 9 Heat exchanger door fluff filter heat exchang er 10 Button for opening door in plinth 11 Ventilation grille 12 Adjustable feet Control panel Control panel 6 5 4 3 2 1 1 Programme selector and on off switch 2 Function buttons 3 Start Pause button 4 Delay Start Zeitvorwahl button 5 Status LED 6 Display electrolux 49 ...

Page 50: ... warning child lock long anti crease buzzer time delay start cycle duration time program scope 10 min 3h delay start scope Before first use Warning If the appliance was not transported in an upright position leave it to stand for 12 hours before connecting it to the electricity supply and using it for the first time so that the oil can flow back to the compressor Otherwise the compressor could be ...

Page 51: ... wahl Cupboard Dry Schrank trocken 3 kg For thin fabrics which are not ironed e g easy care shirts table linen baby clothes socks lin gerie with bones or wires all except Time Zeit wahl Iron Dry Bü geltrocken 3 kg For thin fabrics which are also to be ironed e g knitwear shirts all except Time Zeit wahl special Time Pro gramme Zeit programm 7 kg For drying of individual items of laundry all except...

Page 52: ... shirts Special program with anti crease mechanism for easy care fabrics such shirts and blouses for minimum ironing effort The results depend on the type of fabric and its finish Place fabrics in the dryer straight after spinning once dried im mediately remove fabrics and place on a clothes hanger all except Time Zeit wahl Silk Seide 1 kg For drying silk using warm air and gentle move ment all ex...

Page 53: ...rogramme Zeitprog ramm Allows to set individual time of drying from minimum 10 min to maximum of 3 hours in 10 min steps 1 Turn the programme knob to the Time Pro gramme Zeitprogramm 2 Press the Time Zeitwahl button repeatedly un til the desired programme duration is shown in the display e g for a programme of 1 hour and 20 minutes Delay Start Zeitvorwahl Allows to delay the start of a drying pro ...

Page 54: ...r about one minute The drying cycles except for the Wool Wolle programme are automatically followed by an anti crease phase which lasts around 30 minutes The drum rotates at intervals during this phase This keeps the laundry loose and free of creases The laundry can be removed at any time during the anti crease phase The laundry should be taken out towards the end of the anti crease phase at the l...

Page 55: ...e dryer without the fluff filters Clogged filters cause higher energy consump tion drying cycle elongation and dryer damage A dirty heat pump can only be cleaned up by means of a costly process As necessary approx once every 6 months re move the fluff from the heat exchanger using the sponge supplied When doing this please use rubber gloves 1 2 3 4 5 7 8 6 10 11 9 electrolux 55 ...

Page 56: ...d on the basis of type volume and dampness of laundry Automatic process this is not a machine fault Programme inactive Full water reservoir Empty water reservoir3 press START PAUSE button Drying cycle to short Small laundry volume Too dry laundry for selected programme Select time programme or higher drying level e g EXTRA DRY Drying cycle to long 6 Fluff filters clogged Clean fluff filters To hig...

Page 57: ... Loading volume depends on programme 1 max 7 kg Voltage 220 230 V Required fuse 6 A Total power 1050 W Energy efficiency class A Energy consumption 7 kg of cotton pre drained at 1000 rpm 2 1 9 kWh Average annual energy consumption 126 2 kWh Use Domestic Permissible ambient temperature 5 C to 35 C Consumption values The consumption values have been established under standard conditions They may dev...

Page 58: ...buttons or turn knob to Off Aus position Emptying water res ervoir warning off 2 1 Turn the programme selector to any programme 2 Press simultaneously the Spin Speed U Min and Time Zeitwahl buttons and hold down for approx 5 seconds The current setting is on the display warning icon and warning message is off warning icon and warning message is switched on 1 Water contains a variable quantity of l...

Page 59: ...electrolux 59 ...

Page 60: ...ezubehör und Ersatzeile besuchen Sie unseren Web Shop www electrolux ch Pour les accessoires et le pièces détachées visité notre Web Shop www electrolux ch Per gli accessori e i pezzi di ricambio vogliate visitare il nostro Web Shop www electrolux ch ...

Reviews: