background image

appliance when the door or the

window is opened.

• Each appliance has cooling fans on

the bottom.

• If the appliance is installed above a

drawer:

– Do not store any small pieces or

sheets of paper that could be

pulled in, as they can damage the

cooling fans or impair the cooling

system.

– Keep a distance of minimum 2 cm

between the bottom of the

appliance and parts stored in the

drawer.

2.2 Electrical Connection

WARNING!

Risk of fire and electric

shock.

• All electrical connections should be

made by a qualified electrician.

• The appliance must be earthed.

• Before carrying out any operation

make sure that the appliance is

disconnected from the power supply.

• Make sure that the parameters on the

rating plate are compatible with the

electrical ratings of the mains power

supply.

• Make sure the appliance is installed

correctly. Loose and incorrect

electricity mains cable or plug (if

applicable) can make the terminal

become too hot.

• Use the correct electricity mains

cable.

• Do not let the electricity mains cable

tangle.

• Make sure that a shock protection is

installed.

• Use the strain relief clamp on the

cable.

• Make sure the mains cable or plug (if

applicable) does not touch the hot

appliance or hot cookware, when you

connect the appliance to the near

sockets.

• Do not use multi-plug adapters and

extension cables.

• Make sure not to cause damage to

the mains plug (if applicable) or to the

mains cable. Contact our Authorised

Service Centre or an electrician to

change a damaged mains cable.

• The shock protection of live and

insulated parts must be fastened in

such a way that it cannot be removed

without tools.

• Connect the mains plug to the mains

socket only at the end of the

installation. Make sure that there is

access to the mains plug after the

installation.

• If the mains socket is loose, do not

connect the mains plug.

• Do not pull the mains cable to

disconnect the appliance. Always pull

the mains plug.

• Use only correct isolation devices: line

protecting cut-outs, fuses (screw type

fuses removed from the holder), earth

leakage trips and contactors.

• The electrical installation must have

an isolation device which lets you

disconnect the appliance from the

mains at all poles. The isolation

device must have a contact opening

width of minimum 3 mm.

2.3 Use

WARNING!

Risk of injury, burns and

electric shock.

• Remove all the packaging, labelling

and protective film (if applicable)

before first use.

• Use this appliance in a household

environment.

• Do not change the specification of this

appliance.

• Make sure that the ventilation

openings are not blocked.

• Do not let the appliance stay

unattended during operation.

• Set the cooking zone to “off” after

each use.

• Do not rely on the pan detector.

• Do not put cutlery or saucepan lids on

the cooking zones. They can become

hot.

• Do not operate the appliance with wet

hands or when it has contact with

water.

• Do not use the appliance as a work

surface or as a storage surface.

ENGLISH

5

Summary of Contents for LIT60433

Page 1: ...LIT60433 EN Hob User Manual ...

Page 2: ...rvice information www electrolux com webselfservice Register your product for better service www registerelectrolux com Buy Accessories Consumables and Original spare parts for your appliance www electrolux com shop CUSTOMER CARE AND SERVICE Always use original spare parts When contacting our Authorised Service Centre ensure that you have the following data available Model PNC Serial Number The in...

Page 3: ...Do not let children play with the appliance Keep all packaging away from children and dispose of it appropriately Keep children and pets away from the appliance when it operates or when it cools down Accessible parts are hot If the appliance has a child safety device it should be activated Children shall not carry out cleaning and user maintenance of the appliance without supervision 1 2 General S...

Page 4: ...imilarly qualified persons in order to avoid a hazard WARNING Use only hob guards designed by the manufacturer of the cooking appliance or indicated by the manufacturer of the appliance in the instructions for use as suitable or hob guards incorporated in the appliance The use of inappropriate guards can cause accidents 2 SAFETY INSTRUCTIONS 2 1 Installation WARNING Only a qualified person must in...

Page 5: ...if applicable or to the mains cable Contact our Authorised Service Centre or an electrician to change a damaged mains cable The shock protection of live and insulated parts must be fastened in such a way that it cannot be removed without tools Connect the mains plug to the mains socket only at the end of the installation Make sure that there is access to the mains plug after the installation If th...

Page 6: ...activate the cooking zones with empty cookware or without cookware Do not put aluminium foil on the appliance Cookware made of cast iron aluminium or with a damaged bottom can cause scratches on the glass glass ceramic Always lift these objects up when you have to move them on the cooking surface This appliance is for cooking purposes only It must not be used for other purposes for example room he...

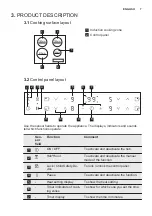
Page 7: ...tell which functions operate Sen sor field Function Comment 1 ON OFF To activate and deactivate the hob 2 Hob Hood To activate and deactivate the manual mode of the function 3 Lock Child Safety De vice To lock unlock the control panel 4 Pause To activate and deactivate the function 5 Heat setting display To show the heat setting 6 Timer indicators of cook ing zones To show for which zone you set t...

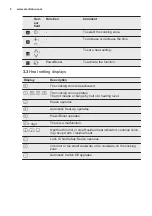
Page 8: ...is deactivated The cooking zone operates The dot means a change by half of a heating level Pause operates Automatic Heat Up operates PowerBoost operates digit There is a malfunction OptiHeat Control 3 step Residual heat indicator continue cook ing keep warm residual heat Lock Child Safety Device operates Incorrect or too small cookware or no cookware on the cooking zone Automatic Switch Off operat...

Page 9: ...e object or clean the control panel the hob gets too hot e g when a saucepan boils dry Let the cooking zone cool down before you use the hob again you use incorrect cookware The symbol comes on and the cooking zone deactivates automatically after 2 minutes you do not deactivate a cooking zone or change the heat setting After some time comes on and the hob deactivates The relation between the heat ...

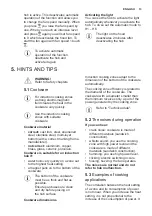
Page 10: ...back to 00 The indicator of the cooking zone goes out When the time comes to an end the sound operates and 00 flashes The cooking zone deactivates To stop the sound touch Minute Minder You can use this function as a Minute Minder when the hob is activated and the cooking zones do not operate The heat setting display shows To activate the function touch Touch or of the timer to set the time When th...

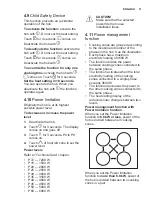
Page 11: ...al data chapter P 72 7200 W P 15 1500 W P 20 2000 W P 25 2500 W P 30 3000 W P 35 3500 W P 40 4000 W P 45 4500 W P 50 5000 W P 60 6000 W CAUTION Make sure that the selected power fits the house installation fuses 4 11 Power management function Cooking zones are grouped according to the location and number of the phases in the hob See the illustration Each phase has a maximum electricity loading of ...

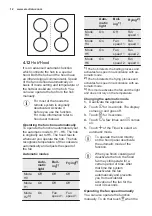
Page 12: ...il ing1 Frying2 Mode H3 On Off Fan speed 1 Mode H4 On Fan speed 1 Fan speed 1 Mode H5 On Fan speed 1 Fan speed 2 Mode H6 On Fan speed 2 Fan speed 3 1 The hob detects the boiling process and activates fan speed in accordance with au tomatic mode 2 The hob detects the frying process and activates fan speed in accordance with au tomatic mode 3 This mode activates the fan and the light and does not re...

Page 13: ...able for an induction hob if water boils very quickly on a zone set to the highest heat setting a magnet pulls on to the bottom of the cookware The bottom of the cookware must be as thick and flat as possible Ensure pan bases are clean and dry before placing on the hob surface Cookware dimensions Induction cooking zones adapt to the dimension of the bottom of the cookware automatically The cooking...

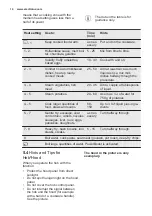
Page 14: ...max l of water for 750 g of potatoes 4 5 Cook larger quantities of food stews and soups 60 150 Up to 3 l of liquid plus ingre dients 5 7 Gentle fry escalope veal cordon bleu cutlets rissoles sausages liver roux eggs pancakes doughnuts as nec essary Turn halfway through 7 8 Heavy fry hash browns loin steaks steaks 5 15 Turn halfway through 9 Boil water cook pasta sear meat goulash pot roast deep fr...

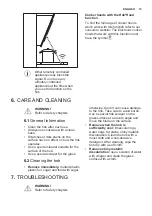
Page 15: ...ow the hob operates Use a special cleaner suitable for the surface of the hob Use a special scraper for the glass 6 2 Cleaning the hob Remove immediately melted plastic plastic foil sugar and food with sugar otherwise the dirt can cause damage to the hob Take care to avoid burns Use a special hob scraper on the glass surface at an acute angle and move the blade on the surface Remove when the hob i...

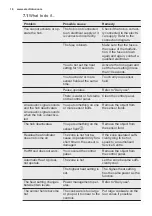
Page 16: ...ic signal sounds when the hob is deactiva ted You put something on one or more sensor fields Remove the object from the sensor fields The hob deactivates You put something on the sensor field Remove the object from the sensor field Residual heat indicator does not come on The zone is not hot be cause it operated only for a short time or the sensor is damaged If the zone operated suffi ciently long...

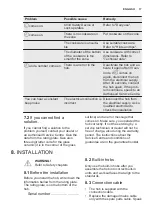
Page 17: ...lution If you cannot find a solution to the problem yourself contact your dealer or an Authorised Service Centre Give the data from the rating plate Give also three digit letter code for the glass ceramic it is in the corner of the glass surface and an error message that comes on Make sure you operated the hob correctly If not the servicing by a service technician or dealer will not be free of cha...

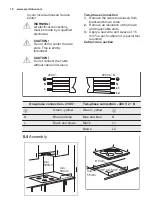
Page 18: ...ove the cable end sleeve from black and brown wires 2 Remove an insulation of the brown and black cable ends 3 Apply a new wire end sleeve of 1 5 mm on each cable end special tool required Cable cross section N L1 N L 230V 400V 2 N L2 One phase connection 230 V Two phase connection 400 V 2 N Green yellow Green yellow N Blue and blue Blue and blue N L Black and brown Black L1 Brown L2 8 4 Assembly ...

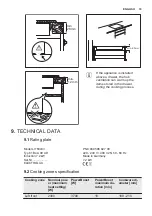
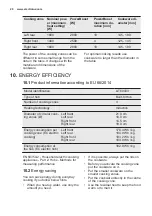
Page 19: ... 9 TECHNICAL DATA 9 1 Rating plate Model LIT60433 PNC 949 596 827 00 Typ 61 B4A 00 AD 220 240 V 400 V 2N 50 60 Hz Induction 7 2 kW Made in Germany Ser Nr 7 2 kW ELECTROLUX 9 2 Cooking zones specification Cooking zone Nominal pow er maximum heat setting W PowerBoost W PowerBoost maximum du ration min Cookware di ameter mm Left front 2300 3700 10 180 210 ENGLISH 19 ...

Page 20: ...cular cook ing zones Ø Left front Left rear Right front Right rear 21 0 cm 18 0 cm 14 5 cm 18 0 cm Energy consumption per cooking zone EC electric cooking Left front Left rear Right front Right rear 178 4 Wh kg 184 9 Wh kg 183 2 Wh kg 184 9 Wh kg Energy consumption of the hob EC electric hob 182 9 Wh kg EN 60350 2 Household electric cooking appliances Part 2 Hobs Methods for measuring performance ...

Page 21: ...iners to recycle it Help protect the environment and human health by recycling waste of electrical and electronic appliances Do not dispose of appliances marked with the symbol with the household waste Return the product to your local recycling facility or contact your municipal office ENGLISH 21 ...

Page 22: ...www electrolux com 22 ...

Page 23: ...ENGLISH 23 ...

Page 24: ...www electrolux com shop 867346813 A 052018 ...

Reviews: