background image

Something not working

Certain problems are due to lack of simple maintenance or oversights, which can
be solved easily without calling out an engineer. Before contacting your local
Service Centre, please carry out the checks listed below.

During machine operation it is possible that the 

red

«Start/Pause» pilot light flashes,

the buzzer sounds and one of the following alarm codes appears on the display to
indicate that the machine is not working:

E10

: problem with the water supply

E20

: problem with water draining

E40

: door open.

Once the problem has been eliminated, press the «Start/Pause»  button to restart
the programme. If after all checks, the problem persists, contact your local
Service Centre.

Malfunction

Possible cause

Solution

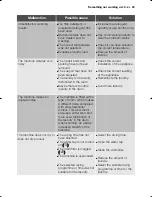
The washer-dryer does not
start:

The door has not been
closed. 

E40

The plug is not properly
inserted in the power
socket.

There is no power at the
socket.

The main fuse or the fuse in
the plug has blown.

The selector dial is not
correctly positioned and the
«Start/Pause» button has
not been pressed.

The «Delay» has been
selected. 

Close the door firmly.

Insert the plug into the
power socket.

Please check your domestic
electrical installation.

Replace the fuse.

Please turn the selector dial
and press the «Start/Pause»
button again.

If the laundry is to be
washed immediately, cancel
the delay start. 

The machine fills then
empties immediately:

The end of the drain hose is
too low. 

Refer to relevant paragraph
in “water drainage” section.

The machine does not fill:

The water tap is closed.

E10

The inlet hose is squashed or
kinked. 

E10

The filter in the inlet hose is
blocked. 

E10

The door is not properly
closed. 

E40

Open the water tap.

Check the inlet hose
connection.

Clean the water inlet hose
filter.

Close the door firmly.

Something not working

electrolux  

31

132972140 EN.qxd  26/10/2007  11.40  Pagina  31

Summary of Contents for EWX 14540 W

Page 1: ...User Manual EWX 14540 W Washer dryer ...

Page 2: ......

Page 3: ...future The Electrolux ambition is to offer a wide variety of quality products that make your life more comfortable You find some examples on the cover in this manual Please take a few minutes to study this manual so that you can take advantage of the benefits of your new machine We promise that it will provide a superior User Experience delivering Ease of Mind Good luck ...

Page 4: ...6 Programme information 27 Care and cleaning 28 Something not working 31 Technical data 35 Consumption values 36 The following symbols are used in this manual Important information concerning your personal safety and information on how to avoid damaging the appliance General information and tips Environmental information Installation 37 Built in 43 Environment concerns 46 Guarantee conditions 47 C...

Page 5: ...r to the manufacturer s recommendations of quantities Wash small items such as socks laces washable belts etc in a washing bag or pillow case as it is possible for such items to slip down between the tub and the inner drum Do not use your washer dryer to wash and dry articles with whalebones material without hems or torn material Always unplug the appliance and turn off the water supply after use ...

Page 6: ... users should always check that they have not left their gas lighters disposable or otherwise in their clothing Never tumble dry items that have had contact with chemicals such as dry cleaning fluid These are of a volatile nature and could cause an explosion Only tumble dry items which have been washed in water or require air ing Plastic detergent dispensers should not remain in the drum during th...

Page 7: ... children s reach Make sure that children or pets do not climb into the drum To avoid this the machine incorporates a special feature To activate this device rotate the button without pressing it inside the door clockwise until the groove is horizontal If necessary use a coin To disable this device and restore the possibility of closing the door rotate the button anti clockwise until the groove is...

Page 8: ... EWX14540W 1400 900 700 Spin Normal Prewash Synthetics Delicates EasyIron Spin Drain Rinse Silk Hand Wash Wool Eco Synthetics Cottons Drying Cottons 1 2 3 4 5 EN008 Detergent dispenser drawer Your new appliance meets all modern requirements for effective treatment of laundry with low water energy and detergent consumption The Jet system allows total use of detergent and reduces water consumption t...

Page 9: ...elay button Display Start Pause button Door locked light Time manager buttons 10 9 8 7 6 5 4 3 2 1 1 3 4 5 8 7 2 6 10 9 Time Manager 95º 60º 50º 40º 30º Temp Extra Rinse Drying Time Delay Start Pause EWX14540W 1400 900 700 Spin Normal Prewash Synthetics Delicates EasyIron Spin Drain Rinse Silk Hand Wash Wool Eco Synthetics Cottons Drying Cottons ...

Page 10: ...ng Start Pause it will be impossible to start the machine after pressing Start Pause it will be impossible to change any other programme or option To enable disable this option press Drying Time and Delay buttons simultaneously for about 6 seconds until the icon appears disappears on from the display Acoustic signals The machine is provided with an acoustic device which sounds in the following cas...

Page 11: ... selector dial is divided into following sections C0065 C0064 Cottons Normal and Prewash Synthetics Delicates and Easy Iron Spin Drain and Rinses Silk Handwash Wool and Eco Drying Cottons and Synthetics The selector dial can be turned either clockwise or anticlockwise Turn to position O to Reset programme Switch OFF the machine At the end of the programme the selector dial must be turned to positi...

Page 12: ...e proposed by the washer dryer Maximum speeds are for all Cottons programmes 1400 rpm for Synthetics Easy Iron Wool and Handwash 900 rpm for delicate fabrics and Silk 700 rpm Night Cycle by selecting this option the machine will not drain the water of the last rinse so as not to crease the laundry As all spinning phases are suppressed this washing cycle is very quiet and it can be selected at nigh...

Page 13: ...e you press the button the time increases by 5 mins Note The programme time will automatically increase by up to 2 minutes This is quite normal Select the Delay button Before you start the programme if you wish to delay the start press the Delay button repeatedly to select the desired delay The corresponding light will illuminate The selected delay time value up to 20 hours will appear on the disp...

Page 14: ...s started the remaining time is updated every minute 2 05 Selected drying time After selecting a drying programme the drying time is shown in minutes or hours and minutes max 130 mins After the programme has started the time remaining is updated every minute Washing programme phase icons By selecting the wash programme the washing or drying programme phase icons corresponding to the various phases...

Page 15: ... button the green pilot light stops flashing The door locked pilot light illuminates to indicate that the appliance starts operating and the door is locked The door pilot light indicates if the door can be opened light on the door cannot be opened The appliance is running light off the door can be opened The washing programme is finished To interrupt a programme which is running press the Start Pa...

Page 16: ...Eco programme The availability of these soil level icons change according to the type of fabric as shown in the following chart Altering an option or a running programme It is possible to change any option before the programme carries it out Before you make any change you must pause the washer dryer by pressing the Start Pause button Soil Level Icon Type of fabric Intensive For heavy soiled items ...

Page 17: ...the water level is above the bottom edge of the door or that the drum is turning In this case the door can not be opened If you cannot open the door but you need to open it you have to switch the machine off by turning the selector dial to O After few minutes the door can be opened pay attention to the water level and temperature At the end of the programme The machine stops automatically The buzz...

Page 18: ...il the time you want appears on the display see the drying programmes 1 00 Drying Time 4 Press the Start Pause button to start the programme 5 At the end of the programme the buzzer sounds Three flashing zeros 0 00 will appear on the display At this point begins an anti crease phase which lasts for about 10 mi nutes During this time the Door locked light is still alight to indi cate that the door ...

Page 19: ...e selected wash programme fabric 4 Select the drying time see the drying programmes 5 Select the required options by pressing the relevant buttons If possible do not select a spin speed lower than that proposed by the appliance to avoid too long a drying time therefore saving energy In any case the reduction of the spin speed is only possible after selecting drying The lowest values that you can s...

Page 20: ...hen drying is completed use either a fabric softener when you are washing the laundry or a fabric conditioner specifically for tumble dryers Particularly delicate items such as syn thetic curtains woollen and silk gar ments with metal inserts nylon stock ings bulky garments such as anoraks bedcovers quilts sleeping bags and duvets must not be machine dried Garments padded with foam rubber or mater...

Page 21: ...in Lipstick moisten with acetone as above then treat stains with methylated spirits Remove any residual marks from white fabrics with bleach Red wine soak in water and detergent rinse and treat with acetic or citric acid then rinse Treat any residual marks with bleach Important As a dryer the machine works on the condensation principle Therefore the water tap must be open and the drain hose must d...

Page 22: ...priate compartments of the dispenser drawer before starting the wash programme If using concentrated powder or liquid detergents a programme without prewash must be selected The washer dryer incorporates a recirculation system which allows an optimal use of the concentrated detergent Pour liquid detergent into the dispenser drawer compartment marked just before starting the programme Any fabric so...

Page 23: ... wash at all Bleaching Bleach in cold water Do not bleach Ironing Hot iron max 200 C Warm iron max 150 C Lukewarm iron max 110 C Do not iron Dry cleaning Dry cleaning in all solvents Dry cleaning in perchlorethylene petrol pure alcohol R 111 R 113 Dry cleaning in petrol pure alcohol and R 113 Do not dry clean Drying Flat On the line On clothes hanger Tumble dry high temperature low temperature Do ...

Page 24: ...ed Spin Red Night Cycle Rinse Hold Extra Rinse Time Manager Main wash from 60 C to 30 3 rinses Short spin at 900 rpm Easy Iron 60 30 Synthetic or mixed fabrics to be ironed Spin Red Night Cycle Rinse Hold Extra Rinse Main wash from 60 C to 30 4 rinses Short spin at 900 rpm Delicates 40 30 Delicate fabrics for example curtains Night Cycle Rinse Hold Extra Rinse Time Manager Main wash from 40 to 30 ...

Page 25: ...f programme Washing programmes Silk 30 Silk items to be gently washed and spun Spin Red Night Cycle Rinse Hold Main wash at 30 C 2 rinses Short spin at 700 rpm Handwash 40 30 Special programme for hand washing fabrics Spin Red Night Cycle Rinse Hold Main wash from 40 to 30 3 rinses Short spin at 900 rpm Wool 40 30 Specially tested programme for wool garments bearing the Pure new wool non shrink ma...

Page 26: ...oning Cotton and linen bathrobes bath towels etc Synthetics and mixed fabrics jumpers blous es underwear house hold linen 1400 rpm 2 5 kg 85 1400 rpm 1 kg 40 900 rpm 1 5 kg 85 900 rpm 1 kg 60 The Store dry drying programme for Cottons is the reference pro gramme for the Energy Label data in compliance with EC directive 92 75 Drying programmes Max Load Iron dry Suitable forironing Cotton and linen ...

Page 27: ...lling OFF To reset a programme and to switch off the machine turn the selector dial to O A new programme can now be selected programme information electrolux 27 Silk Delicate washing programme suitable for silk and mixed synthetics items Washing temperature is 30 C The maximum spin speed is automatically reduced to 700 rpm Washing programme for machine washable wool as well as for hand washable wo...

Page 28: ...de the drum We recommend that a maintenance wash be performed on a regular basis To run a maintenance wash The drum should be empty of laundry Select the hottest cotton wash programme Use a normal measure of detergent must be a powder with biological properties External cleaning Clean the exterior cabinet of the appliance with soap and water only and then dry thoroughly Cleaning the dispenser draw...

Page 29: ...on the floor The water should drain by gravity into the bowl When the bowl is full hook the hose back up and empty the bowl Repeat the procedure until water stops flowing out P0037 P0038 Unscrew and remove the filter Clean carefully under a fast running tap Warning When the appliance is in use and depending on the programme selected there can be hot water in the filter Never remove the filter duri...

Page 30: ...and that of the inlet hose in a bowl Run the draining programme Drain Disconnect the appliance Screw the inlet hose and reposition the drain hose When you intend to start the machine up again make sure that the room temperature is above 0 C P1090 Emergency emptying out If the water is not discharged proceed as follows to empty out the machine pull out the plug from the power socket close the water...

Page 31: ...losed E40 The plug is not properly inserted in the power socket There is no power at the socket The main fuse or the fuse in the plug has blown The selector dial is not correctly positioned and the Start Pause button has not been pressed The Delay has been selected Close the door firmly Insert the plug into the power socket Please check your domestic electrical installation Replace the fuse Please...

Page 32: ...he end of washing cycle Wait for the Door locked pilot light going out Select drain or spin programme to empty out the water No water is visible in the drum Machines based on modern technology operate very economically using very little water without affecting performance There is water on the floor Too much detergent or unsuitable detergent creates too much foam has been used Check whether there ...

Page 33: ...ain filter Reduce the amount of laundry Select the suitable drying programme or time for the laundry Unsatisfactory washing results Too little detergent or unsuitable detergent has been used Stubborn stains have not been treated prior to washing The correct temperature was not selected Excessive laundry load Increase the detergent quantity or use another one Use commercial products to treat the st...

Page 34: ...lectronic unbalance detection device has cut in because the laundry is not evenly distributed in the drum The laundry is redistributed by reverse rotation of the drum This may happen several times before the unbalance disappears and normal spinning can resume If after 10 minutes the laundry is still not evenly distributed in the drum the machine will not spin In this case redistribute the load man...

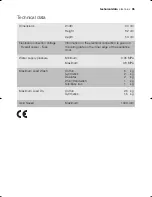
Page 35: ...aximum Cotton Synthetics Delicates Wool Handwash Silk Easy Iron Maximum Load Wash 5 kg 2 kg 2 kg 1 kg 1 kg Cotton Synthetics Maximum Load Dry 2 5 kg 1 5 kg Maximum Spin Speed 1400 rpm Electrical connection Voltage Overall power Fuse Information on the electrical connection is given on the rating plate on the inner edge of the appliance door ...

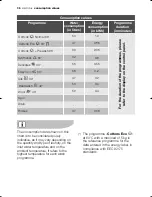
Page 36: ...ontrol panel Handwash 40 0 4 50 Silk 30 0 4 50 Wool 40 0 2 47 Easy Iron 60 0 2 68 0 08 37 Spin Drain Rinses The consumption data shown on this chart is to be considered purely indicative as it may vary depending on the quantity and type of laundry on the inlet water temperature and on the ambient temperature It refers to the highest temperature for each wash programme The programme Cottons Eco at ...

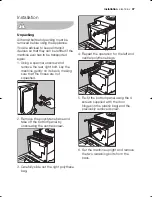
Page 37: ...ack making sure that the hoses are not squashed 2 Remove the polystyrene base and take off the bottom panel by unscrewing the central screw 3 Carefully slide out the right polythene bag P0457 P0255 4 Repeat the operation for the left and central polythene bags 5 Re fit the bottom panel using the 4 screws supplied with the door hinges in the plastic bag and the previously removed screw 6 Set the ma...

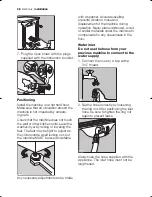
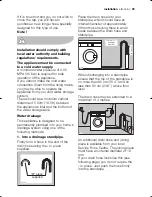
Page 38: ...ry adjustment can be made P1051 P0020 P0256 with a spanner Accurate levelling prevents vibration noise and displacement of the machine during operation Never place cardboard wood or similar materials under the machine to compensate for any unevenness in the floor Water inlet Do not use the hose from your previous machine to connect to the water supply 1 Connect the hose to a tap with a 3 4 thread ...

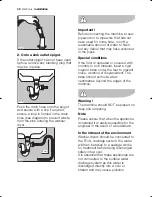
Page 39: ... s drainage system using one of the following methods 1 Into a drainage standpipe Firstly form a hook in the end of the drain hose using the U piece supplied U piece supplied P1199 Place the drain hose into your standpipe which should have an internal diameter of approximately 38mm thus ensuring there is an air break between the drain hose and standpipe When discharging into a standpipe ensure tha...

Page 40: ... with crumbly or soft material insert a rigid support base under the feet to prevent noise vibration or displacement The base should protrude a few centimetres beyond the edges of the machine Warning The machine should NOT be placed on deep pile carpeting Note Please ensure that when the appliance is installed it is easily accessible for the engineer in the event of a breakdown In the interest of ...

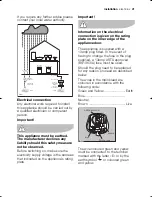
Page 41: ...RIVER FOUL DRAIN FOUL SEWERS SEWAGE TREATMENT WORKS RIVER P0987 TREATED DISCHARGE Important Information on the electrical connection is given on the rating plate on the inner edge of the appliance door The appliance is supplied with a 13amp plug fitted In the event of having to change the fuse in the plug supplied a 13amp ASTA approved BS1363 A fuse must be used Should the plug need to be replaced...

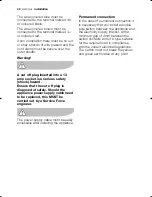
Page 42: ... of safely Should the appliance power supply cable need to be replaced this MUST be carried out by a Service Force engineer The power supply cable must be easily accessible after installing the appliance Permanent connection In the case of permanent connection it is necessary that you install a double pole switch between the appliance and the electricity supply mains with a minimum gap of 3mm betw...

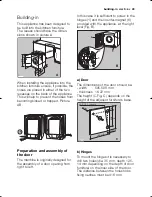
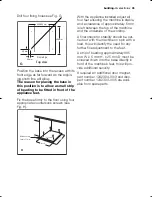
Page 43: ...be 416 mm 35 Ø 12 5 14 depth 16 22 B C 22 1 5 595 598 416 P0422S C 4 1 2 3 6 1 2 3 P0982 7 B 5 Building in This appliance has been designed to be built into the kitchen furniture The recess should have the dimen sions shown in picture A When installing the appliance into the kitchen furniture ensure if possible the hoses are placed in either of the two recesses on the back of the appliance This wi...

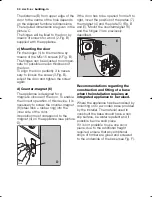
Page 44: ...net 6 steel disk rubber ring into the inner side of the door Its position must correspond to the magnet 4 on the appliance see picture D P0984 6 4 D If the door has to be opened from left to right invert the position of the plates 7 the magnet 4 and the plate 5 Fig B and E Mount the countermagnet 6 and the hinges 1 as previously described Recommendations regarding the construction and fitting of a...

Page 45: ...view 95 mm 490 mm G With the appliance installed adjust all four feet ensuring the machine is stable and a clearance of approximately 5 mm is left between the top of the machine and the underside of the worktop A final check for stability should be car ried out with the machine on spin with a load this will identify the need for any further fine adjustment to the feet A strip of beading approximat...

Page 46: ...vent potential negative consequences for the environment and human health which could otherwise be caused by inappropriate waste handling of this product For more detailed information about recycling of this product please contact your local council your household waste disposal service or the shop where you purchased the product Ecological hints To save water energy and to help protect the enviro...

Page 47: ...incurred for calls to put right an appliance which is improperly in stalled or calls to appliances outside the United Kingdom Appliances found to be in use within a commercial environment plus tho se which are subject to rental agree ments Products of Electrolux manufacturer that are not marketed by Electrolux Service and Spare Parts In the event of your appliance requiring service or if you wish ...

Page 48: ... these countries to another of the countries listed below the appliance guarantee will move with you subject to the following qualifications The appliance guarantee starts from the date you first purchased the appliance which will be evidenced by production of a valid purchase document issued by the seller of the appliance The appliance guarantee is for the same period and to the same extent for l...

Page 49: ... Porcia PN Latvija 37 17 84 59 34 Kr Barona iela 130 2 LV 1012 Riga Lituania 370 5 27 80 609 Verkiu 2 9 09108 Vilnius Lithuania Luxembourg 35 2 42 43 13 01 Rue de Bitbourg 7 L 1273 Hamm Magyarország 36 1 252 1773 H 1142 Budapest XIV Erzsébet királyné útja 87 Nederland 31 17 24 68 300 Vennootsweg 1 2404 CG Alphen aan den Rijn Norge 47 81 5 30 222 Risløkkvn 2 0508 Oslo Österreich 43 18 66 400 Herzig...

Page 50: ...50 electrolux ...

Page 51: ......

Page 52: ...ANC number 132 972 140 00 202007 ...

Reviews: