background image

48        www.electrolux.co.th

13.   WI-FI CONNECTIVITY SETUP

13.1 Download and installing 

and configuring “Electrolux 

Life” App*.

This chapter describes how to connect the 

smart appliance to the Wi-Fi network and to 

link it to a mobile devices.
By this functionality you can monitor and 

control your laundry appliance from your 

mobile devices.
To connect the appliance to enjoy the full 

range of features and services you need:

* Minimum requirements: iPhone6/iOS 9.3/

Android 5.1 and above. You will need to install 

the Electrolux Life App, create an Electrolux 

account and accept the Terms and Conditions 

and Electrolux’s Privacy Policy in the App to use 

the connected features of the laundry appliance. 

Internet and Wi-Fi connections are required to 

use the full features of the App and the laundry 

appliance. Minimum requirements, Apps and 

services are subject to change without notice.

* Setup will take several minutes 

depending on your network speed.

1.  Go to the App Store/Play Store on your 

smart device. 

2.  Download and install App 

“Electrolux Life”.

•  Wireless network at home with internet 

connection enabled.

•  Mobile device connected to wireless 

network.

3.  Create an Electrolux account. You 

can only create one Electrolux 

account per product. This account 

can be shared across multiple 

devices.

4.  Setting up your Washing Machine. 

Make sure your machine is plugged 

in and operating normally, stand near 

it with your smart device. 

Tap on “Appliances” at the bottom of 

the home screen. 

Tap on “Add Appliance” and follow 

the prompts on screen.

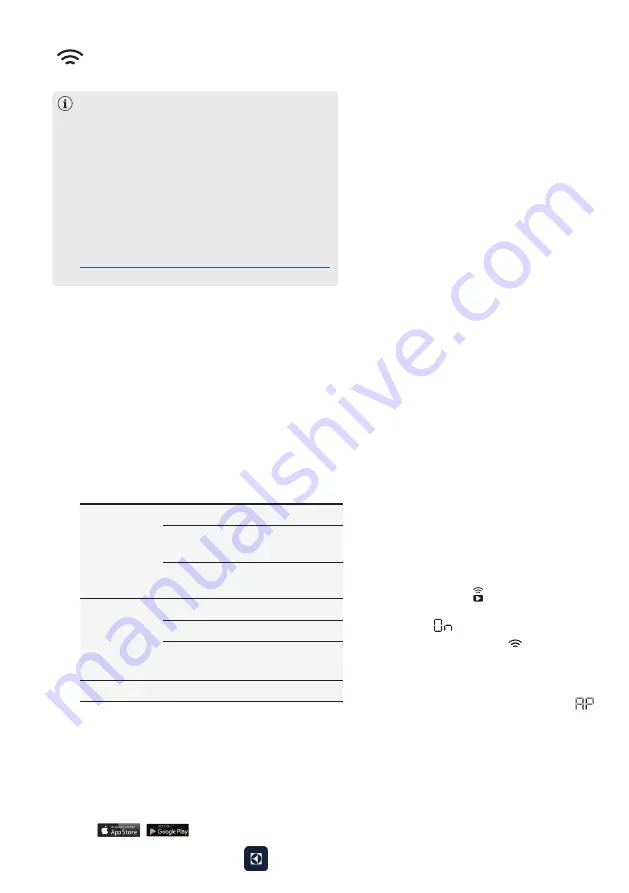
Frequency/ 

Protocol

Wi-Fi:

 2.4 GHz / 802.11 bgn

Wi-Fi:

 5 GHz / 802.11an 

(for indoor use only)

Bluetooth Low Energy

5.0:

 2.4 GHz / DSSS

Max Power

Wi-Fi 2.4 GHz:

 <20 dBm

Wi-Fi 5 GHz:

 <23 dBm

Bluetooth Low Energy 

5.0:

 <20 dBm

Encryption

WPA, WPA2

5.  Turning on your Washing Machine 

Wi-Fi. Initially your machine creates 

its own Wi-Fi network to assist in 

setting up. After setup this network 

disappears and your machine will 

connect to your home Wi-Fi network. 

Press and hold   Remote touch 

button for 3 seconds. 

The text 

 pop up for about 5 

seconds and the icon   starts 

flashing and wireless module begins 

starting up. It may takes about 45 

seconds before it is ready. When the 

wireless module is ready, the text 


(Access Point) is on to inform you, 

that the access point will be open for 

about 3 minute.

6.  Connect your Washing Machine: 

iOS

Tap the home button to exit the app. 

Go to “Settings” on your phone and 

select “Wi-Fi”. 

Select your Washing Machine’s Wi-Fi 

“The software in this product contains 

components that are based on free and 

open source software. Electrolux gratefully 

acknowledges the contributions of the open 

software and robotics communities to the 

development project. To access the source 

code of these free and open source software 

components whose license conditions 

require publishing, and to see their full 

copyright information and applicable license 

terms, please visit: 

http://electrolux.opensoftwarerepository.com


(folder NIU5)”

Summary of Contents for EWF1141R9SB

Page 1: ...EWF1141R9WB EWF1141R9SB EN TH Washing Machine เครื องซัักผ า คู มืือการใช งาน การตั งค าการเชื อมต อ WI FI แบบไร สาย User Manual WI FI CONNECTIVITY SETUP 2 50 48 99 ...

Page 2: ...information can be found on the rating plate Model PNC Serial Number Adherence to the directions for use in this manual is extremely important for health and safety Failure to strictly adhere to the requirements in this manual may result in personal injury property damage and affect your ability to make a claim under the Electrolux manufacturer s warranty provided with your product Products must b...

Page 3: ... Completed But There Is Water In The Drum 27 5 11 AUTO Off Mode 27 6 WASHING HINTS 28 6 1 Sorting The Laundry 28 6 2 Temperatures 28 6 3 Before Loading The Laundry 28 6 4 Maximum Loads 28 6 5 Removing Stains 28 6 6 Detergents Type And Quantity Of Detergent 29 7 INTERNATIONAL WASH CODE SYMBOLS 30 8 CARE AND CLEANING 31 8 1 External Cleaning 31 8 2 Descaling 31 8 3 After Each Wash 31 8 4 Maintenance...

Page 4: ...ng the appliance are thoroughly familiar with its operation and safety features Save these instructions and make sure that they remain with the appliance if it is moved or sold so that everyone using it through its life will be properly informed on appliance use and safety bed and breakfast type environtments areas for communal use in blocks of flats or in launderettes staff kitchen areas in shops...

Page 5: ...o the machine Only use manufacturer s recommended quantities of fabric softener and detergent Damage to the fabric or appliance can occur if you exceed the recommended amount Wash small items such as socks laces washable belts etc in a washing bag or pillow case as it is possible for such items to slip down between the tub and the inner drum Do not use your washing machine to wash articles with wh...

Page 6: ...y Always be sure that there is no water leakage from hoses and their connections after the installation Any plumbing work required to install this appliance should be carried out by a qualified plumber Any electrical work required to install this appliance should be carried out by a qualified electrician Only wash fabrics which are designed to be machine washed Follow the instructions on each garm...

Page 7: ... Level Adjustment Feet Front Level Adjustment Feet Back Water Inlet Hose Transit Bolts Hose Support Transit Bolts Hose Support Mains Cable Water Drain Hose Worktop Control Panel Transit Bolts 2 1 Parts 2 PRODUCT DESCRIPTION see page 19 see page 11 see page 33 see page 45 see page 45 ...

Page 8: ...efore using the appliance Drain Pump Filter when open Level Adjustment Feet Drum Lifter Stainless Steel Washing Drum Door when open for more informations For more informations see page 19 see page 19 2 2 Accessories Plastic Caps To close the holes on the rear side of the cabinet after the removal of the transit bolts Plastic Hose Guide To connect the drain hose on the edge of a sink ...

Page 9: ...sh program BEFORE loading the laundry in the drum The display shows these indicators when the door is open 2 3 Load Sensor The display will show when max limit is reached for selected program On the display the weight of the laundry updates by 0 5 kg steps The weight is a general indication that changes with the type of the laundry If you exceed the max weight limit of a program the symbol will st...

Page 10: ...shown on display If one or both options are not shown on the display detergent and softener should be added manually Cottons Mixed Bedding Energy Saver Baby Care Quick 15 Daily 39 Delicates Cottons Mixed Bedding Energy Saver Rinse Spin Baby Care Quick 15 Daily 39 Wool Delicates Auto dose detergent is available for the following wash programs AutoDose Fabric Softener Program available are The appli...

Page 11: ...elay End touchpad P Favourite program save option H Remote touchpad Q Child safety lock option I Spin touchpad Display D E C B A F G I H J C Delay End Icon D Temperature represents Cold water E Door Lock Icon F Program Duration Delay End Time Alarm Code G Remote Icon Wi Fi connection indicator Remote connection indicator H Add Clothes Icon I AutoDose Icon J Maximum Load Capacity of Selected Progra...

Page 12: ...delicate knitting items with normal soil Cottons Mixed Baby Care Do not add detergent White and coloured cotton Synthetic or mixed fabric items Cold to 40 C You can send any additional program from Mobile Application to store at this program position and can recall to using it everytime when you rotate program knob to this position This can be done through the App App Program Program Outdoor is th...

Page 13: ... cotton clothes such as shirts blouses towels and undergarments Ideal for normal level of soil Full Wash 60 Program Option Cottons Mixed Bedding Energy Saver Vapour Refresh Spin Rinse Spin Baby Care Quick 15 Daily 39 Wool Delicates Favourite App Program 1 Hygienic Care option can be combined with temperature 40 to 90 C only 2 Stain option can be combined with temperature 40 to 90 C only No Spin Ri...

Page 14: ...s not emptied out and the drum turns regularly to prevent the laundry creases The door is still locked to indicate that the water must be emptied out Rinse Hold Remote Touchpad This option allows you to connect washing machine to Wi Fi network and to link it to your smart phone By this functionality you can receive notifications control and monitor your washing machine from your mobile devices Ple...

Page 15: ...teps below set the washing machine to PAUSE by pressing Start Pause touchpad press the Start Pause to start the program deselect this option by pressing Delay End touchpad the display will show delay time Touchpad Select option to turn ON the sensors for the dirt and detergent residue The initial time displayed on the control panel indicates the time needed for the maximum dirt level When using th...

Page 16: ...effective with half load 1 If AutoDose Detergent is Off put the detergent for Main wash phase into the compartment Manual for powder or I for liquid and pour detergent for Prewash phase directly into the drum 2 If AutoDose Detergent is On detergent is dispensed from the AutoDose compartment during Prewash phase So you do not need to add more detergent 1 If AutoDose Detergent is Off when you set th...

Page 17: ...FETY LOCK which permits you to leave the appliance unsupervised with the door closed without having to worry that children might be injured by or cause damage to the appliance To activate the function press and hold Prewash touchpad about 2 seconds until the display shows the icon To deactivate the function press and hold Prewash touchpad about 2 seconds until the display shows the icon To set Chi...

Page 18: ...ete stop before opening the door wait for door lock icon to turn off During installation or before first use you may observe some water in the machine This is a residual water left in the machine after a full functional test in the factory to ensure the machine is delivered to customers in perfect working order and is no cause for concern 1 Make sure that all transit bolts have been removed from t...

Page 19: ...5 1 Loading The Laundry 5 2 Detergent Dispenser With Autodose Tanks And Manual Compartments When using detergent and any other treatments always follow the instructions that you find on the packaging of the detergent products We recommend not to exceed the maximum indicated level in each compartment Max Do not put POWDER detergent in the AutoDose compartment If both AutoDose options are enabled fo...

Page 20: ...he detergent product instruction to identify the right dosage considering a normal laundry soil level the actual water hardness and the additional dosage suggested for larger load 1 Standard Mode Allows you to store liquid detergent and softener in the AutoDose compartments and to toggle on off auto dosing of detergent and or softener 2 Dual Detergent Mode Allows you to store 2 different types of ...

Page 21: ...dicated level 4 Gently pour only liquid softener in the AutoDose fabric softener tank Fill up to the maximum indicated level 5 Close the AutoDose cover lid 6 Gently close the detergent dispenser by pushing all the way in In Standard Mode you can toggle on off auto dosing of detergent and softener By default both AutoDose detergent and softener are enabled the first time appliance is powered on 1 S...

Page 22: ...ks before refilling see section 8 5 for instructions on how to clean the tanks If the tanks are filled before the appliance is powered on for the first time the AutoDose indicator will not blink When the activated tank reaches a low level of detergent indicator blinks slowly and continuously on the display It will stop blinking when the compartment is refilled If tank is not refilled once a progra...

Page 23: ...m is running In such case the appliance will immediately be paused If you press the Start Pause touchpad an error sound is generated and everything in the display will turn off except the AutoDose symbols and remain lit for a few seconds Then the display returns to the previous paused state This will happen even if AutoDose is turned off To restart the program ensure the drawer is properly closed ...

Page 24: ... has not been used for more than 4 weeks with full tanks detergent softener can become viscous or dry out It is recommended to clean the drawer as indicated in Care and Cleaning chapter see page 31 Fine tuning settings is not permanent and will return to normal dose after the cycle ends Fine tuning settings is not permanent and will return to normal dose after the cycle ends Fine tuning feature ca...

Page 25: ...g settings is not permanent and will return to normal dose after the cycle ends AutoDose Softener touchpad is disabled in this mode the display will show when touched it In Link Mode both compartments are filled with the same detergent You can toggle On Off dosing of AutoDose detergent Touch AutoDose Detergent touchpad to toggle on off both detergent tanks Detergent 1 and Detergent 2 symbols will ...

Page 26: ...that you wish 2 Press Start Pause again The program will continue 3 While a program or the Delay End is operating the appliance door is locked and the display shows the indicator First set the machine to PAUSE by pressing the Start Pause touchpad Wait until the door lock indicator goes off then the door can be opened If the door lock indicator does not disappear this means that the machine is alre...

Page 27: ...utton to reactivate the appliance Display will show the end of the last wash Press any touchpad again to show the last wash program NOTE The door lock indicator is on The door stays locked 1 To drain the water Press the Start Pause touchpad The appliance drains the water and spins with the maximum spin speed for selected program Alternatively before pressing the Start Pause touchpad you can press ...

Page 28: ...re washing Rub particularly soiled areas with a special detergent or detergent paste Treat curtains with special care Remove hooks or tie them up in a bag or a net Make sure that no metal objects are left in the laundry e g coin hair clips safety pins pins Washing a maximum load makes the most efficient use of water and energy For heavily soiled laundry reduce the load size Cotton linen drum full ...

Page 29: ...ult and harm to the machine Do not use wrong types of detergent such as Top Loading Handwash detergent or Soap Based products in your frontload washing machine This can result in excessive suds longer cycle time low spin speeds poor rinsing and overloading of the motor The choice and quantity of detergent will depend on type of fabric delicates woollens cottons etc degree of soil size of the load ...

Page 30: ...erature 95 C Hot iron max 200 C Dry cleaning in all solvents Dry cleaning in perchlorethylene petrol pure alcohol R 111 R 113 Dry cleaning in petrol pure alcohol and R 113 DO NOT dry clean Warm iron max 150 C Lukewarm iron max 110 C DO NOT iron Max wash temperature 60 C Max wash temperature 40 C Max wash temperature 30 C DO NOT wash at all Ironing Dry cleaning Drying Flat Tumble dry DO NOT tumble ...

Page 31: ...rum We recommend to use maintenance wash to clean the drum regularly to remove any residue The drum should be empty of laundry Press Start Pause to start the program Select the Cottons 90 C program To run a maintenance wash WARNING CAUTION 8 1 External Cleaning 8 2 Descaling 8 3 After Each Wash 8 4 Maintenance Wash 8 5 Cleaning The Detergent Dispenser And The Autodose Tanks 8 CARE AND CLEANING Bef...

Page 32: ...s position by aligning its holes on drawer hooks as indicated in the picture Close it till click sound is heard 4 Press the catch on the back as indicated in the picture and lift up the top cover to remove it 5 Wash the drawer and all inserts under running water Do not use sharp or metal brushes and sponges Do not clean with any sharp and metal brushes or any tools to avoid damaging pumps and sens...

Page 33: ... cover and press till click sound is heard c Place the top cover on the tanks compartment and press till click sound is heard d Replace components on manual compartment To restore the functionality refill tanks with detergent and softener If you place a wrong additives in the tanks you can easily recover it by using the drain plug on both side of the drawer Before opening drain plugs ensure to pla...

Page 34: ...in pump 1 Open the drain pump door 2 Place a suitable water container below the recess of the drain pump to collect the water that flows out Press the two levers and pull forward the drainage duct to let the water flow out 3 When the container is full of water put the drainage duct back again and empty the container Do step 2 3 again and again until no more water flows out from the drain pump 4 Pu...

Page 35: ...housing with exposed section facing up Make sure that you correctly tighten the filter to prevent leakages 9 Close the drain pump door Remove the water inlet hose from the water tap If your water is very hard or contains traces of lime deposit the water inlet filter may become clogged It is therefore a good idea to clean it from time to time To clean the water inlet filters 1 Close the water tap 2...

Page 36: ...ter tap Remove the inlet hose behind the appliance Install the inlet hose again Make sure that the couplings are tight to prevent leakages Install the valve filter back to the housing Use a suitable tool pulling filter from the valve eg long nose pliers as picture Clean the filter under the water tap ...

Page 37: ...ain plug from the main socket Turn off the water tap 2 Remove the water inlet hose 3 Remove the drain hose from the rear support and unhook it from sink or spigot NOTE Make sure that the temperature is more than 0 C before you use the appliance again 4 Put the end of the drain and inlet hose in a container Let the water flow out of the hoses 5 When no more water flows install the inlet hose and th...

Page 38: ...se filter The door is not properly closed Close the door firmly Open the water tap Machine does not start Machine does not fill the water Machine fills then empties immediately Check the drain hose connection Machine does not empty and or does not spin Close the door firmly Clean the drain pump filter The door has not been closed The plug is not properly inserted into the power socket There is no ...

Page 39: ...e correct temperature Excessive laundry load Reduce load Machine vibrates or is noisy The transit bolts and packing have not been removed Check the correct installation of the appliance The support feet have not been adjusted Check the correct levelling of the appliance The laundry is not evenly distributed in the drum Pause the machine and redistribute laundry manually There is very little laundr...

Page 40: ... will not spin In this case redistribute the load manually and select the spin program Pause the machine and redistribute laundry manually Machine not installed properly Make sure the levelling of the appliance is correct Refer to Installation Transit bolts or packaging not removed Make sure that the packaging and or the transit bolts are removed Refer to Unpacking The load may be too small Add mo...

Page 41: ...oblem contact our service centre Before calling service centre make a note of the model serial number and purchase date of your machine the Service Centre will require this information If you are unable to identify or solve the problem contact our service centre Before calling service centre make a note of the model serial number and purchase date of your machine the Service Centre will require th...

Page 42: ...Capacity Power supply Voltage Frequency Total power absorbed Water supply pressure Maximum Minimum Use gloves Cut and remove four cut out straps as shown 1 You are advised to keep all transit devices so that they can be refitted if the machine ever has to be transported again All transit bolts and packing must be removed before using the appliance CAUTION 10 TECHNICAL DATA 11 INSTALLATION 11 1 Unp...

Page 43: ...e sure not to damage the hoses Pull up the appliance in vertical position Remove the carton box Remove the polystyrene packaging materials Remove the plastic bag which cover the machine 2 Open the door Remove the polystyrene piece from the door seal and all the items from the drum 3 7 Remove the power supply cable and the drain and inlet hoses from the hose holders A on the rear of the appliance ...

Page 44: ...s important that your washing machine stands firm and leveled on the floor to ensure correct operation The appliance must not be installed behind a lockable door a sliding door or a door with a hinge on the opposite side to avoid restricting the washing machine door 8 9 Pull out the plastic spacers 10 Put the plastic caps in the holes X3 You can find these caps in the user manual bag Remove the th...

Page 45: ...not touch the wall or cupboard units Connect the water inlet hose to a tap with 3 4 BSP thread Use the hose supplied with the washing machine DO NOT USE OLD HOSES The inlet hose must not be lengthened If it is too short and you do not wish to move the tap you will have to purchase a new longer hose specially designed for this type of use Loosen the ring nut to angle the hose to the left or right d...

Page 46: ...nside diameter of the drain pipe must be larger than the outside diameter of the drain hose The drain hose must not be twisted or curled Run it along the floor only the part near the drainage point must be raised In this case make sure the end cannot come unhooked when the machine will be emptied This could be done by tying it to the tap with a piece of string or attaching it to the wall For the c...

Page 47: ...ou purchased the product Normally soiled laundry may be washed without prewashing in order to save detergent water and time the environment is protected too The machine works more economically if it is fully loaded With adequate pre treatment stains and limited soiling can be removed the laundry can then be washed at a lower temperature Measure out detergent according to the water hardness the deg...

Page 48: ...ormally stand near it with your smart device Tap on Appliances at the bottom of the home screen Tap on Add Appliance and follow the prompts on screen Frequency Protocol Wi Fi 2 4 GHz 802 11 bgn Wi Fi 5 GHz 802 11an for indoor use only Bluetooth Low Energy 5 0 2 4 GHz DSSS Max Power Wi Fi 2 4 GHz 20 dBm Wi Fi 5 GHz 23 dBm Bluetooth Low Energy 5 0 20 dBm Encryption WPA WPA2 5 Turning on your Washing...

Page 49: ...p For iOS devices you will then be prompted go to SETTINGS on your phone and select your Home Wi Fi then return to the Electrolux Life App Android For Android devices select your Washing Machine s Wi Fi network from the drop down box 7 Connect your Washing Machine to your home Wi Fi You ll need to select your Wi Fi network name and input your password If the connectivity is configured Access Point...

Page 50: ...การรับประกันสินค า ข อปฏิบัติและคำแนะนำการใช งานภายในคู มือฉบับนี เป นสิ งสำคัญที ควรปฏิบัติตามเพื อให เกิดประโยชน ต อสุขภาพ และความปลอดภัย การไม ปฏิบัติตามคำแนะนำและข อกำหนดอย างเคร งครัดอาจทำให บุคคลได รับบาดเจ บ เกิดความเสียหายต อทรัพย สินและส งผลกระทบต อการเรียกร องค าสินไหมทดแทนภายใต การรับประกัน สินค าจากอีเลคโทรลักซ ที มาพร อมกับผลิตภัณฑ ผลิตภัณฑ นี ต องได รับการติดตั งและการใช งานตามคำแนะน...

Page 51: ...รซัักเสร จสิ นแต มีี น ำำ ค างอยู ในถััง 78 5 11 โหมดลดการใช พลัังงานโดยอััตโนมััติิ 78 6 คำำ แนะนำำ ในการซััก 79 6 1 การแยกประเภทผ าที จะซััก 79 6 2 อุุณหภููมิิ 79 6 3 ก อนบรรจุุผ าในถัังซััก 79 6 4 ปริิมาณผ าที บรรจุุสููงสุุด 79 6 5 การขจััดคราบ 79 6 6 ชนิิดของผงซัักฟอกและ ปริิมาณการใช งาน 80 7 สััญลัักษณ สากล สำำ หรัับงานซััก 81 8 การดููแลรัักษาและทำำ ความสะอาด 82 8 1 การทำำ ความสะอาดภายนอก 82 ...

Page 52: ... าจะไม เล นกับเครื อง เครื องซักผ าต องไม ถูกติดตั งอุปกรณ ควบคุมการทำงานจากภายนอก เช น อุปกรณ กำหนดเวลา หรือถูกติดตั งวงจรควบคุมที แตกต างไป จากเดิมของเครื อง เพื อความปลอดภัยและการใช งานอย างถูกต อง ก อนติดตั งและใช งานเครื อง เป นครั งแรก ขอให อ านคู มือการใช งานเล มนี รวมถึงเคล ดวิธีการใช งานและ คำเตือนต างๆ อย างละเอียด เพื อป องกันความผิดพลาดและอุบัติเหตุที พึงหลีกเลี ยง ผู ใช ควรศึกษาข อมูล...

Page 53: ...มาะสมเท านั น หากเติมน ำยามากเกินไป อาจทำให เกิดความเสียหายต อผ าหรือเครื อง ซักผ าได โปรดดูปริมาณที แนะนำของบริษัท ผู ผลิตได ที บรรจุภัณฑ ห ามใช เครื องซักผ าเพื อซักผ าที เสริมโครงลวด วัสดุที ไม เย บขอบหรือขาด ไม ควรซ อมเครื องด วยตนเอง การซ อมโดยผู ที ไม มีประสบการณ อาจทำให เกิดการ บาดเจ บหรือเครื องทำงานผิดปกติอย างรุนแรง โปรดติดต อศูนย บริการใกล บ านท าน และควร ใช ชิ นส วนที เป นของแท ทุกครั ...

Page 54: ...รื องได เท านั น โปรดปฏิบัติตามคำแนะนำบนเสื อผ าแต ละชิ น อย าบรรจุผ าเกินปริมาณที กำหนด โปรดดู รายละเอียดส วนที เกี ยวข องในคู มือการใช งาน ก อนการซัก ตรวจสอบว ากระเป าต างๆ ไม มี สิ งของตกค าง ให ติดกระดุมและรูดซิปให เรียบร อย และพยายามอย าซักผ าที ขอบลุ ย หรือขาด ขจัดคราบติดค าง เช น สี หมึก สนิม และหญ าก อนซัก ห ามซักเสื อชั นในเสริมโครง ลวด โดยที ไม ใส ในถุงซัก ไม ควรซักเสื อผ าที เป อนผลิตภั...

Page 55: ...น ำยาปรับผ านุ ม ขาตั งเครื องด านหลัง ปรับระดับได ท อน ำเข า สลักยึดสำหรับขนย าย ที เก บสาย สลักยึดสำหรับขนย าย ที เก บสาย ปลั กไฟ ท อน ำทิ ง สลักยึดสำหรับขนย าย 2 รายละเอีียดของผลิิตภััณฑ 2 1 ชิ นส วนของเครื อง ดููข อมููลเพิ มเติิมในหน า 69 ดููข อมููลเพิ มเติิมในหน า 95 ดููข อมููลเพิ มเติิมในหน า 59 ดููข อมููลเพิ มเติิมในหน า 84 ดููข อมููลเพิ มเติิมในหน า 96 ...

Page 56: ...อง ป มระบายน ำ ตัวกรอง ป มระบายน ำ ประตูเครื อง เมื อเป ดประตู ตัวกรองป มระบายน ำ เมื อเป ดประตู ขาตั งเครื องแบบปรับระดับได สลักยึดสำหรับขนย าย เมื อถอดออก โปรดตรวจสอบให แน ใจว าได นำสลักยึด สำหรับขนย าย 3 ชิ น ออกจากเครื อง เรียบร อยแล ว ก อนการใช งานเครื อง ดููข อมููลเพิ มเติิม ในหน า 69 ดููข อมููลเพิ มเติิมในหน า 69 ช องเติิมสารซัักฟอก น ำำ ยาปรัับผ านุ มด วยมืือและเทคโนโลยีีปรัับ ปริิมาณอััตโ...

Page 57: ...าสูงสุดที แนะนำแต ละโปรแกรม จอแสดงผลจะแสดงสัญลักษณ เมื อ บรรจุผ าถึงปริมาณสูงสุดของโปรแกม ที จอแสดงผล น ำหนักของผ าจะถูกเพิ มขึ น ขั น ละ 0 5 กก น ำหนักนี เป นข อบ งชี โดยทั วไป โดยจะเปลี ยน ไปตามประเภทของผ า น ำหนักที ปรากฏบนจอแสดงผล คือ น ำหนักผ าโดยประมาณเท านั น เพื อการใช งานที ถูกต องของ อุปกรณ ตรวจวัดน ำหนักผ า ให เป ดเครื องและ เลือกโปรแกรมที ต องการ ก อนบรรจุผ า ลงถังซัก จอแสดงผลจะแสดงตัว...

Page 58: ...rgy Saver ซัักประหยััด Rinse Spin ล างผ า ปั นหมาด Baby Care เสื อผ าเด ก Quick 15 ซััก 15 นาทีี Daily 39 ซัักประจำำ 39 นาทีี Wool ผ าขนสััตว Delicates ผ าเนื อบาง มีีสารซัักฟอกแบบปรัับปริิมาณอััตโนมััติิ สำำ หรัับโปรแกรมการซัักต อไปนี น ำำ ยาปรัับผ านุ ม AutoDose โปรแกรมการ ทำำ งานที ใช ได ประกอบไปด วย เครื องปรัับตั งไว สำำ เร จจากโรงงานเพื อให เหมาะกัับการใช งานทั วไปของผู ใช ส วนใหญ ขณะปิิดใช ...

Page 59: ... ำหนักผ าที บรรจุ D E C B A F G I H J 3 แผงควบคุุมการทำำ งาน 3 1 รายละเอีียดแผงควบคุุม 2s 2s A B C D E P Q F G H I J K L M N O A ลููกบิิด เลืือกโปรแกรม J ตััวเลืือก อุุณหภููมิิ ระบบสััมผััส B ตััวเลืือก เซ นเซอร วอช ระบบสััมผััส K จอแสดงผล C ปุ ม เปิิด ปิิด L ตััวเลืือก AutoDose น ำำ ยาปรัับผ านุ ม ระบบสััมผััส D ตััวเลืือก คราบ ระบบสััมผััส M ตััวเลืือก AutoDose น ำำ ยาซัักผ า ระบบสััมผััส E ตััว...

Page 60: ...ี เพื อให ได ผลการซักที ดีและลดการใช พลังงาน ซึ งเวลาของ โปรแกรมซักจะเพิ มขึ น Cottons ผ าฝ าย Mixed ผ าผสม โปรแกรมนี ไม ต องเติมผงซักฟอก ผ าฝ ายขาวหรือสี ผ าสังเคราะห หรือรวมทุกเนื อผ า น ำเย น ถึง 90 C น ำเย น ถึง 60 C น ำเย น ถึง 60 C โปรแกรมจาก แอปพลิเคชัน คุณสามารถส งโปรแกรมที อยู ในแอปพลิเคชันมา บันทึกไว ใช งานที โปรแกรมตำแหน งนี ได และสามารถ เรียกใช งานได ตลอดเมื อคุณหมุนลูกบิดเลือกโปรแกรม ...

Page 61: ...สำหรับซักผ าไม สกปรกมากที น ำหนักสูงสุดที รองรับ โปรแกรม อุณหภูมิที เลือกได ประเภทของผ าและระดับความสกปรก รอบป น หมาดสูง สุด น ำหนักผ าสูงสุด ผ าแห ง 1200 รอบ นาที โปรแกรมพิเศษสำหรับผ าขนสัตว ที ติดฉลาก Pure new woollen non shrink machine washable ผ าขนสัตว ที สามารถซักด วยเครื องได ไม หด Wool ผ าขนสัตว น ำเย น ถึง 40 C น ำเย น ถึง 30 C 1200 รอบ นาที 1200 รอบ นาที ผ าใยสังเคราะห หรือรวมทุกเนื อผ า...

Page 62: ... วมกับอุณหภูมิ 40 ถึง 90 องศาเซลเซียสเท านั น โปรแกรม ตัวเลือก Cottons Mixed Bedding Energy Saver Vapour Refresh Spin Rinse Spin Baby Care Quick 15 Daily 39 Wool Delicates Favourite App Program No Spin Rinse Hold Delay End 1 Hygienic Care Prewash Sensor Wash Auto Dose Auto Dose 2 Stain Full Wash 60 3 3 ตััวเลืือกเสริิมที สามารถใช ร วมกัับโปรแกรมได ...

Page 63: ...นและยกเลิิกการจ ายสาร ซัักฟอกอััตโนมััติิ โปรดดูู 5 2 ถาดจ ายสารซัักฟอก พร อมถัังบรรจุุอััตโนมััติิและการเติิมด วยมืือ ใน หน า 69 AutoDose น ำำ ยาปรัับผ านุ ม ระบบ สััมผััส ปุ มนี ใช สำำ หรัับการเปิิดใช งานและยกเลิิกการจ ายน ำำ ยา ปรัับผ านุ มอััตโนมััติิ โปรดดูู 5 2 ถาดจ ายสารซัักฟอก พร อมถัังบรรจุุอััตโนมััติิและการเติิมด วยมืือ ในหน า 69 เลืือกรอบปั นหมาด ระบบสััมผััส สััมผััสสััญลัักษณ เลืือกร...

Page 64: ... หยุดการทำงานเครื องชั วคราว โดยสัมผัสปุ ม เริ ม หยุด ยกเลิกหน วงเวลา โดยสัมผัสที ปุ ม Delay End ให เวลาเปลี ยนเป น หรือสัมผัสปุ มนี อีกครั งเพื อเลือกหน วงเวลาใหม ที ต องการ สัมผัสปุ ม เริ ม หยุด เพื อให เครื องทำงาน หากคุณได เริ มหน วงเวลาไปแล ว สัมผัสปุ ม เริ ม หยุด แล ว และคุณต องการที จะยกเลิก หรือปรับเปลี ยนเวลา ให ปฏิบัติดังนี ดูรายละเอียดข อกำหนดเรื องผงซักฟอก ที ใช ในหัวข อ ชนิดของผงซักฟอ...

Page 65: ...าน ฟัังก ชััน AutoDose จะดัับลง แต ตััวเลืือก Stain ขจััดคราบ จะยัังคงทำำ งานอยู ในโหมดการเติิมด วยมืือ สามารถเลืือกตััวเลืือกขจััดคราบกัับอุุณหภููมิิ 40 ถึึง 90 องศาเซลเซีียสเท านั น ให เติิมผงซัักฟอก สำำ หรัับรอบ Prewash เพิ ม รอบซััก ในถััง เลืือกตััวเลืือกนี หากคุุณต องการให เพิ มรอบการซัักผ าก อน รอบการซัักหลััก ใช ตััวเลืือกนี ในกรณีีที ผ าสกปรกมาก โดยเฉพาะอย างยิ ง หากมีีทราย ฝุ น โคลนและคร...

Page 66: ...2 วิินาทีี จนได ยิิน เสีียง บี ป บี ป พร อมกัับไฟ LED ที ตำำ แหน ง โปรแกรม Favourite ติิดสว าง ท านสามารถเรีียกใช โปรแกรมที บัันทึึกไว โดยเลืือกที โปรแกรม Favourite ที จอจะแสดงผลจะแสดง รายละเอีียดโปรแกรมที บัันทึึกไว ให ทราบว าโปรแกรม ถููกเรีียกใช แล ว เลืือกตััวเลืือกนี เพื อเพิ มระยะเวลาในการซัักด วย ระบบไอน ำำ ประมาณ 30 นาทีี หลัังจากสิ นสุุดรอบ การล างผ า ไฟแอลอีีดีีที สััญลัักษณ ตััวเลืือกนี ...

Page 67: ...มาณ 3 วินาที จอแสดงผลจะแสดงสัญลักษณ พร อมเสียงเตือน การตั งค านี ช วยให คุณสามารถป ดเสียงเตือนของ เครื องซักผ า หลังจากโปรแกรมสิ นสุดการทำงาน ตัวอย างเช น หากคุณตั งโปรแกรมซักผ าก อนที คุณ จะเข านอน และโปรแกรมจะสิ นสุดการทำงานอีก ประมาณ 1 ชั วโมง หากคุณป ดเสียงเตือนนี แล ว เครื องจะไม ส งเสียงเตือนรบกวนคุณหลังจบการ ทำงานตลอดทั งคืน หลังจากที คุณได เลือกโปรแกรมและตัวเลือก อื นที ต องการแล ว ให กดปุ...

Page 68: ...น ใจว าเครื องที จััดส งให แก ลููกค าทำำ งานได อย าง สมบููรณ แบบ และไม มีีปััญหาที ต องกัังวล 1 สลัักเกลีียวยึึดสำำ หรัับขนส งทั งหมดจะต องนำำ ออกจากเครื องให เรีียบร อยทั งหมด 2 ตรวจสอบให แน ใจว าจุุดเชื อมต อทางไฟฟ าและ ระบบน ำำ เป นไปตามคำำ แนะนำำ ในการติิดตั ง 3 อย าลืืมเติิมน ำำ ยาซัักผ าและน ำำ ยาปรัับผ านุ มใน ถัังที กำำ กัับด วย ดููรายละเอีียดได จาก หััวข อ การตั งค าเบื องต น ใน เทคโนโลยี...

Page 69: ... อ คำำ แนะนำำ ในการซััก หน า 79 5 2 ถาดจ ายสารซัักฟอกพร อมถััง บรรจุุอััตโนมััติิและการเติิมด วยมืือ ขณะใช สารซัักฟอกและน ำำ ยาอื น ๆ ให ปฏิิบััติิตาม คำำ แนะนำำ ในบรรจุุภััณฑ ของผลิิตภััณฑ ทุุกครั ง อย าเติิมเกิินระดัับที แจ งในแต ละช องเติิม Max สููงสุุด อย าเติิมสารซัักฟอกชนิิดผงในช อง AutoDose หากตััวเลืือก AutoDose ทั งสองตััวเลืือกถููกเปิิดใช งานสำำ หรัับโปรแกรมที เลืือก สารซัักฟอกและน ำำ ยา...

Page 70: ...ะเปิิด ปิิดระบบปรัับปริิมาณอััตโนมััติิ สำำ หรัับสารซัักฟอกและ หรืือน ำำ ยาปรัับผ านุ ม 2 โหมดน ำำ ยาซัักผ าสองชนิิด Dual Detergent Mode ใช สำำ หรัับการจััดเก บน ำำ ยาซัักผ า 2 ชนิิดในช อง AutoDose 2 ช อง และเปิิด ปิิดการใช งานสลัับกััน 3 โหมดน ำำ ยาซัักผ าชนิิดเดีียวสองช อง Link Detergent Mode ใช สำำ หรัับการจััดเก บน ำำ ยาซัักผ า 1 ชนิิดในช อง AutoDose ทั งสองช อง และเปิิด ปิิดการ ปรัับปริิมาณอั...

Page 71: ...ัับผ านุ มในถัังน ำำ ยาปรัับผ า นุ ม AutoDose เติิมน ำำ ยาให ถึึงระดัับสููงสุุด 5 ปิิดฝาช อง AutoDose 6 ค อย ๆ ปิิดช องจ ายสารซัักฟอกโดยดัันเข า ให สุุด ในโหมดมาตรฐาน คุุณสามารถเปิิด ปิิดระบบปรัับ ปริิมาณสารซัักฟอกและน ำำ ยาปรัับผ านุ มอััตโนมััติิ ตามค าเริ มต น ทั งสารซัักฟอกและน ำำ ยาปรัับผ านุ ม AutoDose จะถููกเปิิดใช งานในครั งแรกที เปิิดเครื อง 1 การใช งาน AutoDose โหมด มาตรฐาน กดที ปุ มสััม...

Page 72: ...มล ขั น 5 กดปุ มสััมผััส Softener น ำำ ยาปรัับผ านุ ม เพื อเลืือกกำำ หนดปริิมาณของน ำำ ยาปรัับผ านุ ม กดที ปุ มสััมผััส อุุณหภููมิิ ซ ำำ ๆ เพื อเพิ ม และ รอบปั น เพื อลด ระดัับต ำำ สุุดคืือ 1 มล คุุณ สามารถกดปุ มสััมผััสค างไว เพื อเพิ มระดัับทีีละ 10 มล ขั น 6 บัันทึึกและออกจากโหมดกำำ หนดค า โดยกดค างที ปุ มสััมผััส อุุณหภููมิิ Temp และ รอบปั น Spin อีีกครั งเป นเวลา 3 วิินาทีี หรืือคุุณ สามารถหม...

Page 73: ...ด ชั วคราวก อนหน า กรณีีเช นนี จะเกิิดขึ นแม ว าจะปิิด AutoDose ไว ก ตาม เริ มต นโปรแกรมอีีกครั งโดยปิิดถาด AutoDose ให สนิิท จากนั นกดปุ มสััมผััส เริ ม หยุุดชั วคราว 1 เปิิดช องจ ายสารซัักฟอก 2 ยกถาดเติิมพิิเศษสำำ หรัับน ำำ ยาซัักผ าออก การเติิมสารชนิิดผง การเติิมสารชนิิดน ำำ 1 สอดช องเติิมพิิเศษสำำ หรัับน ำำ ยาซัักผ าลงไป 2 เทน ำำ ยาซัักผ าในช องเติิม ดัังรููป 3 ในกรณีีที ต องการเติิมน ำำ ยาปรั...

Page 74: ...การทำำ ความสะอาดถาดจ ายสารซัักฟอก และถััง AutoDose ที หน า 82 2 การใช งาน AutoDose ผ าน แอปพลิิเคชััน Electrolux Life คุุณสามารถปรัับเพิ ม ลดปริิมาณ AutoDose ผ านทาง แอปพลิิเคชัันได และยัังสามารถเปิิดใช งานโหมดการ ทำำ งานได อีีกสองโหมดคืือ โหมดน ำำ ยาซัักผ าสองชนิิด และ โหมดน ำำ ยาซัักผ าชนิิดเดีียวสองช อง ค าการปรัับปริิมาณไม ใช ค า ถาวร เครื องจะ ปรัับไปที ระดัับค าเริ มต นหลัังจากสิ นสุุดรอบ กา...

Page 75: ...ซัักผ าชนิิดเดีียวกััน การปรัับแต งปริิมาณน ำำ ยาซัักผ า น ำำ ยาซัักผ า 1 ช องเติิมหลััก ปริิมาณปกติิ ค าเริ มต น น ำำ ยาซัักผ า 1 ช องเติิมหลััก เพิ มน ำำ ยาซัักผ าขึ นเล กน อย น ำำ ยาซัักผ า 1 ช องเติิมหลััก ลดน ำำ ยาซัักผ าลงเล กน อย ค าการปรัับปริิมาณไม ใช ค า ถาวร เครื อง จะปรัับไปที ระดัับค าเริ มต นหลัังจากสิ นสุุด รอบการทำำ งาน น ำำ ยาซัักผ า 2 ช องเติิมเสริิม ปริิมาณปกติิ น ำำ ยาซัักผ า 2...

Page 76: ...ำงาน เครื องจะปรับเวลาในการทำงานของโปรแกรม ที เลือกอีกครั งตามชนิดของผ าและปริมาณผ า ที บรรจุ จอแสดงผลจะแสดงระยะเวลาการทำงานใหม อีกครั ง สามารถเปลี ยนโปรแกรมได ก ต อเมื อป ดการทำงาน ของเครื องแล วเท านั น กดปุ ม On Off เพื อยกเลิกการทำงานของ โปรแกรมและป ดเครื อง ตอนนี คุณสามารถเลือกโปรแกรมใหม และเลือก ตัวเลือกเสริมใหม ที ต องการได แล ว หลังจากนั น กดปุ ม Start Pause เพื อเริ มโปรแกรมใหม กดปุ ม On ...

Page 77: ...ป ดประตูเครื อง คุณต อง ทำการระบายน ำออกจากเครื องก อน จอแสดงผลจะแจ งเวลาเป น ไฟแอลอีดีที ปุ ม Start Pause จะดับลง สัญลักษณ ล อคประตู จะหายไป นำผ าออกจากเครื อง ตรวจสอบให แน ใจว า นำผ าออกหมดแล ว เป ดประตูทิ งไว สักครู เพื อป องกันราหรือกลิ น ป ดก อกน ำ ในช วงสุดท ายของการทำงานของโปรแกรม เวลาคงเหลือสามารถเป นไปได ตั งแต 7 นาที หรือ น อยกว าจนถึง 0 นาที เนื องจากการคำนวณเวลา การทำงานที มากเกินจริงใ...

Page 78: ...จากถังซัก พร อมกับ ป นหมาดที ความเร วรอบสูงสุดของโปรแกรมซัก ที คุณเลือกไว 2 กดปุ ม On Off เพื อป ดการทำงานเครื อง 3 หลังจากเวลาประมาณ 18 ชั วโมง หาก คุณไม ได กดปุ มสัมผัส Start Pause เครื องจะดำเนินการระบายน ำออกและ ป นหมาดโดยอัตโนมัติ ยกเว นโปรแกรม Wool โหมดนี จะป ดการทำงานของเครื องลงโดยอัตโนมัติ เพื อลดการใช พลังงานไฟฟ าในกรณีต อไปนี เมื อไม ได กดปุ มใดๆ เป นเวลา 5 นาที ก อน กดปุ ม เริ ม หยุด ก...

Page 79: ...ใส ในถุงหรือตาข าย ตรวจสอบให แน ใจว า ไม มีโลหะใดๆ ติดค าง อยู ในเสื อผ า เช น กิ บติดผม เข มกลัด ซ อนปลาย เข มหมุด 90 C 60 C 50 C 40 C 30 C น ำเย น การซักชุดชั นใน ถุงน องและ ผ าเนื อบาง ให ใส ในถุงซัก ซึ งสามารถหาซื อได ตามร านค า หรือห างสรรพสินค าชั นนำทั วไป แยกผ าที ติดขุยง ายออกจากผ าที มีขุย อย าซัก พร อมกัน ด วยปริมาณบรรจุสูงสุดจะทำให ใช น ำและพลังงาน ได อย างเต มประสิทธิภาพ สำหรับผ าที ส...

Page 80: ...ป นที น าพอใจและอาจทำให เครื องเสียหายได อย าใช สารซักฟอกผิดประเภท เช น สำหรับ เครื องฝาบนหรือสำหรับซักด วยมือหรือสาร ซักฟอกประเภทที ทำจากสบู กับเครื องซักผ า ฝาหน าเครื องนี เพราะจะทำให เกิดฟองมากเกินไป อันเป นสาเหตุทำให ระยะ เวลาการซักของเครื องนานมากกว าเดิม การป นผ าไม มีประสิทธิภาพ การล างผ าไม มี ประสิทธิภาพ และมอเตอร ทำงานหนัก สารซักฟอกชนิดฟองน อยถูกออกแบบมาเพื อใช สำหรับเครื องซักผ าฝาหน า...

Page 81: ...สาเหตุ สารซักฟอกมากเกินไปจะทำให เกิด ซักผ าจำนวนน อยๆ เกิดฟองมากขณะซัก ผ าสกปรกน อย ลดปริมาณสารซักฟอกที ใช ลง ถ า สัญลักษณ เหล านี มีแสดงไว ที ฉลากผ า เพื อช วยในการพิจารณาวิธีการดูแลผ าที ดีที สุด ข อมูลความกระด างของน ำในพื นที สามารถสอบ ถามได จากหน วยงานที จ ายน ำให หรือหน วยงาน ราชการในพื นที คุณอาจต องใช ปริมาณของสารซักฟอกตามที ผู ผลิต ได แนะนำไว ที บรรจุภัณฑ ก อน จากนั นสังเกตผล การซักที ได ...

Page 82: ...ื อทำความสะอาดคราบที อาจ ตกค างภายในเครื องซักผ า ไม ควรบรรจุผ าในถังซัก เลือกโปรแกรม Tub Clean ล างถังซัก กดปุ ม Start Pause เพื อเริ มโปรแกรม การซักเพื อบำรุงรักษาเครื อง 8 การดููแลรัักษาและทำำ ความสะอาด 8 1 การทำำ ความสะอาดภายนอก 8 2 การขจััดตะกรััน 8 3 หลัังการซัักแต ละรอบ 8 4 การซัักเพื อดููแลรัักษาเครื อง ด วยโปรแกรม Tub Clean ล าง ถัังซััก 8 5 การทำำ ความสะอาดถาดจ าย สารซัักฟอกและถััง AutoD...

Page 83: ... านั น ข อควรระวััง คำำ เตืือน 3 เปิิดตััวอุุดระบายในถัังเติิมแต ละถััง และเท น ำำ ยาออก 4 กดตััวล อคด านหลัังตามภาพ แล วยกฝาครอบ ด านบนขึ นเพื อนำำ ออก 5 ล างถาดและชิ นส วนต าง ๆ โดยให น ำำ ไหล ผ าน 6 พลิิกช องจ ายคว ำำ ลงแล วเปิิดฝาครอบด านล าง ตามภาพ 7 ขจััดคราบสารซัักฟอกที เหลืือทั งหมดจากส วน ลำำ เลีียง ใช ผ าชุุบหมาดเนื อนุ มเท านั น 8 ใส ฝาครอบด านล างกลัับเข าที โดยปรัับแนวรููที ขอเกี ยวถา...

Page 84: ... AutoDose ไม ถููกต อง หรืือต องการเติิมน ำำ ยาชนิิดใหม สามารถ ทำำ ได โดยเปิิดฝาปิิดช องระบายน ำำ ยาทั งสอง ด านของถาด ตรวจสอบปั มระบายน ำำ เป นประจำำ และดููแล ให สะอาดอยู เสมอ ทำำ ความสะอาดปั มระบายน ำำ หาก เครื องไม ระบายน ำำ ออก ถัังซัักไม สามารถหมุุนได เครื องเกิิดเสีียงผิิดปกติิเนื องจากปั มระบายน ำำ อุุดตััน จอแสดงผลแจ งรหััสเตืือน เนื องจากมีีปััญหากัับ ระบบระบายน ำำ 10 ประกอบถาดกลัับตามขั น...

Page 85: ...มสะอาดป มระบายน ำ 1 เป ดฝาครอบป มระบายน ำ 2 วางภาชนะรองน ำที เหมาะสมไว ด านล างช อง ระบายน ำ กดครีบล อคสองตัวเข าหากัน จาก นั นดึงช องระบายน ำออกมาทางด านหน า เพื อปล อยให น ำระบายออกมา 3 หลังจากน ำเต มภาชนะรองน ำ ให ดันช อง ระบายน ำกลับเข าที และเทน ำออกจากภาชนะ รองน ำ แล วทำซ ำข อที 2 3 จนกระทั งไม มีน ำ ไหลออกมาจากป มระบายน ำ 4 ดันช องระบายน ำกลับเข าที แล วหมุนตัวกรอง ทวนเข มนา ิกาเพื อนำตัวกร...

Page 86: ...ิการ 7 ทำความสะอาดตัวกรองใต ก อกน ำ 8 ใส ตัวกรองกลับเข าที หมุนให แน นเพื อป องกัน น ำรั ว 9 ป ดฝา หากน ำกระด างมากหรือมีคราบหินปูน ตัวกรองที ท อน ำเข าอาจอุดตันได แนะนำให ทำความสะอาด เป นระยะๆ การทำความสะอาดตัวกรองท อน ำเข า 1 ป ดก อกน ำ 2 หมุนท อน ำเข าออกจากก อกน ำ ไกด ตั งขึ น ตั งขึ น 8 7 การทำำ ความสะอาดตััวกรอง ท อน ำำ เข า ...

Page 87: ...ังเครื องออก 5 เลือกใช เครื องมือที เหมาะสม เช น ครีมปากยาว เพื อดึงตัวกรองวาล วน ำเข าออก ดังภาพ 6 7 เป ดก อกน ำ ติดตั งท อน ำเข ากลับเข าที หมุนให แน นเพื อ ป องกันน ำรั ว ประกอบตัวกรองวาล วน ำเข ากลับเข าที เดิม ทำความสะอาดตัวกรองด วยแปรง โดยเป ด น ำไหลผ านแล วเช ดด วยผ าให แห ง ...

Page 88: ...ฟฟ า และปิิดก อกน ำำ 2 ถอดสายน ำำ เข าออกจากก อกน ำำ 3 ปลดท อระบายน ำำ ออกจากฐานรองด านหลััง และปลดปลายท อน ำำ ทิ งออกจากซิิงค หรืือหััว ก อก การระบายน ำำ ในกรณีีฉุุกเฉิิน 4 วางปลายท อน ำำ ทิ งและท อน ำำ เข าไว บนภาชนะ รองน ำำ แล วปล อยให น ำำ ระบายออก 5 เมื อไม มีีน ำำ ไหลออกมาแล ว เก บท อระบายน ำำ และท อน ำำ เข าเข าที เดิิม ข อแนะนำำ เมื อต องการจะใช งานเครื องอีีกครั ง ควร ตรวจสอบให แน ใจว าอุ...

Page 89: ...ัตโนมัติ ท อน ำเข าตันหรือหักงอ ตรวจสอบการต อท อน ำเข า ปลายท อระบายน ำอยู ต ำเกินไป ให ดูข อมูลอ างอิงในหัวข อ การระบายน ำ ตัวกรองท อน ำเข าอุดตัน ทำความสะอาดตัวกรองท อน ำเข า ประตูเครื องป ดไม สนิท ป ดประตูให สนิท ก อกน ำป ดอยู เป ดก อกน ำ เครื องซักผ า ไม ทำงาน น ำไม เติมเข า เครื องซักผ า น ำเข าเครื องซักผ า แล วระบายออกทันที ความผิดปกติที เกิด สาเหตุที เป นไปได แนวทางแก ไข ตรวจเจอความผิดปกติ...

Page 90: ...ราว รอประตูเครื องคลาย ล อค จากนั นเป ดประตูเครื องแล วทำการ กระจายผ าออกให ทั วถัง อาจมีผ าในถังซักน อยมาก บรรจุผ าเพิ มหรือลดความเร วรอบป นหมาด พื นไม มั นคง เช น พื นไม ดูในหัวข อ พื นที การติดตั ง มีน ำค างอยู ในถังซัก ป ญหานี อาจเกิดจากข อผิดพลาด ของเครื องเอง ไม สามารถเป ด ประตูเครื องได เครื องสั น หรือ ส งเสียงดัง มีน ำรั วภายในเครื อง ถอดปลั กเครื อง ป ดก อกน ำและติดต อ ศูนย บริการใกล บ า...

Page 91: ...0 นาทีผ านไป หากผ ายัง กระจายตัวอยู ในถังซักไม ทั วถึง เครื องจะ ไม ป นหมาด ในกรณีนี ให ทำการ กระจายผ าในถังซักด วยตัวเองก อนแล ว จึงเลือกโปรแกรมป นหมาด การป นหมาดเริ ม ทำงานช า หรือ เครื องไม ป นหมาด ติดตั งเครื องไม ถูกต อง เครื องต องติดตั งได ระดับสมดุล ดูในหัวข อ การติดตั ง สลักยึดสำหรับขนย ายหรือบรรจุภัณฑ ไม ได นำออก บรรจุภัณฑ และ หรือสลักยึดสำหรับ ขนย ายจะต องนำออก ดูในหัวข อ การแกะบรรจุภัณ...

Page 92: ...รื องซักผ า 3 เป ดฝาป ดตัวกรองป มระบายน ำ 4 ใช อุปกรณ ที เหมาะสมเกี ยวดึงสายตัวปลด ล อกกรณีฉุกเฉิน สีแดง กระตุกลง 2 ครั ง และให ดันค างไว คุณจะได ยินเสียง คลิก ขณะเดียวกันก ให เป ดประตูเครื องพร อมๆกัน หากเป ดประตูเครื องไม ได ในขณะที ดันสายตัว ปลดล อกกรณีฉุกเฉินไว ให ลองปล อยสายแล ว ลองเป ดประตูอีกครั ง 5 นำผ าออก 6 ป ดฝาตัวกรองป มระบายน ำ หากท านไม สามารถหาสาเหตุหรือแก ไขป ญหาที เกิดขึ นได โปรด ...

Page 93: ... 65 9 เซนติเมตร แหล งจ ายไฟ แรงดันไฟฟ า ความถี กำลังไฟทั งหมด แรงดันน ำ สูงสุด ต ำสุด 0 8 0 05 เมกะพาสคัล 220 240 โวลต 50 เฮิรตซ 2100 วัตต โปรแกรม ปริมาณผ าที บรรจุได Cottons Mixed Delicates Bedding Vapour Refresh Energy Saver App Program Spin Rinse Spin Baby Care Wool Quick 15 Daily 39 Full Wash 60 Favourite สูงสุด1 กก 4 กก 4 กก 3 กก 1 5 กก สูงสุด กก สูงสุด กก สูงสุด กก 4 กก 2 กก 1 5 กก 5 5 กก สู...

Page 94: ... ำทางด านหลังจนพับหักงอ ดังภาพ ดันเครื องให อยู ตำแหน งตั งตามเดิม เป ดประตูเครื อง นำสิ งของด านในทั งหมด ออกมาดังภาพ 3 7 8 9 ดึงที เก บท อพลาสติกออก 10 ป ดรูด วยหมวกพลาสติกที มาพร อมกับเครื อง ซึ งสามารถหาได จากในถุงบรรจุคู มือการใช งาน นำสายไฟ ท อระบายน ำและท อน ำเข าออก จากที เก บท อ A ทางด านหลังเครื อง ดัง ภาพ หมุนสลักเกลียวสามตัวออก A 1st 2nd 3rd ...

Page 95: ...สม เครื องซักผ าจะต องมั นคงและได ระดับกับพื น เพื อให แน ใจว าการทำงานถูกต อง เครื องจะต องไม ติดตั งอยู ด านหลังประตูที ล อคได ประตูเลื อนหรือประตูที บานพับอยู ตรงกันข ามกับ ประตูเครื องซักผ า ต อท อน ำเข าเข ากับเกลียว BSP ขนาด 3 4 นิ ว ใช ท อที จัดมาให พร อมกับเครื องซักผ า อย าใช ท อเก า ปลายอีกข างหนึ งของท อน ำเข าซึ งต ออยู กับเครื อง สามารถหมุนไปในทิศทางใดก ได เพียงแค คลาย ข อต อแล วหมุนท...

Page 96: ...ละรัดด วย สายรัดให แน น ตรวจสอบให แน ใจว าไม มีแรงดัน ไหลวนในท อเพื อป องกันน ำเสียจากอ างไหลเข า สู เครื องซักผ า ในกรณีนี โปรดตรวจสอบให แน ใจว าปลายท อ ไม หลุดออกจากปลอกเมื อเครื องปล อยน ำออก ต อกับท อที แยกออกจากท อน ำทิ งของ อ างน ำ ปลายท อระบายน ำสามารถจัดตำแหน งได สามวิธี ดังนี เกี ยวไว กับขอบอ างล างจาน โดยใช ปลอกพลาสติกที ให มาพร อมเครื อง 45 35 การประกอบท อน ำกับปลอกพลาสติก ดัดท อ 2 ดันส...

Page 97: ...ขเครื อง กับแหล งจ ายไฟฟ าภายในบ านของคุณว า เป นอัตราแรงดันไฟฟ าเดียวกันหรือไม ข อควรระวัง โปรดเชื อมต อเครื องเข ากับเต าจ ายไฟ ที ต อสายดินไว เมื อติดตั งเครื องแล ว ควรให สายไฟอยู ในตำแหน ง ที สะดวกต อการใช งาน หากสายไฟชำรุดและต องการเปลี ยน ใช สายไฟใหม ขอให ติดต อศูนย บริการ ใกล บ าน สูงสุด 90 ซม ต ำสุด 60 ซม ลงสู ท อระบายน ำ ปลายท อระบายน ำจะต องสามารถระบายน ำออก ดังนั นเส นผ าศูนย กลางภายใน...

Page 98: ...ทิ งผลิตภัณฑ นี อย างถูกต อง จะช วยลด ผลกระทบที มีต อสภาพแวดล อม และ สุข อนามัย หากท านทิ งผลิตภัณฑ นี อย างไม ถูกต อง เหมาะสม จะก อให เกิดผลเสียต อสภาพ แวดล อมและสุขอนามัย สอบถามข อมูลเพิ มเติมเกี ยวกับการรีไซเคิล ผลิตภัณฑ ได จากหน วยงานในพื นที ผู ให บริการจัดเก บขยะประจำพื นที ของคุณ หรือ ร านที จำหน ายผลิตภัณฑ นี ผ าที สกปรกธรรมดาอาจซัก โดยไม จำเป น ต องแช ผ าก อนซัก ทั งนี เพื อประหยัดสาร ซัก...

Page 99: ...ัญชีี Electrolux Life คุุณสามารถ สร างได เพีียงหนึ งบััญชีีเท านั นต อหนึ ง ผลิิตภััณฑ และบััญชีีนี สามารถใช งานบน อุุปกรณ อื นได 4 ตั งค าเครื องซัักผ าของคุุณ ตรวจสอบให แน ใจว าเครื องได ถููกติิดตั งและถููกต องตาม คู มืือการติิดตั งและอยู ในสภาพพร อมใช งาน ให คุุณยืืนอยู ใกล ๆเครื องซัักผ า พร อม กัับโทรศััพท สมาร ทโฟนของคุุณ แตะที Appliances บริิเวณด านล างของ หน าจอหลััก แตะที Add Appliance แล...

Page 100: ...ย ฟายเครื องซัักผ าของคุุณได จากกล องดรอปดาวน 7 เชื อมต อเครื องซัักผ าของคุุณกัับเครืือข าย Wi Fi ที บ านของคุุณ คุุณต องเลืือกเครืือข ายชื อ Wi Fi ของคุุณ และใส รหััสผ านของคุุณ ถ าการตั งค าเสร จสมบููรณ สััญลัักษณ จุุดเชื อมต อ จะหายไปและไอคอน จะ หยุุดกระพริิบและติิดค างเพื อยืืนยัันว าการ ตั งค าได ทำำ การเสร จสมบููรณ แล ว การเชื อมต อสำำ เร จแล ว ทุุกครั งที เปิิดเครื องซัักผ า เครื องจะใช เว...

Page 101: ...ิิดการ ใช งานแล ว 1 กดปุ ม สั งงานผ านแอป Remote และ สััญลัักษณ จะปรากฏที จอแสดงผล 2 กดปุ ม เริ ม หยุุด Start Pause เพื อเปิิด ใช งานผ านแอปพลิิเคชััน ตอนนี คุุณสามารถใช งานผ านแอปพลิิเคชััน ได แล ว เปิิดใช งาน สั งงานผ านแอป ปิิดใช งาน สั งงานผ านแอป สั งงานผ านแอปจะเปิิดใช งานโดยอััตโนมััติิเมื อ คุุณกดปุ ม เริ ม หยุุด Start Pause เพื อเริ มการ ทำำ งาน แต ยัังสามารถที จะเริ มการทำำ งานของ โปรแกร...

Page 102: ...102 www electrolux co th NOTE บัันทึึก ...

Page 103: ......

Page 104: ...G0032358 002 A20692102 www electrolux co th ...

Reviews: