background image

electrolux e:volution barbecue

 warranty 23

This document sets out the terms and conditions of product 
warranties for Electrolux branded appliances.  It is an important 
document.  Please keep it with your proof of purchase documents in 
a safe place for future reference should you require service for your 
Electrolux appliance.

General Terms and Conditions

1.  In this warranty
  (a)   ‘Electrolux’ means Electrolux Home Products Pty Ltd ABN 51 

004 762 341 in respect of Appliances purchased in Australia and 
Electrolux (NZ) Limited in respect of Appliances purchased in New 
Zealand;

  (b)  ‘Appliance’ means any Electrolux product purchased by you 

accompanied by this document;

  (c)   ‘Warranty Period’ means 
    (i)  where you use the Appliance for personal, domestic or household 

purposes in Australia the period of ‘24’ months and in New 
Zealand the period of ‘24’ months;

    (ii)  where you use the Appliance for commercial purposes, in 

Australia the period of ‘3’ months and in New Zealand the period 
of ‘3’ months, (if the period stated is 0 months you are not 
covered by this product warranty) following the date of original 
purchase of the Appliance;

  (d)  ‘you’ means the purchaser of the Appliance not having purchased 

the appliance for re-sale, and ‘your’ has a corresponding meaning.

2.   This warranty only applies to Appliances purchased and used  in 

Australia or New Zealand and is in addition to (and does not exclude, 
restrict, or modify in any way) any non-excludable statutory warranties 
in Australia or New Zealand.

3.   Electrolux warrants that, when dispatched from an Electrolux 

warehouse, the Appliance is free from defects in materials and 
workmanship for the Warranty Period.

4.   During the Warranty Period Electrolux or its Authorised Service Centre 

will, at no extra charge if your appliance is readily accessible without 
special equipment, and subject to these terms and conditions, repair 
or replace any parts which it considers to be defective. Electrolux or 
its ASC may use reconditioned parts to repair your appliance. You 
agree that any replaced Appliances or parts become the property of 
Electrolux. This warranty does not apply to light globes, batteries, filters 
or similar perishable parts.

5.   Parts and Appliances not supplied by Electrolux are not covered by this 

warranty.

6.   Where you are within an Electrolux service area, this warranty covers 

the cost of transport of the Appliance to and from Authorised Service 
Centres of Electrolux and travelling costs for representatives of the 
Authorised Service Centre to and from your home or business.  If you 
are outside an Electrolux service area, you will bear these costs.  For 
information about whether you are within an Electrolux service area, 
please phone 13 13 49 in Australia, or 0800 10 66 10 in New Zealand.

7.   Proof of purchase is required before you can make a claim under this 

warranty.  

8.   You may not make a claim under this warranty unless the defect 

claimed is due to faulty or defective parts or workmanship.  Electrolux is 
not liable in the following situations (which are not exhaustive):

  (a)  The Appliance is damaged by:
    (i) accident

    (ii)  misuse or abuse, including failure to properly maintain or service
    (iii) normal wear and tear
    (iv)   power surges, electrical storm damage or incorrect power 

supply

    (v)  incomplete or improper installation
    (vi)  incorrect, improper or inappropriate operation
    (vii) insect or vermin infestation.
  (b)  The Appliance is modified without authority from Electrolux in 

writing.

  (c)   The Appliance’s serial number or warranty seal has been removed 

or defaced.

  (d)  The Appliance was serviced or repaired by anyone other than 

Electrolux or its Authorised Service Centres.

9.   This warranty, the contract to which it relates and the relationship between 

you and Electrolux are governed by the law applicable in the Australian 
State where the Appliance was purchased or the law applicable in New 
Zealand if the Appliance was purchased in New Zealand. Where the 
Appliance was purchased in New Zealand for business purposes the 
Consumer Guarantee Act does not apply.

Limitation of Liability

10. To the extent permitted by law: 
  (a)   Electrolux excludes all warranties other than as contained in this 

document;

  (b)  Electrolux shall not be liable for any loss or damage whether direct 

or indirect or consequential arising from your purchase, use or non-

use of  

the Appliance.

11.  Provisions of the Trade Practices Act and State consumer legislation 

in Australia, and the Consumer Guarantees Act, the Sale of Goods 
Act and the Fair Trading Act in New Zealand, imply warranties or 
conditions, or impose obligations, upon Electrolux which cannot be 
excluded, restricted or modified.  To the extent permitted by law, the 
liability of Electrolux (if any) arising out of or in relation to the Appliance 
or any services supplied by Electrolux shall be limited (where it is fair 
and reasonable to do so),:

  (a)   in the case of Appliances, at its option, to the replacement or 

repair of the Appliances or the supply of equivalent products or 
the payment of the cost of replacing the Appliances or having the 
Appliances repaired or of acquiring equivalent Appliances. Upon 
being replaced, parts and Appliances become the property of 
Electrolux; or

  (b)  in the case of services, at its option, to the supply of the services 

again or the payment of the cost of having the services re-supplied; 
and in the case of Appliances or services supplied in New Zealand, 
loss or damage whether direct or indirect or consequential that is 
reasonably foreseeable.

Privacy 

You acknowledge that in the event that you make a warranty claim it will be 
necessary for Electrolux and its Authorised Service Centres to exchange 
information in relation to you to enable Electrolux to meet its obligations 
under this warranty.

 Warranty

FOR SALES IN AUSTRALIA AND NEW ZEALAND 


APPLIANCE: ELECTROLUX E:VOLUTION BARBECUE

Important Notice

Before Calling a Service Technician please check carefully the operating instructions, service booklet and the warranty terms and conditions.

FOR SERVICE 

or to find the address of your nearest 

state service centre in Australia 

PLEASE CALL 13 13 49 

For the cost of a local call (Australia only)

SERVICE AUSTRALIA 

ELECTROLUX HOME PRODUCTS

www.electrolux.com.au

FOR SPARE PARTS 

or to find the address of your nearest 

state spare parts centre in Australia 

PLEASE CALL 13 13 50 

For the cost of a local call (Australia only)

FOR SERVICE 

or to find the address of your nearest 

authorised service centre in New Zealand 

FREE CALL 0800 10 66 10 

(New Zealand only)

SERVICE NEW ZEALAND 

ELECTROLUX HOME PRODUCTS

www.electrolux.co.nz

FOR SPARE PARTS 

or to find the address of your nearest 

state spare parts centre in New Zealand 

FREE CALL 0800 10 66 20 

(New Zealand only)

Summary of Contents for EQBM120HAS

Page 1: ...user manual Electrolux E Volution barbecue EQBM120HAS EQBM120LAS EQBM75HAS EQBM75LAS ...

Page 2: ...ou read the safety instructions carefully to avoid misuse and hazards We recommend that you keep this instruction booklet for future reference and pass it on to any future owners After unpacking the barbecue please check it is not damaged If in doubt do not use the appliance but contact your local Electrolux Customer Care Centre Contents Important safety instructions 3 EQBM120HAS description 4 EQB...

Page 3: ... re tighten the leaking joint Carry out the Leak Test procedure as described in this manual If the leak persists turn off the gas supply and call Electrolux Service or a Licensed Gas Fitter warning Do not lean over barbecue when lighting Do not leave the barbecue unattended when alight Do not delay lighting once the gas has been turned on Do not store or use aerosol cans in the vicinity of the bar...

Page 4: ...ks 8 Grill 9 Hotplate 10 Ribbed hotplate 11 Fold down side tables 12 Storage compartment 13 Gas connection point 14 Gas hose with universal LPG connection 15 Slide out gas bottle tray 16 Match holder for manual lighting not illustrated 17 Removable oil reservoirs located at front of cooking surface not illustrated 18 Flame tamers located under grills not illustrated 1 3 6 10 11 15 16 13 14 11 9 12...

Page 5: ...electrolux e volution barbecue EQBM120HAS dimensions 5 EQBM120HAS dimensions 525 363 637 1200 1126 683 922 203 35 Dimensions are in millimetres ...

Page 6: ...Hotplate 8 Ribbed hotplate 9 Fold down side tables 10 Storage compartment 11 Gas connection point 12 Gas hose with universal LPG connection 13 Slide out gas bottle tray 14 Match holder for manual lighting not illustrated 15 Removable oil reservoirs located at front of cooking surface not illustrated 16 Flame tamers located under grills not illustrated 1 2 5 8 9 13 12 11 9 7 10 6 4 3 14 ...

Page 7: ...electrolux e volution barbecue EQBM120LAS dimensions 7 EQBM120LAS dimensions 532 363 653 1200 957 683 922 35 Dimensions are in millimetres ...

Page 8: ...g racks 6 Hotplate 7 Grills 8 Fold down side tables 9 Gas connection point 10 Gas hose with universal LPG connection 11 Slide out gas bottle tray 12 Match holder for manual lighting not illustrated 13 Removable oil reservoirs located at front of cooking surface not illustrated 14 Flame tamers located under grills not illustrated 1 2 7 8 10 11 9 8 6 5 4 3 12 ...

Page 9: ...electrolux e volution barbecue EQBM75HAS dimensions 9 EQBM75HAS dimensions 525 637 750 1126 684 922 203 Dimensions are in millimetres ...

Page 10: ...te 5 Grills 6 Fold down side tables 7 Gas connection point 8 Gas hose with universal LPG connection 9 Slide out gas bottle tray 10 Match holder for manual lighting not illustrated 11 Removable oil reservoirs located at front of cooking surface not illustrated 12 Flame tamers located under grills not illustrated 1 5 6 8 9 7 6 4 3 2 10 ...

Page 11: ...electrolux e volution barbecue EQBM75LAS dimensions 11 EQBM75LAS dimensions 532 653 750 957 684 922 35 Dimensions are in millimetres ...

Page 12: ...plate 1 Ribbed hotplate 1 Flame tamers 2 1 plastic bag containing this instruction book and trim fixing screws description qty EQBM75AS 75cm mobile barbecue base 1 EQB6HAS Roasting hood and warming racks OR EQB6LAS Flat lid with mounting brackets 1 Grills 2 Hotplate 1 Flame tamers 2 1 plastic bag containing this instruction book and trim fixing screws Tools you will need for assembly Phillips head...

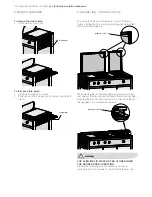
Page 13: ...e external trim Once in position fix hood assembly to trim surround with screws provided OR Fitting of slimline lid Unpack the slimline lid Remove necessary screws from barbecue trim surround to enable assembly of brackets Fit brackets to trim surround with screws removed and additional screws in plastic bag Fit additional screws provided to trim where missing Fit lid to brackets 4 Fit small sliml...

Page 14: ...appliance MUST be serviced only by a qualified licensed person This product is intended for outdoor use only Ventilation holes in the unit must not be obscured by the installation The outlet pressure at the Natual Gas regulator will be lower when all burners are operating Burner pressure should read 1 0kPa with one burner operating and approximately 0 93kPa with four burners operating For conversi...

Page 15: ...urn off the valve and re tighten the joint Repeat the leak test If the leak persists turn off the gas at the isolation valve and contact a licensed gas fitter to correct Leak test procedure Universal LPG leak test points check hose for signs of abrasions cracks or leaks Preparing the unit for Natural Gas installation This barbecue is supplied set up for Universal LPG and is labelled accordingly A ...

Page 16: ...r connection of the hose turn on the valve at the gas bottle or mains as appropriate Using a brush apply the solution to the gas connection points and look for bubbles forming Bubbling will indicate a leak Turn off the valve and re tighten the joint Repeat the leak test If the leak persists turn off the gas at the isolation valves and contact a licensed gas fitter to correct 7 Turndown adjustment ...

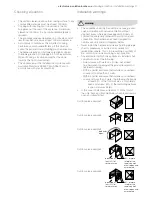
Page 17: ...wind or natural convection This barbecue has been designed for outdoor use only Refer to diagrams below Never install this barbecue inside any building garage shed or breezeway or inside a boat caravan or recreational vehicle This is to prevent the possibility of fire carbon monoxide poisoning or asphyxiation Any enclosure in which this appliance is installed shall comply with one of the following...

Page 18: ...b and rotate to HIGH A spark is generated to light the flame thrower along side the burner The flame thrower makes an audible noise and only operates when the knob is depressed to light the burner Release the knob and check if burner is lit The audible noise from the flame thrower will stop when knob released If the burner did not light turn the knob to the OFF position Allow gas to disperse then ...

Page 19: ...pointer on the knob is positioned at the OFF position Turn gas bottle isolation valve off after turning all knobs to OFF position when appliance not in use Cooking with the hood closed only requires 2 burners to be on low setting Setting is to be adjusted depending on conditions and using the temperature indicator as a guide It is recommended when roasting to place the solid hot plate in the centr...

Page 20: ... fitted both small and large lids When closing the lid the safety leg will pivot forward and rest against the trim surface to prevent the lid closing After ensuring the gas has been turned off to fully close the lid the leg needs to be rotated backwards warning THE SLIMLINE LID MUST NOT BE CLOSED WHEN THE BURNERS ARE OPERATING Closing the lid during burner operation can cause discolouration and da...

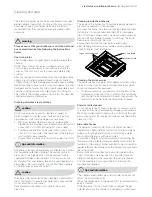
Page 21: ... enter the control panel Care should also be taken not to disturb the spark electrode Cleaning inside the barbecue The inside of the burner box should be regularly cleaned to prevent any build up of food residues To access the burner box remove cooking plates and heat distributors To remove rear heat shield lift to disengage clips To remove burners undo screws securing burners at rear and lift out...

Page 22: ...refill or change gas bottle Ignition system not working Check there is a spark being generated when knob rotated Ignition electrode wet or dirty gently clean and dry electrode ensuring position is unchanged Manually light the barbecue Excess smoke being emitted from the cooking area Too much heat Turn down gas valve or turn off selected burners Smell of gas DO NOT ATTEMPT TO LIGHT THE APPLIANCE Ga...

Page 23: ...mplete or improper installation vi incorrect improper or inappropriate operation vii insect or vermin infestation b The Appliance is modified without authority from Electrolux in writing c The Appliance s serial number or warranty seal has been removed or defaced d The Appliance was serviced or repaired by anyone other than Electrolux or its Authorised Service Centres 9 This warranty the contract ...

Page 24: ...al of thought to anticipating and creating the kind of appliances that our customers really need and want This kind of thoughtful care means innovating with insight Not design for design s sake but design for the user s sake For us thoughtful design means making appliances easier to use and tasks more enjoyable to perform freeing our customers to experience that ultimate 21st century luxury ease o...

Reviews: