using your cooktop
4 USING YOUR COOKTOP Gas Cooktops
WARNING
warning
DO NOT spray aerosols in the vicinity of this appliance while it is
in operation as aerosols can contain flammable propellants.
WARNING
warning
Where the appliance is installed in any confined area, the
area must be properly ventilated. It MUST NOT be used as a
space heater.
Controls
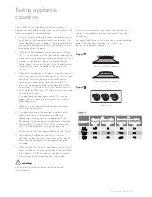
Each burner is controlled by a control knob. The markings
on the control panel indicate which burner the knob controls,
and the settings for that burner (see Figure 2).
Figure 2
OFF
HI
LOW
Lighting burners
Electronic ignition:
These cooktops are fitted with mains
powered or battery ignition. When the appliance has been
connected and the power is on, depressing any knob will
release sparks to all burners (except push button ignition, see
push button ignition models). To light a burner, depress the
corresponding knob and turn to the ‘HIGH’ position (while
depressing the knob). The knob may be released once the
flame is established.
Push button ignition:
Turn the knob to the ‘HIGH’ position
and press the ignition button down until the flame is
established. The height of the flame can be varied by turning
the knob towards the ‘LOW’ position.
WARNING
warning
Keep hands clear of the burners when lighting.
If the burner does not light within 5 seconds, turn knob to ‘OFF’
position, allow gas to disperse then try lighting again.
WARNING
caution
Burners MUST be operated between ‘HIGH’ and ‘LOW’
settings only.
In the absence of electrical power, carry out the ignition directly
to the burner with a hand held ignition source.
Hotplates
Choice of hotplate
For your convenience there is a choice of hotplates:
O
A small burner for special low heat and slow cooking.
O
A medium burner for normal cooking and simmering.
O
A large burner for fast heating and large pots and pans.
O
A wok burner for very fast heating using a wok or large
pot or pan.
To conserve gas place the pan centrally over the burner and
adjust the flame so that it does not extend past the edge of the
pan (Figure 3). Do not boil food too rapidly.
A vigorous boil will not cook food any faster, and will
waste energy.
Pots and pans
All common pots and pans; aluminium, stainless steel, cast iron,
ceramic, etc., may be used on your new gas cooktop. Ensure
that the pots or pans are steady and have flat bases to avoid
dangerous spill-over of hot liquids and wasted energy.
Figure 3
Choice of flame height
Incorrect – flame too high and
will cause gas waste and possible
handle damage.
Correct flame height.
Gas saved.
Choice of cooking utensils
For a large burner,
use a large utensil.
For a small burner,
use a small utensil.
WARNING
caution
Never use asbestos mats, wire mats or grids, or aluminium foil
as it can lead to overheating, cracked enamel or broken glass.
The warranty will be void if these items are used and cause a
failure. Woks should only be used on the wok burner and wok
support trivet.
All burners can place the minimum diameter of pan
Summary of Contents for EHT6047X
Page 1: ... 1 DV RRNWRS 8VHU 0DQXDO EH7 ...
Page 5: ...using your cooktop ...
Page 11: ... NOTES Gas Cooktops notes Th wa Pl fo 1 2 3 4 5 6 ...
Page 12: ...Th wa Pl fo 1 2 3 4 5 6 CPOTVNFS Care Center ...
Page 13: ......
Page 14: ......
Page 15: ......
Page 16: ......


