background image

2. 

PRODUCT DESCRIPTION

2.1 

Cooking surface layout

3

6

1

2

5

4

180 mm

180 mm

145 mm

145 mm

1

Single cooking zone 1500 W

2

Single cooking zone 2000 W

3

Control knobs

4

Power indicator

5

Single cooking zone 1500 W

6

Single cooking zone 2000 W

2.2 

Electric cooking zones

control knobs

Symbol

Function

0

off position

Symbol

Function

1

minimum heat

6

maximum heat

3. 

DAILY USE

WARNING!

Refer to "Safety information"
chapter.

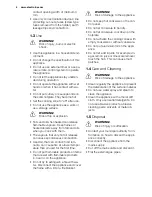
To switch on and increase the heat set-
ting turn the knob counterclockwise. To
decrease the heat setting turn the knob
clockwise. To switch off turn the knob to
the 0.
Power indicator is activated when either
of the zones are turned on, and will stay
on until the cooking zones are switched
off.

3.1 

Before first use

Put cookware containing water on each
cooking zone, set the maximum position
and operate the appliance for 10 min.
This is to burn off the residue in the appli-
ance. After that, operate the appliance at

minimum position for 20 min. During this
period, an odour and smoke can occur.
This is normal. Make sure that the airflow
is sufficient.
After this operation, clean the appliance
with a soft cloth soaked in warm water.

3.2 

Rapid hot plate

A red dot in the middle of the plate shows
a rapid hot plate. A rapid hot plate heats
up faster than usual plates.
The red dot is painted on the surface and
can come off after some time. It does not
have an effect on the performance of the
appliance.
The rapid hot plate can smoke and make
an odour when you use it for the first time.
The smoke and an odour will go off after a
while.

ENGLISH

5

Summary of Contents for EHS6140

Page 1: ...EHS6140 EN HOB USER MANUAL ...

Page 2: ...ou ll get great results every time Welcome to Electrolux Visit our website for Get usage advice brochures trouble shooter service information www electrolux com Register your product for better service www electrolux com productregistration Buy Accessories Consumables and Original spare parts for your appliance www electrolux com shop CUSTOMER CARE AND SERVICE We recommend the use of original spar...

Page 3: ...ecause it is heavy Always wear safety gloves Seal the cut surfaces with a sealant to prevent moisture to cause swelling Protect the bottom of the appliance from steam and moisture Do not install the appliance adjacent to a door or under a window This pre vents hot cookware to fall from the ap pliance when the door or the window is opened If the appliance is installed above draw ers make sure that ...

Page 4: ... the first time Do not put flammable products or items that are wet with flammable products in near or on the appliance Do not try to extinguish a fire with wa ter Disconnect the appliance and cover the flame with a lid or a fire blanket WARNING Risk of damage to the appliance Do not keep hot cookware on the con trol panel Do not let cookware to boil dry Do not let cookware cool down on the hotpla...

Page 5: ...e cooking zones are switched off 3 1 Before first use Put cookware containing water on each cooking zone set the maximum position and operate the appliance for 10 min This is to burn off the residue in the appli ance After that operate the appliance at minimum position for 20 min During this period an odour and smoke can occur This is normal Make sure that the airflow is sufficient After this oper...

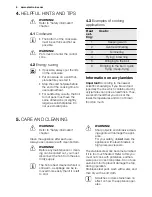
Page 6: ...ns starch acrylamides can pose a health risk Thus we recommend that you cook at the lowest temperatures and do not brown food too much 5 CARE AND CLEANING WARNING Refer to Safety information chapter Clean the appliance after each use Always use cookware with clean bottom WARNING Before any maintenance or clean ing can be carried out you must disconnect the hob from the elec tricity supply The hob ...

Page 7: ...he fuse box If the fuses blow time after time speak to an authorised electrician The effectiveness of the hob is not satisfactory Make sure that the hob is clean and dry Make sure that the cookware is the correct size for the cooking zone Make sure that the cookware has a flat bottom Make sure that the heat setting is correct for this type of cooking If there is a fault first try to find a solutio...

Page 8: ...cent to furni ture according to the regulations in force I E C 335 2 6 Make sure that there is a minimum dis tance of 55 mm between the rear cut out edge and the wall The minimum distance of 100 mm must be left between the side edges of the cut out and adjacent cabinets or walls The minimum distance in line between the edges of the hob and flammable ma terials above the hob is 400 mm If the distan...

Page 9: ...l correctly to give anti shock pro tection Loose and incorrect mains plug and socket connections can make the ter minal become too hot A qualified electrician must install the clamping connections correctly Use a strain relief clamp on cable Use the correct mains connection cable and replace the damaged mains cable with the proper cable type Speak to your local Service Centre The appliance must ha...

Page 10: ...op side of the clamp so the cable can go through it 3 Connect the green and yellow earth wire to the terminal in the plug which is marked with the number 5 or the letter E or the earth symbol or coloured green and yellow see Fig ure 1 4 Connect the blue neutral wire to the terminal in the plug which is marked with the number 4 or the letter N or coloured black see Figure 1 5 Connect the brown live...

Page 11: ...s must obey the indication and the kitchen unit must be equipped with vents to let a continu ous supply of air The electrical connec tion of the hob and the oven must be in stalled separately for safety reasons and to let easy remove oven from the unit 50 cm2 360 cm2 180 cm2 120 cm2 8 TECHNICAL INFORMATION Hob dimensions Width 580 mm Length 500 mm Hob recess dimensions Width 550 mm Length 470 mm H...

Page 12: ...s to recycle it Help protect the environment and human health and to recycle waste of electrical and electronic appliances Do not dispose appliances marked with the symbol with the household waste Return the product to your local recycling facility or contact your municipal office 12 www electrolux com ...

Page 13: ...ENGLISH 13 ...

Page 14: ...14 www electrolux com ...

Page 15: ...ENGLISH 15 ...

Page 16: ...www electrolux com shop 356993701 C 162012 ...

Reviews: