background image

ENGLISH        13

5.

 OPTIONS AND SETTINGS

5.1

 Option Table

1. Program with Dryness Level Option Selected

2. Program with Time Dry Option Selected

1. 

Select Dryness Level option, 

then

2. 

Select Dry Temp

1. 

Select Time Dry (mins.) option, 

then

2. 

Select Dry Temp

Program

Dryness Level

Dry Temp

Delay start

Boost

Low

Airing

Off
Cottons

Mixed

Delicates

Bedding

Vapour Refresh

Energy Saver

Hygienic Care

Denim

Wool

Shirts

Synthetics

Fast 40

1

2

1

2

Summary of Contents for EDS854J3WB

Page 1: ...EN Tumble Dryer EDS854J3WB EDS854N3SB User Manual 3 ...

Page 2: ...E 17 6 1 Start a program without delay start 17 6 2 Starting the program with delay start 17 6 3 Change a program 17 6 4 Interruption of a program 17 6 5 At the end of the program 18 6 6 Stand by function 18 7 DRYING HINTS 19 7 1 Preparing the laundry 19 7 2 Guide 20 8 CARE AND CLEANING 21 8 1 Cleaning the lint filter 21 8 2 Cleaning the drum 21 8 3 Cleaning the control panel 22 8 4 Cleaning The W...

Page 3: ... a product that brings with it decades of professional experience and innovation Ingenious and stylish it has been designed with you in mind So whenever you use it you can be safe in the knowledge that you ll get great results every time Welcome to Electrolux We recommend the use of original spare parts When contacting Service ensure that you have the following data available The information can b...

Page 4: ...xternal switching device such as timer or connected to a circuit that is regularly switched on and off by utility In the interest of your safety and to ensure the correct use before installing and first using the appliance read this user manual carefully including its hints and warnings To avoid unnecessary mistakes and accidents it is important to ensure that all people using the appliance are th...

Page 5: ...ge Only plug this appliance directly into an AC power supply which is properly earthed and has the correct voltage CAUTION Connect the mains plug to the mains socket only at the end of the installation process Make sure that the mains plug is accessible after installation See the serial number sticker located on the bottom of the door opening for voltage information For safety reasons we strongly ...

Page 6: ...ays take care when moving the appliance as it is heavy Always use safety gloves and enclosed footwear Do not install or use the appliance where the temperature can be lower than 5 C or higher than 35 C The floor area on which the appliance is to be installed must be flat stable heat resistant and clean Make sure that there is air circulation between the appliance and the floor Always keep the appl...

Page 7: ...gh to ignite Pilling stackingl or storing oil affected items can prevent heat from escaping and create a fire hazard If it is unavoidable that fabrics that contain vegetable or cooking oil or have been contaminated by hair care products be placed in a tumble dryer they should first be washed is hot water with extra detergent this will reduce but not eliminate the hazard The final part of tumble dr...

Page 8: ... Work top Lint filter Control panel Appliance door Front feet Drum lifter Nozzle Exhaust grille Air inlet duct Outlet cover Outlet cover Back feet 2 PRODUCT DESCRIPTION 1 1 5 2 6 8 4 3 7 9 10 11 12 2 4 7 8 11 9 10 5 6 12 3 ...

Page 9: ...ENGLISH 9 2 1 Accessories Wall Mounting Kit to invert the dryer on a wall upside down Dryer Venting Kit designed for dryers positioned directly against an outside wall ...

Page 10: ...o not wear gloves when you operate the control panel Make sure that the control panel is always clean and dry Extra Anticrease touch button Dryness Level touch button Child Lock option Delay Start touch button Display Time Dry touch button Start Pause touch button Dry Temp touch button 3 CONTROL PANEL 1 4 2 5 7 9 3 6 8 1 3 4 5 6 8 7 2 9 ...

Page 11: ...ng process will operate and switch off heater The Cooling indicator blink until finish cooling process This process will release heat from the clothes and crease protection Indicator anticrease phase The anticrease cycle is designed to help prevent creases forming in the clothes after program drying cycle has ended The anticrease progress indicator will start blinking with clean filter during the ...

Page 12: ...by clothes that made from cotton fabric to remove up to 99 of germs Denim 4 kg Leisure clothing such as jeans sweat shirts of different material thicknesses e g at the neck cuffs and seams Wool 1 kg Woollen fabrics Gentle drying for hand wash able woolens Remove items immediately when the program is completed Shirts 3 5 kg Easy care fabrics for which a minimum of ironing is necessary The drying re...

Page 13: ...Time Dry Option Selected 1 Select Dryness Level option then 2 Select Dry Temp 1 Select Time Dry mins option then 2 Select Dry Temp Program Dryness Level Dry Temp Delay start Boost Low Airing Off Cottons Mixed Delicates Bedding Vapour Refresh Energy Saver Hygienic Care Denim Wool Shirts Synthetics Fast 40 1 2 1 2 ...

Page 14: ...r for only one item 5 2 Dryness Level This function helps to increase dryness of the laundry There are 3 options Extra dry Cupboard dry Iron dry Dryness Option Guidelines Level of dryness Type of fabric Load Extra Dry Ideal for towels or similar Cotton and linen bathrobes bath towels etc up to Max 1 Cupboard Dry Suitable for items to put away without ironing Cotton and linen towels T shirts underw...

Page 15: ...lay you have selected is indicated on the display The end time will increase in order to show you the selected delay You must select this option after you have set the program and before you press the Start Pause button If you wish to add laundry in the machine during the delay time press Start Pause touchpad to put the machine in pause mode Add laundry close the door and press Start Pause touchpa...

Page 16: ...going to bed so that when the cycle finished it will not disturb you through the night Error warning beeps such as critical faults are not disabled To disable the buzzer sound press Dryness Level and Time Dry touchpads at the same time for 3 seconds the display will show bOF with the BEEP BEEP sound To return to default c onfiguration press these 2 touchpads at the same time for 3 seconds the disp...

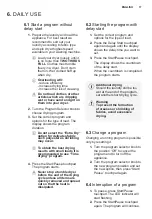
Page 17: ... program starts Never stop a tumble dryer before the end of the drying cycle unless all items are quickly removed and spread out so that the heat is dissipated 6 2 Starting the program with delay start 1 Set the correct program and options for the type of load 2 Press the Delay Start touchpad again and again until the display shows the delay time you want to set 3 Press the Start Pause touchpad Th...

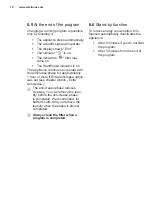
Page 18: ... approximately 1 hour or more if Extra Anticrease option was set see chapter Option Extra Anticrease The anti crease phase reduces creasing You can remove the laun dry before the anti crease phase is completed We recommend for better results that you remove the laundry when the phase is almost completed Always clean the filter when a program is completed 6 6 Stand by function To reduce energy cons...

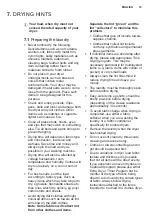
Page 19: ...sheets Avoid drying dark clothes with light coloured items such as towels as lint will show on the dark clothes Note Some fabrics will collect lint from other clothes and items Separate the lint givers and the lint collectors to minimise this problem Clothes that give int include towels nappies chenille Clothes that collect lint include corduroy synthetics and permanent press garments If individua...

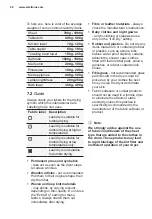
Page 20: ...ng on their quality Do not use the Extra Dry setting for these fabrics Always stretch them out immediately after drying Fibre or leather materials always check the manufacturer s instructions Baby clothes and night gowns acrylic clothing or sleepwear use only on the Iron Dry setting Rubber and plastics Do not dry any items made from or containing rubber or plastics such as aprons bibs babies water...

Page 21: ...r Number of usages with an unclean lint filter based on laboratory tests using a load of new towels tripled doubled normal 8 1 Cleaning the lint filter 8 2 Cleaning the drum WARNING Disconnect the appliance before you clean it Use a standard neutral soap detergent to clean the inner surface of the drum and drum lifters Dry the cleaned surfaces with a soft cloth CAUTION Do not use abrasive material...

Page 22: ...ter is very hard or contains traces of lime deposit the water inlet filter may become clogged It is therefore a good idea to clean it from time to time To clean the water inlet filters 1 Close the water tap 2 Remove the water inlet hose from the water tap 3 Clean the filter in the inlet hose with a stiff brush 4 Remove the inlet hose behind the appliance 5 Clean the filter in the valve with a stif...

Page 23: ...hat the filter is clean The laundry is too wet Spin the laundry in the washing machine again Ensure that the room temperature is higher than 5 C and lower than 35 C Optimal room temperature is 19 C to 24 C Set the Time Drying or the Extra Dry program It can happen that some area remains humid when drying big items e g bed sheets The display shows If you want to set a new program deactivate and act...

Page 24: ...ter in the inlet hose is blocked please clean the inlet hose filter Refer to relevant paragraph in Care And Cleaning section The Nozzle is clogged please contact the Service Centre Contact the Service Centre if you are still having problems Clothes are slightly damp after using Vapour Refresh cycle This is Normal Vapour Refresh uses moisture to reduce the wrinkle on fabrics It is recommended to ha...

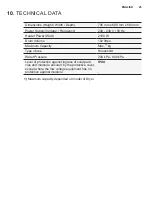
Page 25: ...er Watt 2100 W Drum Volume 102 litres Maximum Capacity Max 1 kg Type of use Household Water Pressure 200 kPa 800 kPa Level of protection against ingress of solid parti cles and moisture ensured by the protective cover except where the low voltage equipment has no protection against moisture IPX4 1 Maximum capacity depended on model of Dryer ...

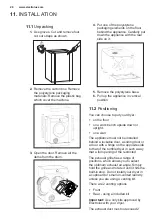
Page 26: ...n choose to put your dryer on the floor on a work bench upside down or upright on a wall The appliance must not be installed behind a lockable door a sliding door or a door with a hinge on the opposite side to that of the tumble dryer in such away that a full opening of the restricted The exhaust grille has a range of positions which allows you to select the optimum exhaust air angle Simply hold t...

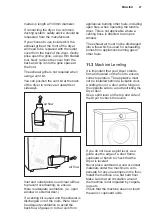
Page 27: ...rom appliances burning other fuels including open fires when operating the tumble dryer This is not applicable where a venting hose is directed to an open window The exhaust air must not be discharged into a flue which is used for exhausting fumes from appliances burning gas or other fuels 11 3 Machine Leveling It is important that your Dryer stands firm and leveled on the floor to ensure correct ...

Page 28: ... need to be replaced this shall be carried out by our Service Centre When the appliance is installed the power supply cable must be easily accessible 11 5 Water Connection Water tap must be installed within 110cm of your dryer s water inlet and the tap must be 3 4 inch BSP thread for laundry hose connection Water pressure must be between 200kpa to 800kpa Use the hose supplied with the dryer DO NOT...

Page 29: ...aste of electrical and electronic appli ances Do not dispose of appliances marked with the symbol with the household waste Return the product to your local recy cling facility or contact your municipal office 5 Connect the inlet hose for the washer and the dryer to the Y Connector and tighten them Water Tap To Washing Machine 6 Turn on the water tap and check for leaks at all connection ...

Page 30: ......

Page 31: ......

Page 32: ...www electrolux com ...

Reviews: