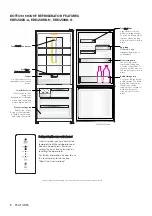
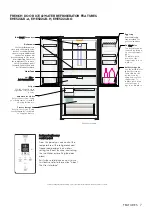
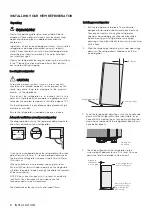
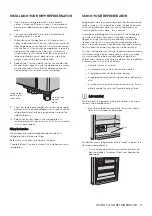
background image

WARNING

CAUTION

ARNING

Do not fill the 

w

ater tank with anything other th

a

n clean 

water (Filtered or Mineral water).
Soft drink, juice, tea or hot water etc, can damage  your 

automatic  icemaker.
The 

w

ater tank can withstand a maximum water 

temperature of 60°C

.

S & INFORM ATION

Remove


and


clean


ice


bin


and


water


tank


once


a


month, 

discarding unused ice and water. This will ensure fresh ice 

and smooth operatio n of your icemaker.
Make sure your refrigerator is level to avoid uneven ice 

cubes.

Tips and Useful Information

Fill the ice tube tray with potable water only.

LED lighting

Your appliance is fitted with long life LED lighting. In the 

unlikely event the LED lights should fail, then the LED lights 

should be serviced by the manufacturer.

Refer to the warranty page for contact details.

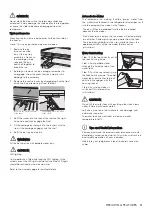
CAUTION

4.

Refit the runner into the rear of the shelf on the right 

hand side and then engage the front. 

5.

Fit the carriage by sliding it into the runners until the 

front if the carriage engages with the shelf. 

6.

Refit the ice tray and ice bin.

Insert into the slot at the rear 

of the shelf

Then engage into the front 

of the shelf

2.

Before you remove the ice carriage, remember to 

disengage it from the glass shelf as it may result in 

damage to the assembly. 

3.

Remove the centre runner by disengaging it at the front 

of the shelf, and removing it from the rear. 

CAUTION

1.

Remove the ice 

bin and ice cube 

tray. If the ice tray 

assembly is frozen to 

the carriage, simply 

squeeze the tray 

and shelf together to 

break the ice. 

Never close the door while the telescopic slides are 

extended. It may damage the slide and/or the refrigerator 

or cause the slide to become disengaged from the 

refrigerator.

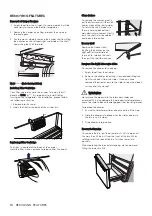
Twist and Serve Ice

Mounting the twist & serve dispenser to the other side of 

the freezer. 

Note :  

T

his is only possible on 

t

op mount models. 

Step 4. Ensure ice maker is 

switched ON (refer control 

instructions). 

Automatic Ice Maker 
The  automatic  ice  making  function  pumps  water  from 

the  water tank located in the refrigerator and dispenses it 

into the automatic ice maker in the freezer.

The ice will then be dropped into the ice bin located


beneath the ice maker

If the water tank is empty, the ice maker will automatically 

turn off after 3 attempts at pumping water from the tank.


The ice maker indicator on the user interface shows the 

operational status of the ice maker (Refer control 

instructions).

Water Tank Refilling
Step 1. Pull the tank directly out of

the tank housing frame.
Step 2. Pour potable water

through the lid at the top of the

water tank.
Step 3. Push the tank directly into

the tank housing frame. To avoid

water leaks ensure that the tank

nozzle fully engages with the

housing socket.

REMOVING FEATURES   

11

Summary of Contents for EBE4500B-A

Page 1: ...User Manual EN Refrigeration 2 ETB4600B A ETB4600B H ETB4600B G ETB5400B A ETB5400B H ETB5400B G ETE5720B A ETE5720B H ETE5720B G EBE4500B A EBE4500B H EBE4500B G EHE5224B A EHE5224B H EHE5224B G ...

Page 2: ... doubt do not use the refrigerator but contact your local customer care centre WARNING This symbol indicates information concerning your personal safety CAUTION This symbol indicates information on how to avoid damaging the refrigerator IMPORTANT This symbol indicates tips and information about use of the refrigerator ENVIRONMENT This symbol indicates tips and information about economical and ecol...

Page 3: ... contact your local authorities and ask for the correct method of disposal When you dispose of your old refrigerators and freezers remove any doors Children can suffocate if they get trapped inside The plug must be accessible when the appliance is in position Never try to repair the refrigerator yourself only use a qualified or authorized service person for repairs IMPORTANT SAFETY INSTRUCTIONS No...

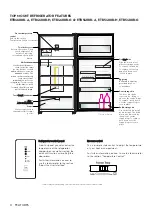
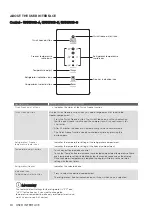
Page 4: ... of your freezer compartment For further information on how to use this feature refer to the section Temperature Control ETB5400 illustrated Refrigerator control panel From this panel you can control the temperature of the refrigerator compartment as well as setting the quick chill function or resetting the door alarm For further information on how to use this feature refer to the section About th...

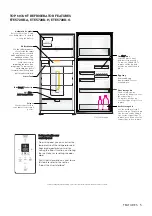
Page 5: ...own over the support lugs to lock in place Slide the bins to meet different storage needs To remove lift and tilt To replace tilt the top and push down until locked in place TOP MOUNT REFRIGERATOR FEATURES ETE5720B A ETE5720B H ETE5720B G Egg tray Removable egg tray provided for your convenience TasteGuard Deodoriser Automatic Ice Maker Refer to the section Using your Refrigerator for details on u...

Page 6: ...in Refer to the section Using your Refrigerator for details on removing and using this feature Crisper Use the crisper to store vegetables fruit or small goods Slide the bins to meet different storage needs To remove lift and tilt To replace tilt the top and push down until locked in place EBE4500 illustrated Removable egg tray provided for your convenience Bottle storage bin Use the bottle bin fo...

Page 7: ...this feature Crisper Use the crisper to store vegetables fruit or small goods Deli drawer Usethe chillerdrawerto store foods likesmallgoods fresh or cooked meat and cheese oras anadditional crisper The drawer will prevent strong food odours from impacting the rest of the refrigerator To remove the chiller drawer pull it forward then lift it up and pull it further forward WaterTank Bottle storage b...

Page 8: ... or by placing them in appropriate collection containers Important check for any damages or marks If you find the refrigerator is damaged or marked you must report it within 7 days should you wish to claim for damage marks under the manufacturers warranty This does not affect your statutory rights Clean your refrigerator thoroughly following the instructions in the Cleaning section and wipe off an...

Page 9: ... refrigerator as it affects efficient circulation If the door is opened frequently a light frosting will occasionally occur on the freezer s interior This is normal and will clear after a few days If the freezer door is accidentally kept open a heavy frost will coat the inside walls and should be removed Your new refrigerator uses a high speed compressor along with other energy efficient component...

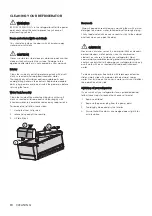
Page 10: ... is nothing behind that may obstruct movement Gently push the shelf into the cabinet and back into position Freezer shelf Remove the freezer shelf by lifting the catches on the right and left underside of the shelf to release the shelf then pull the shelf toward you Drawers fitted with telescopic slides To remove the drawer for cleaning 1 Empty food from the drawer 2 Remove the drawer by pulling i...

Page 11: ...emove the centre runner by disengaging it at the front of the shelf and removing it from the rear CAUTION 1 Remove the ice bin and ice cube tray If the ice tray assembly is frozen to the carriage simply squeeze the tray and shelf together to break the ice Never close the door while the telescopic slides are extended It may damage the slide and or the refrigerator or cause the slide to become disen...

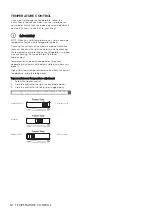
Page 12: ... place it High or low room temperature may also affect the actual temperature inside the refrigerator Top mount freezer temperature adjustment 1 Select the freezer control 2 Slide the control to the right as per image below 3 Slide the control to the left as per image below Set to less cold Summer 35 c Normal Winter 15 c Set to colder FREEZER TEMPERATURE SETTING RECOMMEDATION TEMPERATURE CONTROL I...

Page 13: ...ll function when you add a large amount of food to the refrigerator compartment Press and hold the Temp button for 3 seconds The Quick Chill icon will flash indicating that the Quick Chill is active Your refrigerator will run at 2 C for 90 minutes then automatically return to normal mode The Quick Chill function can be cancelled anytime by pressing the Temp button again IMPORTANT The factory defau...

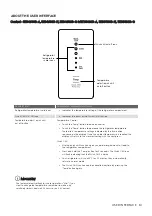
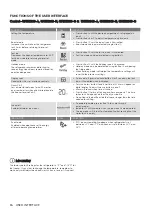
Page 14: ...elected compartment temperature There are 8 temperature settings indicated by the illumination sequence on the display Once the coldest temperature is reached the display will return to the warmest setting with the next press Indicates the selected zone Press to select the desired compartment The refrigerator freezer indication icon will show which zone is selected DESCRIPTION Quick Freeze on off ...

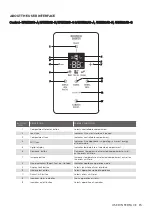
Page 15: ...mperature of selected compartment 6 Decrease button Decreases temperature of selected compartment as well as the drinks chill time 7 Increase button Increases temperature of selected compartment as well as the drinks chill time 8 Mode indicators Boost Fast Ice Holiday Indicates appliance operation mode 9 Display Lock button Selects lock state of user interface 10 Mode select button Selects operati...

Page 16: ...nd 30 minutes as a reminder for when drinks are placed in the freezer for quick chill To turn on press button 11 and initial time of 20 mins will appear on digital display To adjust time use buttons 6 and 7 Alarm will sound when time is finished Press button 11 to turn off during or after countdown The time taken to chill depends on the size of your bottle Do not leave the bottle inside the freeze...

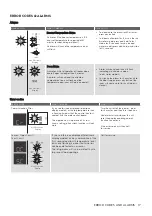
Page 17: ...vice ALARM ICON WHAT IT MEANS OPERATION Freezer Temperature Alarm Activates if the freezer temperature is 10 c over set temperature for a period of 50 minutes except during a defrost An alarm will sound the temperature icons will flash To deactivate the alarm for 50 minutes press any button To deactivate alarm for 12 hrs on the ice water model press and hold Select Mode for 10 seconds for non ice ...

Page 18: ...rotate lid up and off the rear clip 3 Lift lid off tank CLEANING YOUR REFRIGERATOR Door seals Always keep door seals clean by washing them with a mild detergent and warm water followed by a thorough drying Sticky food and drink can cause seals to stick to the cabinet and tear when you open the door ARNING CAUTION Never use hot water solvents commercial kitchen cleaners aerosol cleaners metal polis...

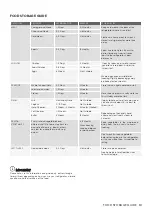
Page 19: ...ns 1 2 Days 2 Months DAIRY Milk Until Expiry Date Not Suitable If dairy takes on a smell or colour and you are unsure about it it is best to throw it out Depending on the variety hard cheese can last from 2 weeks to 2 months Yoghurt 7 10 Days Not Suitable Hard Cheeses 2 Weeks 2 Months 2 Months Grated Soft Cheeses 1 2 Weeks Not Suitable Butter 8 Weeks 12 Months FRUIT VEGETABLES Every fruit and vege...

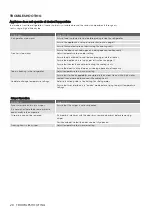
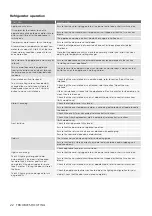
Page 20: ...cting the cooling vents Ensure the door is not held open or is being opened too frequently Food is freezing in the refrigerator Adjust temperature to a warmer setting Ensure that fruit and vegetables are stored in the crisper Items with a high water content should not be placed near the cooling vents Unable to change temperature settings Refer to function guide in Controlling Your Refirgerator Ens...

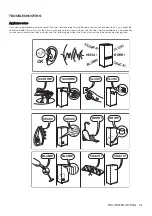
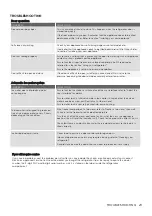
Page 21: ...refrigerator may make sounds that your old one didn t make Because the sounds are new to you you might be concerned about them Most of the new sounds are normal Hard surfaces like the floor walls and cabinets can make the sounds seem louder than they actually are The following describes the kinds of sounds and what may be making them TROUBLESHOOTING 21 ...

Page 22: ...on About the user interface Check that the user interface is not locked refer to section About the user interface If the user interface is frozen turn the appliance off for five minutes for the memory to clear then turn back on Check that the user interface is not in Sabbath Mode refer to control instructions I W models only Alarms Sounding Check that all doors are fully closed Ensure that the ove...

Page 23: ... there is no obstruction under the ice maker and ensure the ice bin is fitted correctly Cover food to ensure ice does not absorb foreign odours Interior of appliance or ice bin may require cleaning refer to Cleaning your refrigerator Discard stale ice monthly and allow ice maker to produce a fresh supply TROUBLESHOOTING Door operation CONCERN WHATTO DO Freezer door pops open This is normal and sho...

Page 24: ...onsumer Care Hotline 60 3 5525 0800 Fax 60 3 5524 2521 Philippines Domestic Toll Free 1 800 10 845 care 2273 Customer Care Hotline 63 2 845 care 2273 Electrolux Phils Inc 25th Floor Equitable Bank Tower 8751 Paseo De Roxas Makati City 1226 Philippines Office Tel 63 2 845 4510 Office Fax 63 2 845 4548 Email wecare electrolux com Singapore CONSUMER CARE HOTLINE 65 67273699 Electrolux SEA Pte Ltd 351...

Reviews: