Operating Instructions
27
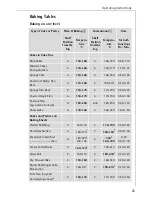
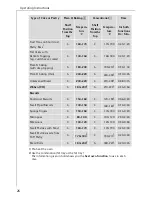
Baking at several shelf positions
Tips on Baking
Type of Cake or Pastry
Fan Cooking
U
Time
Hr.: Min.
Shelf Position from the Top
Tempera-
ture ºC
2 Levels
3 Levels
Cakes and Pastries on
Baking Sheets
Cream Puffs/Eclairs
2. and 5.
-
170-180
0:35-0:60
Dry Streusel Cake
2. and 5.
-
140-160
0:30-0:60
Pizza & baking
2. and 5.
-
170-190
0:40-0:70
Biscuits
Shortcrust Biscuits
2. and 5.
1. 3. and 5.
150-160
0:15-0:35
Small Piped Biscuits
2. and 5.
1. 3. and 5.
140-150
0:20-0:60
Sponge Fingers
2. and 5.
1. 3. and 5.
160-170
0:25-0:40
Meringues
2. and 5.
-
80-100
2:10-2:50
Macaroons
2. and 5.
1. 3. and 5.
100-120
0:40-1:20
Small Pastries with Yeast
2. and 5.
-
160-170
0:30-0:60
Small Pastries made from
Puff Pastry
2. and 5.
-
170-180
1
0:30-0:50
Bread Rolls
2. and 5.
-
180-190
1
0:30-0:55
Tip
This is how to tell if your cake
is cooked through
Push a wooden skewer into the highest point of the
cake. When no more cake mixture sticks to the wood,
you can switch off the oven and utilise the residual
heat.
The cake collapses (is sticky,
not properly cooked through,
water marks)
Check your recipe. Next time
use less liquid. Observe
mixing times, particularly when using kitchen appli-
ances.
The cake is too light
Next time select a dark cake tin or place the cake one
level lower.
Cake with moist topping/
cake is not cooked through,
is unevenly browned
Next time bake at a lower temperature and increase
the cooking time.
Summary of Contents for COMPETENCE E 6000
Page 47: ...Installation Instructions 47 Installation ...
Page 48: ...Installation Instructions 48 Unpacking the Appliance Important Information ...
Page 49: ...Installation Instructions 49 Combination only with ...
Page 50: ...Installation Instructions 50 Preparing the Kitchen Units ...
Page 51: ...Installation Instructions 51 Softline hob Cut out only as per template ...
Page 52: ...Installation Instructions 52 ...
Page 53: ...Installation Instructions 53 ...
Page 54: ...Installation Instructions 54 Fitting alternatively ...
Page 55: ...Installation Instructions 55 Special accessories E No 611 898 716 ...
Page 56: ...Installation Instructions 56 ...
Page 57: ...Installation Instructions 57 ...
Page 58: ...Installation Instructions 58 Electrical connection ...
Page 59: ...Installation Instructions 59 Fixing ...
Page 60: ...Installation Instructions 60 ...
Page 61: ...61 ...
Page 62: ...62 ...


