background image

12.1 Notes on cleaning

Cleaning

Agents

Clean the front of the oven with a soft cloth with warm water and a

mild cleaning agent.
To clean metal surfaces, use a dedicated cleaning agent.
Clean stubborn stains with a special oven cleaner.

Everyday

Use

Clean the oven cavity after each use. Fat accumulation or other food

remains may cause fire. The risk is higher for the grill pan.
Moisture can condense in the oven or on the door glass panels. To

decrease the condensation, operate the oven for 10 minutes before

cooking. Dry the cavity with a soft cloth after each use.

Accessories

Clean all accessories after each use and let them dry. Use a soft

cloth with warm water and a cleaning agent. Do not clean the acces‐

sories in a dishwasher.
Do not clean the non-stick accessories using aggressive agents,

sharp-edged objects or in a dishwasher

12.2 Stainless steel or

aluminium ovens

Clean the oven door with a damp cloth or

sponge only. Dry it with a soft cloth.
Do not use steel wool, acids or abrasive

materials as they can damage the oven

surface. Clean the oven control panel

with the same precautions.

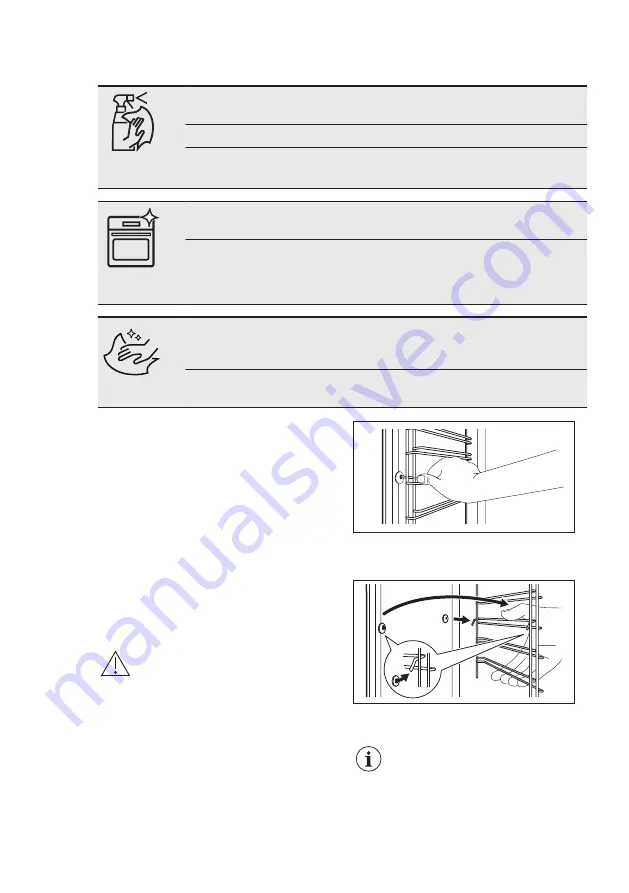
12.3 Removing the shelf

supports

To clean the oven, remove the shelf

supports.

CAUTION!

Be careful when you remove

the shelf supports.

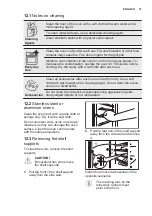
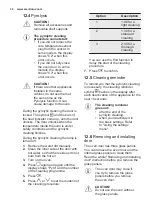
1. Pull the front of the shelf support

away from the side wall.

2. Pull the rear end of the shelf support

away from the side wall and remove

it.

2

1

Install the removed accessories in the

opposite sequence.

The retaining pins on the

telescopic runners must

point to the front.

ENGLISH

31

Summary of Contents for COE7P31X2

Page 1: ...Forquickaccessto manuals how to guides supportand more through ourphoto registrationvisit electrolux com register Get the most out of your appliance COE7P31X2 EOE7P31X EN Oven User Manual ...

Page 2: ...So whenever you use it you can be safe in the knowledge that you ll get great results every time Welcome to Electrolux Visit our website for Get usage advice brochures trouble shooter service information www electrolux com webselfservice Register your product for better service www registerelectrolux com Buy Accessories Consumables and Original spare parts for your appliance www electrolux com sho...

Page 3: ...e way and understand the hazards involved Children between 3 and 8 years of age and persons with very extensive and complex disabilities shall be kept away from the appliance unless continuously supervised Children of less than 3 years of age should be kept away from the appliance unless continuously supervised Do not let children play with the appliance Keep all packaging away from children and d...

Page 4: ...ust be replaced by the manufacturer its Authorised Service Centre or similarly qualified persons to avoid an electrical hazard Excessive spillage must be removed before the pyrolytic cleaning Remove all parts from the oven To remove the shelf supports first pull the front of the shelf support and then the rear end away from the side walls Install the shelf supports in the opposite sequence Use onl...

Page 5: ...lation devices line protecting cut outs fuses screw type fuses removed from the holder earth leakage trips and contactors The electrical installation must have an isolation device which lets you disconnect the appliance from the mains at all poles The isolation device must have a contact opening width of minimum 3 mm Fully close the appliance door before you connect the mains plug to the mains soc...

Page 6: ... to prevent the deterioration of the surface material Clean the appliance with a moist soft cloth Only use neutral detergents Do not use any abrasive products abrasive cleaning pads solvents or metal objects If you use an oven spray follow the safety instruction on it s packaging Do not clean the catalytic enamel if applicable with any kind of detergent 2 5 Pyrolytic cleaning WARNING Risk of Injur...

Page 7: ...eplacing the lamp disconnect the appliance from the power supply Only use lamps with the same specifications 2 7 Service To repair the appliance contact the Authorised Service Centre Use original spare parts only 2 8 Disposal WARNING Risk of injury or suffocation Disconnect the appliance from the mains supply Cut off the mains electrical cable close to the appliance and dispose of it Remove the do...

Page 8: ...et and examine the cavity temperature or the core temperature sensor temperature if present If you press it and hold for three seconds it turns the Fast heat up function ON and OFF 5 MY FAVOURITE PROGRAMME To store your favourite programme Use it to access your favourite programme directly al so when the oven is off 6 DISPLAY Shows the current settings of the oven 7 UP To move up in the menu 8 DOW...

Page 9: ... of the oven Temperature fast heat up The function works Temperature You can examine or change the tem perature Core temperature sensor The core temperature sensor is in the core temperature sensor socket Door lock The door lock function works Minute minder The minute minder function works 4 3 Heat up indicator If you turn on the heating function appears The bars show that the temperature in the o...

Page 10: ...nsive browning and a crispy bottom Conventional Cooking To bake and roast food on one shelf position Slow Cooking To prepare tender suc culent roasts Bottom Heat To bake cakes with crispy bottom and to preserve food Oven func tion Application Moist Fan Baking This function is de signed to save energy during cooking For the cooking instructions re fer to Hints and tips chapter Moist Fan Bak ing The...

Page 11: ...n is at the set temperature a signal sounds and the Heat up indicator disappears 6 4 Checking the temperature You can check the current temperature in the oven when the function or programme works 1 Press The display shows the temperature in the oven 2 Press or the display shows again the set temperature automatically after 5 seconds 6 5 Fast Heat Up Do not put food in the oven when the Fast heat ...

Page 12: ...and temperature 2 Press again and again until starts to flash 3 Press or to set the minutes for DURATION 4 Press or the DURATION starts automatically after 5 seconds 5 Press or to set the hours for DURATION 6 Press or the DURATION starts automatically after 5 seconds When the set time ends the signal sounds for 2 minutes The display shows flashing and time setting The oven turns off 7 Press a sens...

Page 13: ...ns First you set the seconds then the minutes and the hours 3 Press or to set the MINUTE MINDER and to confirm 4 Press or the MINUTE MINDER starts automatically after 5 seconds When the set time ends the signal sounds for 2 minutes and the display shows flashing 00 00 and 5 Press a sensor field to stop the signal 7 7 COUNT UP TIMER 1 To reset the Count Up Timer press and at the same time 2 When th...

Page 14: ...e default weight value with or Touch 6 When the set time ends an acoustic signal sounds for two minutes flashes 7 Touch a sensor field or open the oven door to stop the acoustic signal 8 Deactivate the appliance 8 4 Automatic programmes with the core temperature sensor selected models The core temperature of the food is default and fixed in programmes with the core temperature sensor The programme...

Page 15: ... the display but does not flash before you set the core temperature touch and or to set a new value 6 Set the oven function and the oven temperature The display shows the current core temperature and the heat up symbol While the appliance calculates the approximate duration time the display shows the count up time After the first calculation the display shows the approximate duration of the cookin...

Page 16: ...p pan between the guide bars of the shelf support and the wire shelf on the guide bars above Small indentation at the top increase safety The indentations are also anti tip devices The high rim around the shelf prevents cookware from slipping of the shelf 9 3 Telescopic Runners Keep the installation instructions for the telescopic runners for future use With telescopic runners you can put in and r...

Page 17: ...tal operation of the oven If the Pyrolysis function operates the door is locked A message comes on in the display when you press a sensor field 1 You can turn on this function when the oven is off Do not set a heating function 2 Press and hold for 3 seconds 3 Press and hold and at the same time for 2 seconds An acoustic signal sounds The display shows SAFE The door is locked To turn off the Child ...

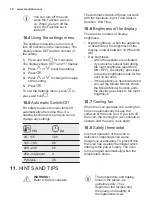
Page 18: ... is deactivated the brightness of the display is lower between 10 PM and 6 AM Day brightness when the appliance is activated if you touch a sensor field during the night brightness apart from ON OFF the display goes back to the day brightness mode for the next 10 seconds if the appliance is deactivated and you set the Minute Minder When the Minute Minder function ends the display goes back to the ...

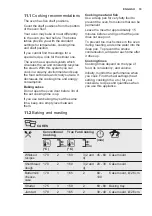
Page 19: ...tween them Cooking meat and fish Use a deep pan for very fatty food to prevent the oven from stains that can be permanent Leave the meat for approximately 15 minutes before carving so that the juice does not seep out To prevent too much smoke in the oven during roasting add some water into the deep pan To prevent the smoke condensation add water each time after it dries up Cooking times Cooking ti...

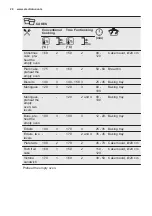
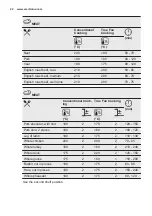
Page 20: ... 120 3 80 100 Baking tray Meringues preheat the empty oven two levels 120 2 and 4 80 100 Baking tray Buns pre heat the empty oven 190 3 190 3 12 20 Baking tray Eclairs 190 3 170 3 25 35 Baking tray Eclairs two levels 170 2 and 4 35 45 Baking tray Plate tarts 180 2 170 2 45 70 Cake mould Ø 20 cm Rich fruit cake 160 1 150 2 110 120 Cake mould Ø 24 cm Victoria sandwich 170 1 160 2 30 50 Cake mould Ø ...

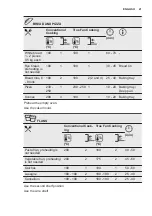
Page 21: ...30 250 1 230 250 1 10 20 Baking tray Deep pan Scones 200 3 190 3 10 20 Baking tray Preheat the empty oven Use the cake mould FLANS Conventional Cook ing True Fan Cooking min C C Pasta flan preheating is not needed 200 2 180 2 40 50 Vegetable flan preheating is not needed 200 2 175 2 45 60 Quiches 180 1 180 1 50 60 Lasagne 180 190 2 180 190 2 25 40 Cannelloni 180 190 2 180 190 2 25 40 Use the secon...

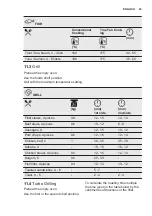
Page 22: ...onal Cook ing True Fan Cooking min C C Pork shoulder with rind 180 2 170 2 120 150 Pork shin 2 pieces 180 2 160 2 100 120 Leg of lamb 190 2 175 2 110 130 Whole chicken 220 2 200 2 70 85 Whole turkey 180 2 160 2 210 240 Whole duck 175 2 220 2 120 150 Whole goose 175 2 160 1 150 200 Rabbit cut in pieces 190 2 175 2 60 80 Hare cut in pieces 190 2 175 2 150 200 Whole pheasant 190 2 175 2 90 120 Use th...

Page 23: ...2 14 Beef steak 4 pieces 0 6 10 12 6 8 Sausages 8 12 15 10 12 Pork chops 4 pieces 0 6 12 16 12 14 Chicken half 2 1 30 35 25 30 Kebabs 4 10 15 10 12 Chicken breast 4 pieces 0 4 12 15 12 14 Burgers 6 0 6 20 30 Fish fillet 4 pieces 0 4 12 14 10 12 Toasted sandwiches 4 6 5 7 Toast 4 6 2 4 2 3 11 4 Turbo Grilling Preheat the empty oven Use the first or the second shelf position To calculate the roastin...

Page 24: ...uckle 1 5 2 kg 160 180 120 150 LAMB C min Lamb leg Roast lamb 1 1 5 kg 150 170 100 120 Lamb saddle 1 1 5 kg 160 180 40 60 POULTRY C min Poultry portions 0 2 0 25 kg each 200 220 30 50 Chicken half 0 4 0 5 kg each 190 210 35 50 Chicken pou lard 1 1 5 kg 190 210 50 70 Duck 1 5 2 kg 180 200 80 100 Goose 3 5 5 kg 160 180 120 180 Turkey 2 5 3 5 kg 160 180 120 150 Turkey 4 6 kg 140 160 150 240 FISH STEA...

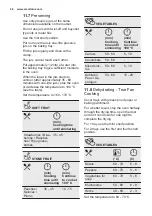
Page 25: ...90 C Set the temperature for Food Sensor 5 After 10 minutes the oven automatically lowers the temperature to 80 C Set the temperature to 120 C kg min Steaks 0 2 0 3 20 40 3 Fillet of beef 1 1 5 90 150 3 Roast beef 1 1 5 120 150 1 Roast veal 1 1 5 120 150 1 11 6 Defrost kg Defrosting time min Further defrost ing time min Chicken 1 100 140 20 30 Place chicken on an upturned saucer placed on a large ...

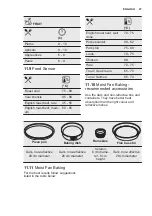
Page 26: ...until simmering Strawberries Blue berries Raspber ries Ripe goose berries 35 45 STONE FRUIT min Cooking time until simmering min Continue to cook at 100 C Peaches Quinces Plums 35 45 10 15 VEGETABLES min Cooking time until simmering min Continue to cook at 100 C Carrots 50 60 5 10 Cucumbers 50 60 Mixed pick les 50 60 5 10 Kohlrabi Peas As paragus 50 60 15 20 11 8 Dehydrating True Fan Cooking Cover...

Page 27: ...ea bream 65 70 Tuna Salmon 65 70 11 10 Moist Fan Baking recommended accessories Use the dark and non reflective tins and containers They have better heat absorption than the light colour and reflective dishes Pizza pan Baking dish Ramekins Flan base tin Dark non reflective 28 cm diameter Dark non reflective 26 cm diameter Ceramic 8 cm diame ter 5 cm height Dark non reflective 28 cm diameter 11 11 ...

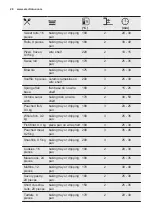
Page 28: ... baking tray or dripping pan 180 3 20 25 Whole fish 0 2 kg baking tray or dripping pan 180 3 25 35 Fish fillet 0 3 kg pizza pan on wire shelf 180 3 25 30 Poached meat 0 25 kg baking tray or dripping pan 200 3 35 45 Shashlik 0 5 kg baking tray or dripping pan 200 3 25 30 Cookies 16 pieces baking tray or dripping pan 180 2 20 30 Macaroons 24 pieces baking tray or dripping pan 180 2 25 35 Muffins 12 ...

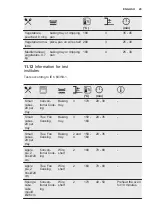
Page 29: ...C min Small cakes 20 per tray Conven tional Cook ing Baking tray 3 170 20 30 Small cakes 20 per tray True Fan Cooking Baking tray 3 150 160 20 35 Small cakes 20 per tray True Fan Cooking Baking tray 2 and 4 150 160 20 35 Apple pie 2 tins Ø20 cm Conven tional Cook ing Wire shelf 2 180 70 90 Apple pie 2 tins Ø20 cm True Fan Cooking Wire shelf 2 160 70 90 Sponge cake cake mould Ø26 cm Conven tional C...

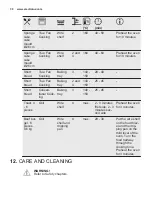
Page 30: ...d 4 140 150 25 45 Short bread Conven tional Cook ing Baking tray 3 140 150 25 45 Toast 4 6 pieces Grill Wire shelf 4 max 2 3 minutes first side 2 3 minutes sec ond side Preheat the oven for 3 minutes Beef bur ger 6 pieces 0 6 kg Grill Wire shelf and dripping pan 4 max 20 30 Put the wire shelf on the fourth lev el and the drip ping pan on the third level of the oven Turn the food halfway through th...

Page 31: ...arm water and a cleaning agent Do not clean the acces sories in a dishwasher Do not clean the non stick accessories using aggressive agents sharp edged objects or in a dishwasher 12 2 Stainless steel or aluminium ovens Clean the oven door with a damp cloth or sponge only Dry it with a soft cloth Do not use steel wool acids or abrasive materials as they can damage the oven surface Clean the oven co...

Page 32: ...ot air 3 Turn on the oven 4 Press again and again until the display shows Pyro and the number of the cleaning programme 5 Press 6 Press or to set the duration of the cleaning procedure Option Description 1 1 00 for a light cleaning 2 1 30 for a standard cleaning 3 2 30 for a thorough cleaning You can use the End function to delay the start of the cleaning procedure 7 Press to confirm 12 5 Cleaning...

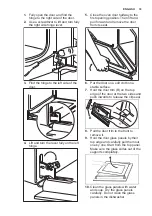
Page 33: ...e door from its seat 6 Put the door on a soft cloth on a stable surface 7 Hold the door trim B on the top edge of the door at the two sides and push inwards to release the clip seal 1 2 B 8 Pull the door trim to the front to remove it 9 Hold the door glass panels by their top edge and carefully pull them out one by one Start from the top panel Make sure the glass slides out of the supports complet...

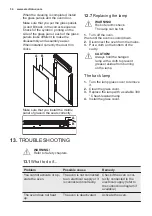
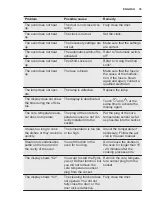
Page 34: ...onnect the oven from the mains 3 Put a cloth on the bottom of the cavity CAUTION Always hold the halogen lamp with a cloth to prevent grease residue from burning on the lamp The back lamp 1 Turn the lamp glass cover to remove it 2 Clean the glass cover 3 Replace the lamp with a suitable 300 C heat resistant lamp 4 Install the glass cover 13 TROUBLESHOOTING WARNING Refer to Safety chapters 13 1 Wha...

Page 35: ...time to activate the display again The core temperature sen sor does not operate The plug of the core tem perature sensor is not cor rectly installed into the socket Put the plug of the core temperature sensor as far as possible into the socket It takes too long to cook the dishes or they cook too quickly The temperature is too low or too high Adjust the temperature if necessary Follow the ad vice...

Page 36: ...ws the error code again con tact the Customer Care Department The appliance is activated and does not heat up The fan does not operate The display shows Demo The demo mode is activa ted Refer to Using the set tings menu in Additional functions chapter 13 2 Service data If you cannot find a solution to the problem yourself contact your dealer or an Authorised Service Centre The necessary data for t...

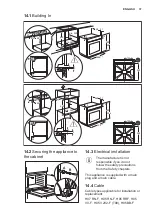
Page 37: ...14 2 Securing the appliance to the cabinet A B 14 3 Electrical installation The manufacturer is not responsible if you do not follow the safety precautions from the Safety chapters This appliance is supplied with a main plug and a main cable 14 4 Cable Cable types applicable for installation or replacement H07 RN F H05 RN F H05 RRF H05 VV F H05 V2V2 F T90 H05 BB F ENGLISH 37 ...

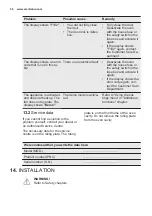
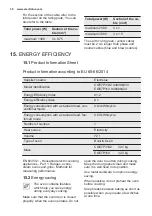
Page 38: ...ional mode 0 93 kWh cycle Energy consumption with a standard load fan forced mode 0 69 kWh cycle Number of cavities 1 Heat source Electricity Volume 72 l Type of oven Built In Oven Mass COE7P31X2 32 1 kg EOE7P31X 32 3 kg EN 60350 1 Household electric cooking appliances Part 1 Ranges ovens steam ovens and grills Methods for measuring performance 15 2 Energy saving The oven contains features which h...

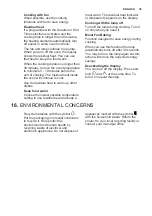
Page 39: ...sidual heat and keep a meal warm The residual heat indicator or temperature appears on the display Cooking with the lamp off Turn off the lamp during cooking Turn it on only when you need it Moist Fan Baking Function designed to save energy during cooking When you use this function the lamp automatically turns off after 30 seconds You may turn on the lamp again but this action will reduce the expe...

Page 40: ...www electrolux com shop 867355041 B 112019 ...

Reviews: