background image

E

8

Children  below  the  age  of  7  should  use  the 
microwave  oven  with  a  supervising  person  very 
near  to  them.  Between  the  ages  of  7  and  12,  the 
supervising person should be in the same room.
The child must be able to reach the oven comfort-
ably; if not, he/she should stand on a sturdy stool.
At no time should anyone be allowed to lean or swing 
on the oven door.

About children


and the microwave

About safety

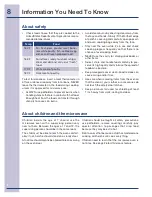
•  Check foods to see that they are cooked to the 

United States Department of Agriculture’s recom-
mended temperatures.

Temp

Food

160˚F 

For fresh pork, ground meat, bone-
less white poultry, fish, seafood, egg 
dishes and frozen prepared food.

165˚F 

For leftover, ready-to-reheat refriger-
ated, and deli and carry-out “fresh” 
food.

170˚F 

White meat of poultry.

180˚F 

Dark meat of poultry.

To test for doneness, insert a meat thermometer in 
a thick or dense area away from fat or bone. NEVER 
leave the thermometer in the food during cooking, 
unless it is approved for microwave use.
•  ALWAYS use potholders to prevent burns when 

handling utensils that are in contact with hot food. 
Enough heat from the food can transfer through 
utensils to cause skin burns.

•  Avoid steam burns by directing steam away from 

the face and hands. Slowly lift the farthest edge 
of a dish’s covering and carefully open popcorn 
and oven cooking bags away from the face.

•  Stay near the oven while it’s in use and check 

cooking progress frequently so that there is no 
chance of overcooking food.

•  NEVER use the cavity for storing cookbooks or 

other items.

•  Select, store and handle food carefully to pre-

serve its high quality and minimize the spread of 
foodborne bacteria.

•  Keep waveguide cover clean. Food residue can 

cause arcing and/or fires.

•   Use care when removing items from the oven so 

that the utensil, your clothes or accessories do 
not touch the safety door latches.

•   Keep  aluminum  foil  used  for  shielding  at  least 

1 inch away from walls, ceiling and door.

Information You Need To Know

Children  should  be  taught  all  safety  precautions: 
use  potholders,  remove  coverings  carefully,  pay 
special  attention  to  packages  that  crisp  food 
because they may be extra hot.
Don’t assume that because a child has mastered one 
cooking skill he/she can cook everything.
Children need to learn that the microwave oven is 
not a toy. See page 26 for Child Lock feature.

Summary of Contents for 316495005

Page 1: ...P N 316495005 TINSEB481MRR1 Use Care Guide Over the Range Microwave Oven Guía de Uso y Cuidado Horno microondas sobre la estufa Mode d emploi et d entretien Four à micro ondes au dessus de la cuisinière ...

Page 2: ...umber Electrolux serial number see picture for location Please read and save this guide Thank you for choosing Electrolux the new premium brand in home appliances This Use Care Guide is part of our commitment to customer satisfaction and product quality throughout the service life of your new appliance We view your purchase as the beginning of a relationship To ensure our ability to continue servi...

Page 3: ... 14 Time cooking 14 To set power level 14 Using the rack 14 Manual defrost 15 Sensor Settings 15 18 Popcorn 16 Reheat 16 Reheat chart 16 Cook 17 Cook chart 17 18 Meal Settings 19 22 Quick breakfast 19 Quick breakfast chart 19 20 Express lunch 20 Express lunch chart 20 Dinner recipes 21 22 Quick Settings 23 Quick settings chart 23 Other Special Features 24 25 Defrost 24 Defrost chart 24 25 Keep war...

Page 4: ...over edge of table or counter 15 See door surface cleaning instructions on page 29 16 To reduce the risk of fire in the oven cavity a Do not overcook food Carefully attend to appliance when paper plastic or other combustible materials are placed inside the oven to facilitate cooking b Remove wire twist ties from paper or plastic bags before placing bag in oven c If materials inside the oven ignite...

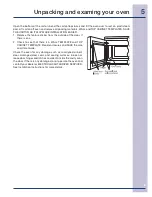
Page 5: ... if there is one 2 Check to see that there is a Wall TEMPLATE and Top CABINET Template Read enclosures and SAVE the Use and Care Guide Check the oven for any damage such as misaligned or bent door damaged door seals and sealing surfaces broken or loose door hinges and latches and dents inside the cavity or on the door If there is any damage do not operate the oven and contact your dealer or ELECTR...

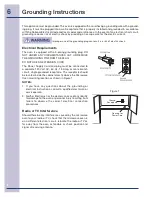
Page 6: ...OM THE PLUG DO NOT USE AN EXTENSION CORD The Power Supply Cord and plug must be connected to a separate 120 Volt AC 60 Hz 15 Amp or more branch circuit single grounded receptacle The receptacle should be located inside the cabinet directly above the Microwave Oven mounting location as shown in Figure 1 NOTES 1 If you have any questions about the grounding or electrical instructions consult a quali...

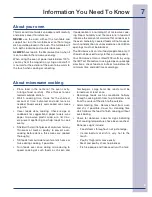
Page 7: ... to center of dish once or twice during cooking if possible Turn foods over once during microwaving to speed cooking of such foods as chicken and hamburgers Large items like roasts must be turned over at least once Rearrange foods such as meatballs halfway through cooking both from top to bottom and from the center of the dish to the outside Add standing time Remove food from oven and stir if poss...

Page 8: ...ith hot food Enough heat from the food can transfer through utensils to cause skin burns Avoid steam burns by directing steam away from the face and hands Slowly lift the farthest edge of a dish s covering and carefully open popcorn and oven cooking bags away from the face Stay near the oven while it s in use and check cooking progress frequently so that there is no chance of overcooking food NEVE...

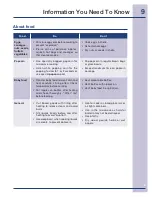
Page 9: ...corn package Baby food Transfer baby food to small dish and heat carefully stirring often Check temperature before serving Put nipples on bottles after heating and shake thoroughly Wrist test before feeding Heat disposable bottles Heat bottles with nipples on Heat baby food in original jars General Cut baked goods with filling after heating to release steam and avoid burns Stir liquids briskly bef...

Page 10: ...chase so that they meet your needs A microwave safe thermometer will assist you in determining cor rect doneness and assure you that foods have been cooked to safe temperatures Electrolux is not responsible for any damage to the oven when accessories are used It is not necessary to buy all new cookware Many pieces already in your kitchen can be used success fully in your new Over the Range Microwa...

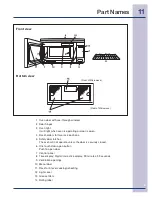
Page 11: ...The oven will not operate unless the door is securely closed 6 One touch door open button Push to open door 7 Control panel 8 Time display Digital interactive display 99 minutes 99 seconds 9 Ventilation openings 10 Menu label 11 Rack for 2 level cooking reheating 12 Light cover 13 Grease filters 14 Rating label Front of Microwave Rear of Microwave Front view Bottom view Part Names ...

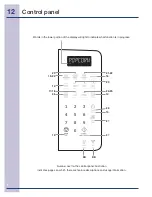
Page 12: ...n indicates pages on which there are feature descriptions and usage information 13 21 22 16 27 19 20 Words in the lower portion of the display will light to indicate what function is in progress 28 28 28 27 Control panel 20 16 23 25 17 18 24 25 14 13 ...

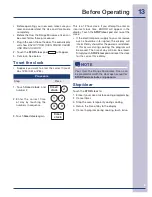
Page 13: ...is a 12 hour clock If you attempt to enter an incorrect clock time ERROR will appear in the display Touch the STOP clear pad and re set the clock If the electrical power supply to your microwave oven should be interrupted the display will intermittently show after the power is reinstated If this occurs during cooking the program will be erased The time of day will also be erased Simply touch STOP ...

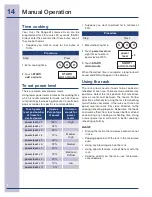
Page 14: ...ot in use Popping popcorn with the rack in the microwave oven Using any browning dish on the rack Using special features except Reheat with the rack Cooking directly on the rack use microwave safe cookware Manual Operation Time cooking Your Over the Range Microwave Oven can be programmed for 99 minutes 99 seconds 99 99 Always enter the seconds after the minutes even if they are both zeros Suppose ...

Page 15: ...nd the oven will turn off 8 Check food for temperature after cooking If additional time is needed continue to cook manually 9 Each food has a cooking hint Touch user pref pad when the HELP indicator is lighted in the display Covering Foods Some foods cook better when covered Use the cover recommended in the food charts 1 Casserole lid 2 Plastic wrap Use plastic wrap recommended for microwave cooki...

Page 16: ...with vented plastic wrap or wax paper Place on oven floor Touch reheat the number 2 and START add a minute At signal stir casserole and rotate dish Touch START add a minute At end stir and allow to stand covered for 5 to 10 minutes 3 No stir 13 x 9 x 2 glass utility casserole Ideal for reheating non stirrable casseroles such as lasagna Cover with vented plastic wrap or wax paper Place on oven floo...

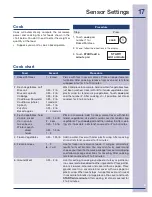
Page 17: ...tes 3 Fresh Vegetables hard Carrots sliced Corn on cob Green beans Winter squash diced halves 0 25 1 5 lb 2 4 pcs 0 25 1 5 lb 0 25 1 5 lb 1 2 Place in casserole Add 1 4 tbsp water Cover with lid for tender vegetables Use plastic wrap cover for tender crisp vegetables Touch cook pad and the number 3 After cook ing stir if possible Let stand covered for 2 to 5 minutes 4 Frozen Vegetables 0 25 1 25 l...

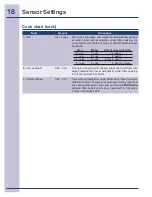
Page 18: ...uart 1 5 cups 3 cups 2 5 or 3 quart 2 cups 4 cups 3 quart or larger 8 Fish seafood 0 25 2 lb Arrange in ring around shallow glass dish roll fillet with edges underneath Cover with plastic wrap After cooking let stand covered 3 minutes 9 Chicken Breast 0 25 2 lb Cover with vented plastic wrap When oven stops turn over Shield with small flat pieces of aluminum foil any areas that are cooking too rap...

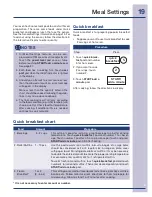
Page 19: ...l Procedure Step Press 1 Touch quick break fast pad and number 5 for hot cereal quick breakfast 5 2 If you want to cook 2 servings touch number 2 2 3 Touch START add a minute pad START add a minute After cooking follow the directions in display Quick breakfast chart Food Amount Procedure 1 Beverage 5 2 cups This setting is good for restoring a cool beverage to a better drinking temperature Touch q...

Page 20: ...er cooking stir and let stand covered for 2 minutes Express lunch Express lunch is for cooking heating foods that take a short amount of time Suppose you want to use Express lunch to heat 2 cups of soup Express lunch chart Food Amount Procedure 1 Chicken Nuggets 0 3 1 lb Place frozen chicken nuggets on a flat plate allowing space between each It is not necessary to cover them 2 Frozen Snacks 1 or ...

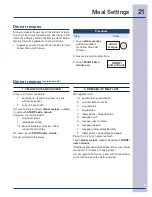
Page 21: ... Stir well and cover Touch dinner recipes number 1 and touch START add a minute At pause stir well and add 1 cup frozen peas 1 red pepper diced 11 4 pounds boneless chicken cutlets sliced into thin strips Re cover Touch START add a minute At end garnish with parsley 2 Dressed up Meat Loaf Mix together well 11 2 pounds lean ground beef 1 2 cup soft bread crumbs 1 2 cup red wine 1 egg beaten 2 table...

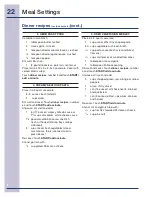
Page 22: ...awed shrimp bay scallops crabmeat 3 cups mixed fresh vegetables sliced mushrooms thinly julienned carrots green beans Re cover Touch START add a minute At end garnish with 1 3 cup grated Parmesan cheese 5 Orzo Vegetarian Medley Place in a 3 quart casserole 1 cup orzo or other tiny shaped pasta 31 2 cups vegetable or chicken broth 1 4 cup pesto sauce fresh or reconstituted from dry 1 2 cup small pi...

Page 23: ...or 3 oz After touching soften touch number 2 three times for 8 oz Melt 1 Butter 2 Chocolate 2 tbsp 1 2 cup 1 cup chips 1 square Use a Pyrex measuring cup Cover with plastic wrap After touching melt touch number 1 two times for 2 tbsp After touching melt touch number 1 three times for 1 2 cup After touching melt touch number 2 two times for 1 cup chips After touching melt touch number 2 three times...

Page 24: ...he 1st stage open the door Turn steak over and shield any warm portions Close the door Touch START add a minute pad START add a minute 5 After the 2nd stage open the door Shield any warm portions Close the door Touch START add a minute pad START add a minute After defrost cycle ends let stand covered NOTES 1 To defrost other food or foods above or below the weights allowed on the Defrost chart use...

Page 25: ...ch keep warm pad keep warm 4 Enter the desired time by touching the number pads 1 5 0 and 0 for 15 minutes 1 5 0 0 5 Touch START add a minute pad START add a minute The operation will start When the cooking time is complete a long tone will sound and Keep warm will start KEEP WARM will appear in the display every 10 seconds and count down for 15 minutes NOTE Keep warm cannot be programmed with Oth...

Page 26: ...1 Touch user pref pad user pref 2 Touch number 3 3 3 Enter the start time 4 3 0 4 Touch timer clock pad timer clock Convenient Features Procedure Step Press 5 Enter cooking time 2 0 0 0 6 Touch power level pad six times for 50 power power level x 6 7 Touch START add a minute pad START add a minute NOTES 1 Auto Start can be used for manual cooking if clock is set 2 If the oven door is opened after ...

Page 27: ...Settings Quick Settings or Defrost slightly more done touch the power level pad once after touching your choice of pads or before touching START add a minute pad The display will show MORE Should you discover that you like any of the Sensor Settings Meal Settings Quick Settings or Defrost slightly less done touch the power level pad twice after touching your choice of pads or before touching START...

Page 28: ...erations and specific special features can now be demonstrated with no power in the oven For example touch add a minute pad and the display will show and count down quickly to END To cancel touch timer clock the number 0 and STOP clear pads If easier unplug the oven from the electrical outlet and replug Light Press the light pad one time for high twice for low and three times to turn off Fan The f...

Page 29: ...For heavier soil use baking soda or a mild soap rinse thoroughly with hot water The rack can be cleaned with hot soapy water rinsed and dried Odor Removal Occasionally a cooking odor may remain in the oven To remove combine 1 cup water grated peel and juice of 1 lemon and several whole cloves in a 2 cup glass measuring cup Boil for several minutes using 100 power Allow to set in oven until cool Wi...

Page 30: ...engag ing both the bottom and top tabs and replace the screws removed in step 2 Louver Top tab Bottom tab Screw Screw Charcoal filter white side faces front Light bulbs 1 To replace light bulbs first disconnect power to the oven at the circuit breaker panel or by unplugging 2 To release cover remove the screw on the light cover See illustration 3 Replace light bulbs with equivalent watt bulb avail...

Page 31: ...left side of louver YES ____ NO ____ C Is the water in the oven warm YES ____ NO ____ Service Call Check If NO is the answer to any of the above ques tions please check electrical outlet fuse and or circuit breaker If they are functioning prop erly CONTACT YOUR NEAREST ELECTROLUX AUTHORIZED SERVICER A microwave oven should never be serviced by a do it yourself repair person NOTE If time appearing ...

Page 32: ...Cu Ft Weight Approx 54 5 lb The International Electrotechnical Commission s standardized method for measuring output wattage This test method is widely recognized In compliance with standards set by FCC Federal Communications Commission Authorized DHHS Complies with Department of Health and Human Services DHHS rule CFR Title 21 Chapter I Subchapter J This symbol on the nameplate means the product ...

Page 33: ...from the factory 5 Damages to finish after installation 6 Replacement of light bulbs and or fluorescent tubes on models with these features EXCLUSIONS This warranty does not cover the following 1 CONSEQUENTIAL OR INCIDENTAL DAMAGES SUCH AS PROPERTY DAMAGE AND INCIDENTAL EXPENSES RESULTING FROM ANY BREACH OF THIS WRITTEN OR ANY IMPLIED WARRANTY NOTE Some states do not allow the exclusion or limitat...

Reviews: