background image

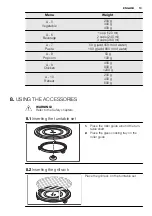
Menu

Weight

A - 5

Vegetable

200 g
300 g
400 g

A - 6

Beverage

1 cup (120 ml)

2 cups (240 ml)
3 cups (360 ml)

A - 7

Pasta

50 g (add 450 ml of water)

100 g (add 800 ml of water)

A - 8

Popcorn

50 g

100 g

A - 9

Chicken

400 g
800 g

1200 g

A - 10

Reheat

200 g
400 g
600 g

8. 

USING THE ACCESSORIES

WARNING!

Refer to the Safety chapters.

8.1 

Inserting the turntable set

1.

Place the roller guide around the turn-
table shaft.

2.

Place the glass cooking tray on the
roller guide

8.2 

Inserting the grill rack

Place the grill rack on the turntable set.

ENGLISH

13

Summary of Contents for MO325G

Page 1: ...MO325G EN MICROWAVE OVEN USER MANUAL 2 IT FORNO A MICROONDE ISTRUZIONI PER L USO 19 ...

Page 2: ...u use it you can be safe in the knowledge that you ll get great results every time Welcome to Electrolux Visit our website for Get usage advice brochures trouble shooter service information www electrolux com Register your product for better service www electrolux com productregistration Buy Accessories Consumables and Original spare parts for your appliance www electrolux com shop CUSTOMER CARE A...

Page 3: ...xperience and knowledge if they are supervised by an adult or a per son who is responsible for their safety Do not let children play with the appliance Keep all packaging away from children Keep children and pets away from the appliance when it operates or when it cools down Accessible parts are hot If the appliance has a child safety device we recom mend that you activate it Cleaning and user mai...

Page 4: ... out any service or repair operation that involves the removal of a cover which gives protection against exposure to microwave energy Do not heat liquids and other foods in sealed contain ers They are liable to explode Only use utensils that are suitable for use in microwave ovens When heating food in plastic or paper containers keep an eye on the appliance due to the possibility of igni tion The ...

Page 5: ...ven shall not be placed in a cabinet unless it has been tested in a Cabinet The rear surface of appliances shall be placed against a wall Pay attention to the minimum dimensions of the cabi net if applicable Refer to the installation chapter The appliance must be operated with the decorative door open if applicable Do not use harsh abrasive cleaners or sharp metal scrapers to clean the glass door ...

Page 6: ...e WARNING Risk of injury burns or electric shock or explosion Use this appliance in a household envi ronment Do not change the specification of this appliance Make sure that the ventilation openings are not blocked Do not let the appliance stay unatten ded during operation Do not apply pressure on the open door Do not use the appliance as a work surface and do not use the cavity for storage purpos...

Page 7: ... 4 BEFORE FIRST USE WARNING Refer to the Safety chapters 4 1 Initial Cleaning Remove all parts from the appliance Clean the appliance before first use Refer to chapter Care and Clean ing 4 2 Setting the time When you connect the appliance to the electrical supply or after a power cut the display shows 0 00 and an acoustic signal sounds You can set the time in 24 hour clock system If the clock is n...

Page 8: ...escription 1 Display Shows the settings and cur rent time 2 Defrosting button To defrost food by weight or time 3 Function button To choose the function 4 Setting knob To set the cooking time weight or to activate the auto cooking programmes 5 Stop Clear button To deactivate the appliance or delete the cooking set tings 8 www electrolux com ...

Page 9: ...c before you pre pare the food Cooking If possible cook food covered with ma terial suitable for use in the microwave Only cook food without a cover if you want to keep it crusty Do not overcook the dishes by setting the power and time too high The food can dry out burn or catch fire in some places Do not use the appliance to cook eggs or snails in their shells because they can explode With fried ...

Page 10: ...bles without de frosting them first Ready meals You can prepare ready meals in the ap pliance only if their packaging is suitable for microwave use You must follow the manufacturer s in structions printed on the packaging e g remove the metal cover and pierce the plastic film Suitable cookware and materials Cookware Material Microwave Grilling Defrost ing Heat ing Cook ing Ovenproof glass and porc...

Page 11: ... C 2 Microwaves 36 Grill 64 6 4 Quick Start Press to activate the appliance for 30 seconds at full function power The cooking time increases by 30 seconds with each additional press of the but ton The maximum cooking time is 95 minutes In standby mode turn the Setting knob counterclockwise to set the cooking time then press to start the appli ance at full microwave power 6 5 Defrosting You can cho...

Page 12: ...d start the ap pliance After each stage an acoustic signal sounds 6 7 Grilling or Combi Cooking 1 Press the Function button 2 Turn the Setting knob to set the de sired function 3 Press to confirm 4 Turn the Setting knob to input the time 5 Press to confirm and start the ap pliance 7 AUTOMATIC PROGRAMMES WARNING Refer to the Safety chapters 7 1 Auto Cooking You can use Auto Cooking function to easi...

Page 13: ... 8 Popcorn 50 g 100 g A 9 Chicken 400 g 800 g 1200 g A 10 Reheat 200 g 400 g 600 g 8 USING THE ACCESSORIES WARNING Refer to the Safety chapters 8 1 Inserting the turntable set 1 Place the roller guide around the turn table shaft 2 Place the glass cooking tray on the roller guide 8 2 Inserting the grill rack Place the grill rack on the turntable set ENGLISH 13 ...

Page 14: ...he microwave Problem Remedy You cannot find details for the amount of food prepared Look for a similar food Increase or shorten the length of the cooking times according to the following rule Double the amount al most double the time Half the amount half the time The food got too dry Set shorter cooking time or select lower mi crowave power The food is not defrosted hot or cooked after the time ca...

Page 15: ...he Safety chapters Notes on cleaning Clean the front of the appliance with a soft cloth with warm water and a clean ing agent To clean metal surfaces use a usual cleaning agent Clean the appliance interior after each use Then you can remove dirt more easily and it does not burn on Clean stubborn dirt with a special cleaner Clean all accessories regularly and let them dry Use a soft cloth with warm...

Page 16: ...a for the customer service center is on the rating plate on the appliance We recommend that you write the data here Model MOD Product number PNC Serial number S N 13 INSTALLATION CAUTION Do not block the air vents If you do that the appliance can over heat CAUTION Do not connect the appliance to adapters or extension leads This can cause overloading and risk of fire The appliance is for built in u...

Page 17: ...late on the bottom of cabinet and mark the spots for screws Remove the template and fix the bracket with the screws 3 Install the appliance Make sure the bracket locks the back of the appli ance D B A C 4 Open the door and fix the appliance to the cabinet with a screw ENGLISH 17 ...

Page 18: ...rs to recycle it Help protect the environment and human health and to recycle waste of electrical and electronic appliances Do not dispose appliances marked with the symbol with the household waste Return the product to your local recycling facility or contact your municipal office 18 www electrolux com ...

Page 19: ...re sempre i migliori risultati Benvenuti in Electrolux Visitate il nostro sito web per ricevere consigli scaricare i nostri opuscoli eliminare eventuali anomalie ottenere informazioni sull assistenza www electrolux com registrare il vostro prodotto e ricevere un servizio migliore www electrolux com productregistration acquistare accessori materiali di consumo e ricambi originali per la vostra appa...

Page 20: ...chiatura se sorvegliati o se sono stati istruiti relativamente all uso dell appa recchiatura e hanno capito i rischi coinvolti Non consentire ai bambini di giocare con l apparec chiatura Tenere i materiali di imballaggio al di fuori della portata dei bambini Tenere i bambini e gli animali domestici lontano dall ap parecchiatura durante il funzionamento o raffredda mento Le parti accessibili sono i...

Page 21: ...ersona competente Le apparecchiature non prevedono l utilizzo mediante un timer esterno o un telecomando Qualsiasi intervento di servizio o riparazione che preve da lo smontaggio di un coperchio previsto per proteg gere dall esposizione all energia a microonde va ese guito esclusivamente da una persona competente Non si devono riscaldare liquidi o altri alimenti in conte nitori sigillati perché po...

Page 22: ...ndo l apparecchiatura in condizioni pulite si può provocare il deterioramento della superficie pre giudicare la durata dell apparecchiatura e si possono creare delle situazioni di pericolo La temperatura delle superfici accessibili può essere elevata quando l apparecchiatura è in funzione Il forno a microonde non deve essere inserito in un mo bile se non è studiato per il montaggio ad incasso La s...

Page 23: ...i dell impianto In caso contrario contat tare un elettricista Se l apparecchiatura è collegata alla presa mediante una prolunga assicu rarsi che il cavo sia collegato a terra Accertarsi di non danneggiare la spina e il cavo Contattare il Centro di Assi stenza o un elettricista qualificato per sostituire un cavo danneggiato Non tirare il cavo di alimentazione per scollegare l apparecchiatura Tirare...

Page 24: ...NZA Rischio di lesioni o soffocamento Staccare la spina dall alimentazione elettrica Tagliare il cavo di alimentazione e smal tirlo adeguatamente 3 DESCRIZIONE DEL PRODOTTO 1 2 8 6 7 3 4 5 1 Lampadina 2 Blocco di sicurezza 3 Display 4 Pannello dei comandi 5 Apertura porta 6 Copertura guida d onda 7 Grill 8 Albero del piatto girevole 3 1 Accessori Kit piatto girevole Vassoio di cottura in vetro e g...

Page 25: ...ando si collega l apparecchia tura alla corrente elettrica o dopo un interruzione di corrente il di splay mostra 0 00 e viene messo un segnale acustico È possibile impostare l ora con il sistema 24 ore Se l orologio non è impostato non funziona se l apparecchiatura non viene utilizzata 1 Premere 2 Ruotare la manopola delle Imposta zioni per regolare le ore 3 Premere per confermare 4 Ruotare la man...

Page 26: ... in base al peso o al tempo 3 Tasto funzione Per scegliere la funzione 4 Manopola delle im postazioni Per impostare il tempo di cot tura il peso o per attivare i programmi di cottura automa tica 5 Tasto stop annulla Per disattivare l apparecchia tura o annullare le impostazio ni di cottura 6 Tasto orologio timer cucina Per impostare l ora 26 www electrolux com ...

Page 27: ...iere il foglio di alluminio di imballag gio i contenitori di metallo ecc prima di preparare il cibo Cottura Se possibile cuocere gli alimenti coper ti con del materiale adatto all uso nel microonde Cuocere senza coperchio solo se lo si vuole rosolato Non cuocere eccessivamente i piatti impostando la potenza e il tempo su valori troppo alti Il cibo potrebbe sec carsi scoppiare o rapprendersi in alc...

Page 28: ... biente Si può usare una potenza più elevata per le microonde per cuocere frutta e verdura senza doverle prima scongela re Pietanze pronte È possibile preparare pietanze pronte all interno dell apparecchiatura solo se la confezione è adatta al microonde È necessario seguire le istruzioni del produttore stampate sulla confezione ad es togliere la copertura di metallo e forare la pellicola di plasti...

Page 29: ...olte P 30 30 5 volte P 10 10 Ulteriori funzioni Premere il tasto Fun zione Impostazione di poten za Modalità funzione 6 volte G Doppio Grill Cottura combinata 7 volte C 1 Microonde 55 Grill 45 8 volte C 2 Microonde 36 Grill 64 6 4 Avvio rapido Premere per attivare l apparecchia tura per 30 secondi alla massima po tenza Il tempo di cottura aumenta di 30 secondi ad ogni singola pressione del tasto I...

Page 30: ...tempo o il peso per lo scongelamento 3 Premere per confermare 4 Ruotare la manopola delle Impostazio ni per selezionare il livello di potenza desiderato 5 Premere per confermare 6 Ruotare la manopola delle Impostazio ni per inserire il tempo 7 Premere per confermare e attivare l apparecchiatura Dopo ogni passaggio viene emesso un segnale acustico 6 7 Grill o Cottura combinata 1 Premere il tasto Fu...

Page 31: ...0 g aggiungere 800 ml d acqua A 8 Popcorn 50 g 100 g A 9 Pollo 400 g 800 g 1 200 g A 10 Riscaldamento 200 g 400 g 600 g 8 UTILIZZO DEGLI ACCESSORI AVVERTENZA Fare riferimento ai capitoli sulla si curezza 8 1 Introduzione del kit per il piatto girevole 1 Posizionare la guida a rulli attorno al l albero del piatto girevole 2 Sistemare il vassoio di cottura in vetro sulla guida a rulli ITALIANO 31 ...

Page 32: ... Timer cucina 1 Premere due volte 2 Ruotare la manopola delle Imposta zioni per inserire il tempo 3 Premere per confermare È possibile impostare al massimo 95 mi nuti Una volta trascorso il tempo im postato viene emesso un segnale acustico Il timer rimane è ancora in funzio ne quando si apre la porta o si mette in pausa l apparecchiatura Premere per annullare 10 CONSIGLI E SUGGERIMENTI UTILI 10 1 ...

Page 33: ...dure con un coperchio sul contenitore 10 4 Grill Cuocere al grill i cibi sottili mettendoli al centro della griglia Girare la pietanza a metà del tempo impo stato e continuare a grigliare 10 5 Cottura combinata Utilizzare la cottura combinata per mante nere la croccantezza di alcuni alimenti A metà del tempo di cottura girare la pie tanza e poi continuare Esistono 2 modalità per la cottura combi n...

Page 34: ... piatti di metallo o con bordi metallici Togliere il piatto dall appa recchiatura Sono presenti delle scintille nella cavità Sono presenti degli spiedi in metallo o un foglio di allumi nio che toccano le pareti in terne Assicurarsi che gli spiedi e il foglio di alluminio non toc chino le pareti interne Il kit per il piatto gi revole provoca dei graffi o rumore di abrasione È presente un oggetto o ...

Page 35: ... 1 Installazione dell impianto elettrico AVVERTENZA L installazione dell apparecchiatu ra deve essere eseguita da perso nale qualificato Il produttore non è responsabile qualora non vengano applicate le precauzioni del capitolo Informa zioni per la sicurezza La dotazione standard dell apparecchiatu ra al momento della fornitura prevede un cavo di rete e una spina ATTENZIONE Altezza minima di insta...

Page 36: ...positi contenitori per il riciclaggio Aiutare a proteggere l ambiente e la salute umana e a riciclare rifiuti derivanti da apparecchiature elettriche ed elettroniche Non smaltire le apparecchiature che riportano il simbolo insieme ai normali rifiuti domestici Portare il prodotto al punto di riciclaggio più vicino o contattare il comune di residenza 36 www electrolux com ...

Page 37: ...ITALIANO 37 ...

Page 38: ...38 www electrolux com ...

Page 39: ...ITALIANO 39 ...

Page 40: ...www electrolux com shop 892961090 B 292013 ...

Reviews: