background image

- 13 -

RADIO
Antenna

For FM reception, the unit is equipped with an FM WIRE ANTENNA, move the wire until the reception is 
clear and with no interferences.

FM Tuning

1.  Press the FUNCTION /    button to set the unit to FM mode.

2.  Auto Tuning

 – Press and hold FF /   or FR /   until frequency begins to scroll through the 

stations and automatically tunes to a station with sufficient reception. If a station is received in stereo, 
(ST) is shown. Repeat step 3 if necessary until you find the desired station.

3.  Manual Tuning

 – Press FF /   or FR /   briefly and repeatedly until a station is located.

Programming radio stations

You can store up to a total of 20 radio stations (FM) in the memory; manually or 
automatically (Autostore).
1.  Tune to your desired station
2.  Press PROGRAM /   to activate programming, 

MEMORY

 and 

P01

 will start to flash on the screen.

3.  Press /   or PRESET – /   to allocate a number from    

1 to 20 stations.

4.  Press PROGRAM /   to confirm, display shows the preset number waveband 

and the frequency of the preset station.

5.  Repeat steps 1-4 to store other stations to listen to a preset station. Press /   or  

PRESET – /   once or more until the desired preset station in displayed. To listen to a preset station 
Press /   or PRESET – /   once or more until the desired preset station in displayed. 

Automatic programming radio stations


Automatic programming will station preset 1, from this preset number upwards, former programmed 
tuner stations will be erased. Press and hold the PROGRAM /   button until AUTO appears

.

•  MEMORY

 will start flashing on the screen

• 

Available stations are programmed

• 

After all of the stations are programmed, the last preset station will play.

OPERATION

Summary of Contents for Kinsman EAJUK500

Page 1: ...roduct Please read this instruction manual carefully before using product to ensure proper use Keep this manual in a safe place for future reference www electrohome com Instruction Manual PLEASE RETAIN ORIGINAL PACKAGING FOR WARRANTY PURPOSES EAJUK500 ...

Page 2: ...hisapparatusduringlightningstormsorwhenunusedforlongperiodsoftime 13 Referallservicingtoqualifiedservicepersonnel Servicingisrequiredwhentheapparatushasbeendamagedinany way suchaspower supplycordorplugisdamaged liquidhasbeenspilledorobjectshavefallenintotheapparatus theapparatushasbeenexposedtorainormoisture doesnotoperatenormally orhasbeendropped 14 Thisapplianceshallnotbeexposedtodrippingorsplas...

Page 3: ...elp ThisdevicecomplieswithPart15oftheFCCRules Operationissubjecttothefollowingtwoconditions 1 Thisdevicemaynotcauseharmfulinterference and 2 Thisdevicemustacceptanyinterferencereceived includinginterferencethatmaycauseundesiredoperation IMPORTANT Sincedigitalcircuitrymaycauseinterferencetootherradioortelevisiontunersnearby switchthisunitoffwhennotinuse ormoveitawayfromtheaffectedradio televisiontu...

Page 4: ...e 12 EQ 12 Radio Operation 13 Using Earphones 14 Charging your USB device 14 Using External Speakers 14 USB SD Card Operation 14 CD Player 15 Recording 17 Care and Maintenance 18 Specifications 18 ElectrohomeWarranty 19 Notes 20 WHAT S INCLUDED RCA Auxiliary Cable 3 5mm Auxiliary Cable Lighting System Remote Control Jukebox Remote Control External Power Adapter Instruction Manual 1YearWarranty Lif...

Page 5: ...2 VOLUME TOUCH PLATE 3 FRONT PANEL 4 MAGNETIC PANEL LEFT 5 USB CHARGING PORT 6 AUX INPUT 7 MAGNETIC PANEL RIGHT 8 EARPHONE INPUT 9 SPEAKER 6 7 8 9 1 2 The USB CHARGING PORT is ONLY to CHARGE your USB device not for playback BUTTONS AND CONNECTIONS ...

Page 6: ...SOR 7 VOLUME CONTROL KNOB 8 LCD DISPLAY 9 REC ERASE 10 FUNCTION 11 USB INPUT 12 POWER BUTTON 13 PROGRAM 14 UP F F 15 TIMER 16 DOWN F R 17 CD DRAWER 18 REPEAT ST 19 CD OPEN CLOSE 20 PLAY PAUSE 21 STOP 1 2 3 4 5 6 7 8 15 16 17 18 19 20 21 9 10 13 14 11 12 The USB INPUT is ONLY to PLAYBACK AND RECORD using your USB device ...

Page 7: ...PEN CLOSE 13 MUTE 14 SLEEP 15 VOLUME 16 FUNCTION 17 VOLUME 18 UP FAST FORWARD 19 PROGRAM 20 REPEAT 21 TIMER 22 MONO STEREO The remote controls can be stored on one of the front magnetic panels of the cabinet as indicated on page 5 provided that a metal battery has been fitted 1 2 3 4 5 6 7 8 9 10 11 12 13 14 15 16 17 18 19 20 21 22 BUTTONS AND CONNECTIONS ...

Page 8: ... on one of the front magnetic panels of the cabinet as indicated on page 5 provided that a metal battery has been fitted 1 2 3 4 5 6 7 8 9 10 11 12 13 14 15 16 17 18 19 20 21 22 23 24 25 26 27 28 Using the DIY function To create your own custom colour press the DIY Key Then press and hold the selected colour and keys to adjust the colour ratio of Red Green and Blue Once the colour adjustment is co...

Page 9: ...D R D L G L G DC 15V CC 15V EXT SPEAKER HAUT PARL EXT 4Ω SPEAKER HAUT PARL INT EXT L G ON MARCHE OFF ARRÊT 1 2 3 4 5 6 7 1 EXTERNAL FM ANTENNA 2 AUX IN INPUT 3 BATTERY BACKUP 4 MAIN POWER 5 DC POWER INPUT 6 SPEAKER INT EXT SWITCH 7 EXTERNAL SPEAKER OUTPUT BUTTONS AND CONNECTIONS ...

Page 10: ...IES ARE INSTALLED Toinstallbatteries followtheinstructionsbelow 1 Removethe BATTERY COMPARTMENT COVER fromtheback oftheunit 2 InserttwonewAAAbatteries Followthediagraminsidethe batterycovertoensurethatthebatteriesareproperlyinserted withcorrectpolarityasshowninsidethebatterycover 3 Reinstallthe BATTERY COMPARTMENT COVER WARNING Alkaline batteries are recommended Place batteries based on the polari...

Page 11: ...Press PROGRAM again to confirm The MINUTE digits will start flashing 6 Press the FF or FR button repeatedly to set the minutes to the desired time 7 Press PROGRAM again to confirm The time will stop flashing and the clock is set SETTING THE TIMER The unit can be used as an alarm clock whereby the selected source CD TUNER USB SD CARD OR PHONO will start playing at a preset time PLEASE BE SURE TO SE...

Page 12: ...returns to its previous status To deactivate the sleep timer press SLEEP again to 00 or Press POWER to switch the unit into STANDBY MODE VOLUME CONTROL To adjust theVOLUME you can press theVOLUME UP VOLUME DOWN button on the remote control turn theVOLUME CONTROL KNOB on the front panel or press lightly on theTOUCH SENSITIVE PLATES behind the chrome embellishments on the top of the jukebox see diag...

Page 13: ...ation 2 Press PROGRAM to activate programming MEMORY and P01 will start to flash on the screen 3 Press PRESET or PRESET to allocate a number from 1 to 20 stations 4 Press PROGRAM to confirm display shows the preset number waveband and the frequency of the preset station 5 Repeat steps 1 4 to store other stations to listen to a preset station Press PRESET or PRESET once or more until the desired pr...

Page 14: ... off the internal speakers in the radio and redirects the power to the external speakers If you decide not to use the external speakers be sure the switch is set to INT USB SD CARD OPERATION USB operation 1 Press the FUNCTION button to set the unit to USB mode 2 Plug in the USB storage device in the USB INPUT on the Control Panel READ is displayed as the system scans the contents of USB device 3 T...

Page 15: ...rectly Not all USB memory devices and SD cards will be compatible with this audio system USB Specification USB 2 0 Full speed HOST USB HUB is not supported Corresponding Flash memory Compatible with MPEG Audio 1 2 2 5 Compatible with Layer 1 2 3 Compatible with Bit rate 128 320 Kbps Subfolder nest 8 levels Number of track titles max 999 Support ID3 tagV2 0 CD PLAYER Playing a CD 1 Press the FUNCTI...

Page 16: ...ber appears in the display 5 Press and hold FF or FR to move within the track currently playing 6 Press PRESET or PRESET to select the desired album 7 Press STOP to stop playback PROGRAMMINGTRACKS You may store up to 20 tracks in the desired sequence 1 When the CD player is stopped press PROGRAM to start programming MEMORY and P0 01 start flashing on the screen 2 Press FF or FR once or repeatedly ...

Page 17: ... Message COPY 01 will be displayed the proportional copied percentage will be shown on the decimal number 4 The target device USB or CARD will start to flash on the screen the decimal number will be in increments from 01 as MP3 copying starts the process will stop as it reaches 100 5 Current MP3 will be playback from beginning From AUX to SD USB The system is capable of converting an audio signal ...

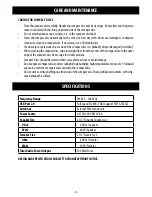
Page 18: ...ctdisctotheouter edge of the compact disc Never wipe in circular motions Compact Discs should be stored in their cases after each use to avoid damage Donotexposecompactdiscstodirectsunlight highhumidity hightemperaturesordust etc Prolonged exposure or extreme temperatures can warp the compact disc Donotstickorwriteanythingoneithersideofthecompactdisc Sharpwritinginstruments ortheink may damage the...

Page 19: ...id spillage G Any product received without appropriate model serial number and CSA cUL cULus cETL cETLus markings H Any products used for rental or commercial purposes I Any installation setup and or programming charges Should this ELECTROHOME product fail to operate during the warranty period warranty service may be obtained upon delivery of the ELECTROHOME product together with proof of purchase...

Page 20: ...NOTES 20 ...

Reviews: