background image

This document is a property of ElectroFlip LLC No unauthorized reproduction is allowed.


6


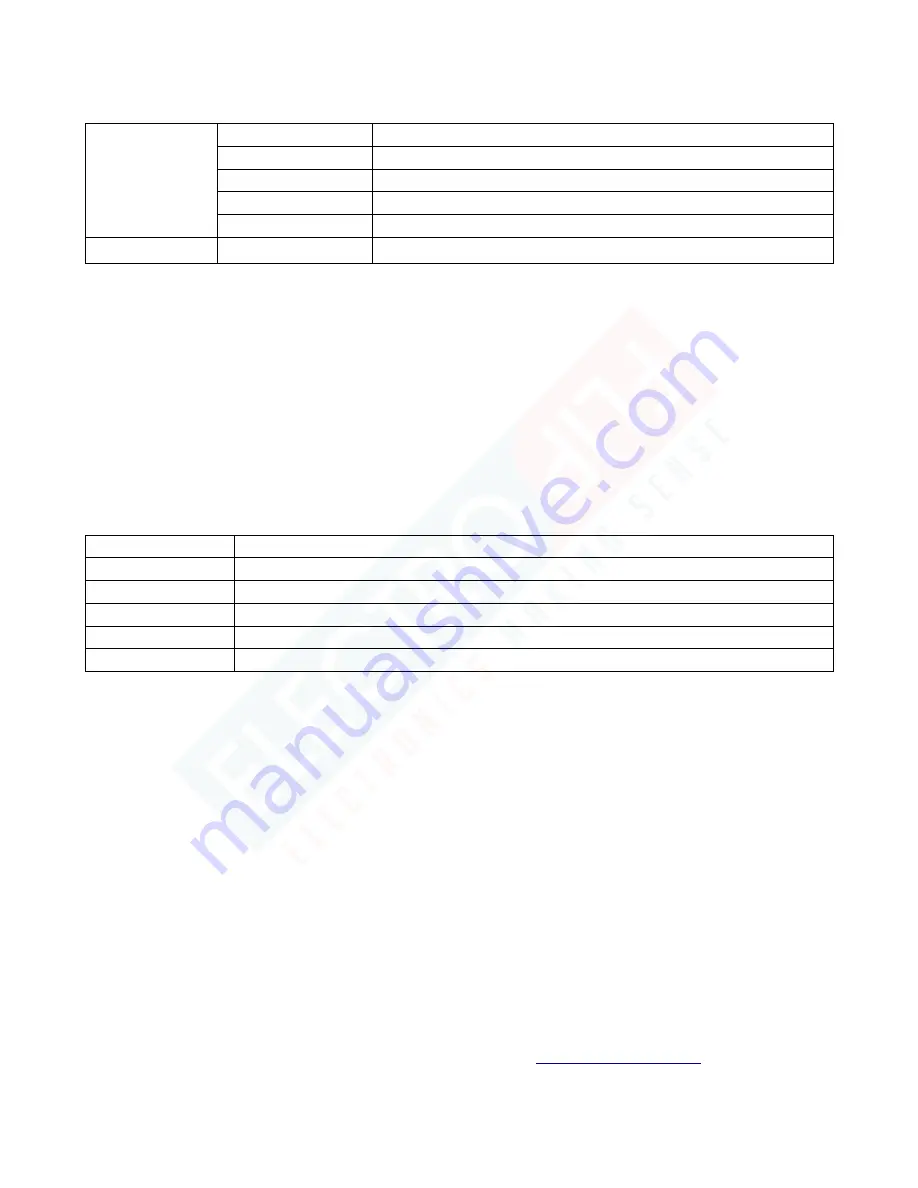
The table below lists the different function settings for Video Mode and Camera Mode


VIDEO MODE


SIZE 

Select from [1280 x 960 / 720 x 480 / 640 x 480 PIXELS] 

TIME STAMP 

Select from [Off / Date only / Date & Time] 

MOTION DETECT 

Select between On Off 

AUDIO RECORD 

Select between On Off 

RECORDING INTERVAL  Select from [2 / 5 / 15 minutes] (how often iDrive2 will automatically save video files


CAMERA MODE

  SIZE 

1.3 M / VGA


NOTE:  If the device is Motion Detect activated, the device will start recording automatically when 

movement is detected and stop recording when no movement is detected.


MODE SETTINGS 


1.


Turn ON the device. 

2.


Press Menu button twice whether in Video or Photo Mode to enter the Setup interface. 

3.


Press the Menu button again to exit after you finished the setup. 


The table below will show you the different Mode settings. 


FORMAT 

Select only if you want to format the SD/MMC card. (NOTE: Formatting will erase any stored files) 

LANGUAGE 

Select from [English / Chinese / Japanese / Russian] 

SYSTEM RESET 

Select [Cancel or Execute System] to reset 

LIGHT FREQUENCY 

Select between [50 / 60 Hz] 

DATE INPUT 

Set correct recording Date and Time by pressing REC/SNAP button and UP and DOWN button. 

IR LED 

Auto or Off


USB CONNECTIVITY 


You can access recorded files from your iDrive2 by connecting the device to your computer via USB cable. 

Below are the steps. 


1.


Connect the iDrive2 to your computer by using the USB cable that came with the package. 

2.


Click My Computer and you will see the iDrive2 as a removable disk. 

3.


Click on the removable disk icon then you can download the video files from the iDrive2 to your 

computer's hard driver. And, play the video on your computer for a smoother playback. 


TROUBLESHOOTING


Below are some of the issues that you may encounter when you are using your device. If the issue you are 

Summary of Contents for iDrive 2

Page 1: ...ur for convenient recording while driver A device that is stylish and slim that shoots high quality video All information and instructions included in this manual are current as of May 22 2014 However due to the fluid nature of advancing technology some characteristics may change or need modifications in the future Should you encounter any problems or have any further questions about your purchase...

Page 2: ... 2 Table of Contents PRODUCT INFORMATION 3 Hardware Parts 3 Product Specification 4 Inside the Package 4 GETTING STARTED 4 Charging the Device 4 Device Power On Off 4 Recording a Video 4 Taking a Photo 5 Preview Delete Videos and Photos 5 Function Setup 5 Mode Settings 6 USB Connectivity 6 TROUBLESHOOTING 7 ...

Page 3: ...This document is a property of ElectroFlip LLC www ElectroFlip com No unauthorized reproduction is allowed 3 PRODUCT INFORMATION HARDWARE PARTS ...

Page 4: ...ive2 USB Cable and Car Charger Once the device is charging you will see a red indicator light and will turn off when device is fully charged NOTE To avoid damaging the device use only the USB cable and Car Charger that came with the package DEVICE POWER ON OFF To turn on the device if it is using the battery power simply press the Power button and it will automatically start to record Press the Po...

Page 5: ... the SD MMC card PREVIEW DELETE VIDEOS AND PHOTOS Video Photo Preview 1 Turn iDrive2 on 2 Press Mode button twice to enter the Preview Mode 3 Press Up or Down button to select a video file 4 Press REC SNAP button to play or stop the video Delete a Video Photo 1 Turn iDrive2 on 2 Press Menu button to enter Delete Mode 3 Select Single All or Select by using the REC SNAP button and UP or DOWN buttons...

Page 6: ...finished the setup The table below will show you the different Mode settings FORMAT Select only if you want to format the SD MMC card NOTE Formatting will erase any stored files LANGUAGE Select from English Chinese Japanese Russian SYSTEM RESET Select Cancel or Execute System to reset LIGHT FREQUENCY Select between 50 60 Hz DATE INPUT Set correct recording Date and Time by pressing REC SNAP button...

Page 7: ...un bake it to dry it out Elmer s glue offers an almost near permanent solution without damaging your windshield or suction cup http help electroflip com article 115 html 2 Does this device records well at night Yes The device have fair low light handling The device can see a little less than what the human eye can see when the driver s headlights are on Obviously they would not do well without the...

Reviews: