background image

This document is a property of ElectroFlip LLC No unauthorized reproduction is allowed. 

6 


BATTERY CHARGING 


1.


Connect the charger with the camera using USB cable then plug to the power source. 

2.


You will see a red background on the LCD screen of the device when it is charging. The 

red background would automatically turn off when the camera is fully charged. 


NOTE: 

To save charging time, power off the camera when charging. Also, please take note of the 

following: 

1.


Only use original parts, charger and USB cable, to guarantee normal device function. 

2.


Cut off the power if anything unusual happens during charging. 

3.


Press “RESET” hole with a needle-like object if camera system is halted by accident. 


INSTALLING A MEMORY CARD 


Make sure that BulletCam 2.0 is turned off before inserting or removing the memory card. To 

remove or insert a memory card, please follow the steps below. 


1.


To insert a memory card, please follow correct orientation then slightly push the card 

until you feel it locked in place. 

2.


To remove the memory card, just slightly press the memory card and it will just pop out 

automatically. 


NOTE: 

If memory card is not inserted properly or device has no memory card, the LCD screen will 

display a resolution icon and battery icon. When memory card is inserted properly, the LCD 

screen will display resolution icon and rest recording time.  


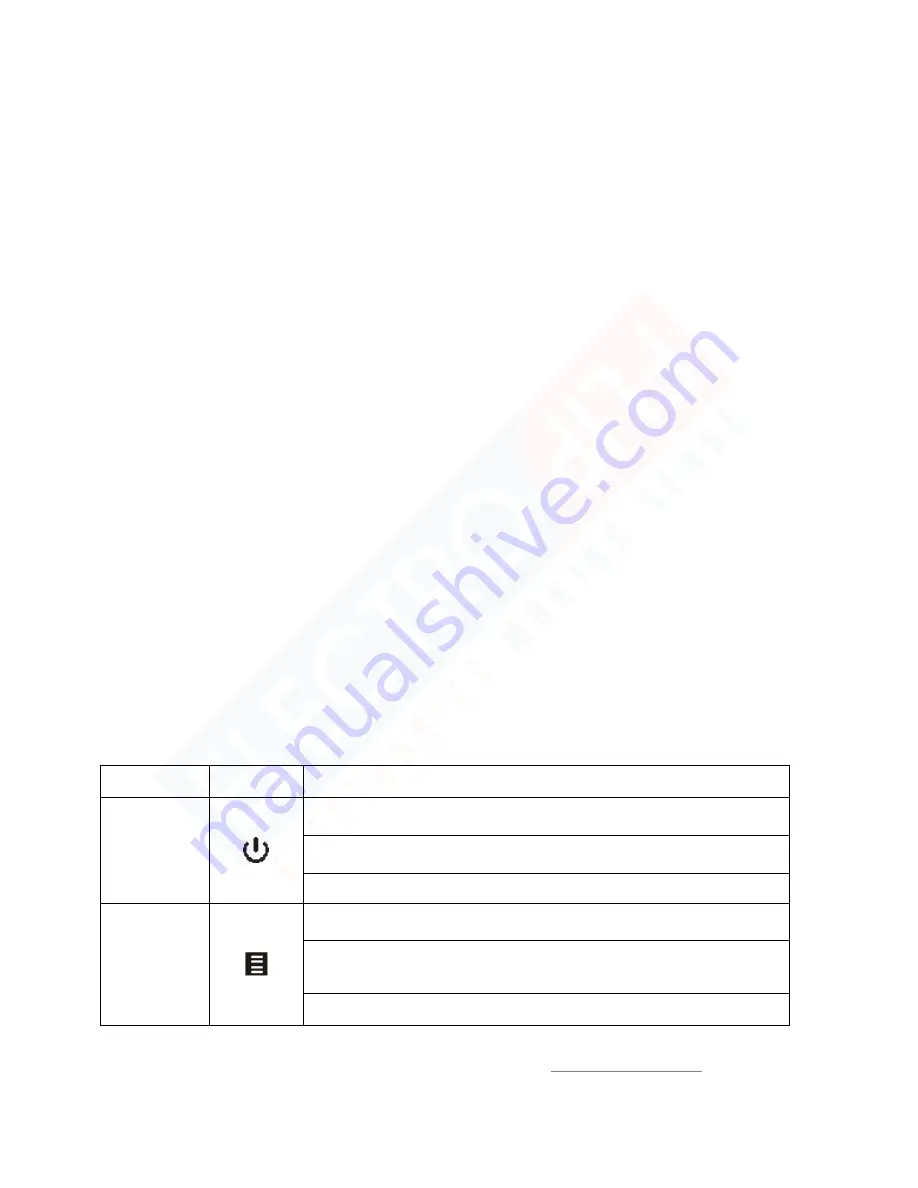
BUTTON FUNCTION DESCRIPTION 


BUTTON 

ICON 

USES 

Power 


Short press to power on; start/stop taking video 

Long press to power off 

Under Setup Mode, press to choose/adjust option 

Menu  


To access/confirm menu settings 

Long press to exit menu settings directly (while in menu 

settings mode) 

Short press to turn ON/OFF laser light during video recording. 


Summary of Contents for BulletCam 2.0

Page 1: ...ctions included in this manual are current as of February 12 2015 However due to the fluid nature of advancing technology some characteristics may change or need modifications in the future Should you encounter any problems or have any further questions about your purchase please visit our website www ElectroFlip com and contact us through our Contact Us page ...

Page 2: ...FETY INFORMATION 3 PRODUCT INFORMATION 3 Hardware Parts 3 Product Specification 4 GETTING STARTED 4 Mount Options and Instructions 4 Battery Charging 6 Installing a Memory Card 6 Powering ON OFF the Camera 7 Video Recording 7 Menu Settings 8 Playback USB Connection 10 Playback Using Card Reader 10 PC Camera 10 TROUBLESHOOTING 11 ...

Page 3: ...der direct sunlight for extended periods of time as this may affect the camera s housing and internal components 5 We recommend using battery in temperatures between 0 to 40 6 Turn off the camera before removing the memory card to prevent damage to the card or stored data 7 Do not alter or disassemble the camera to avoid damage and 8 The rise in temperature is normal after using the digital camera...

Page 4: ...50mAh LENS 130 degree PORT USB 2 0 EXTERNAL MEMORY MicroSD up to 64GB Class 4 or above SCREEN High resolution 4 digit block code LCD FORMAT MOV WATERPROOF Waterproof design GETTING STARTED MOUNT OPTIONS and INSTRUCTIONS A Mount to Holder 1 Mount the camera into the rotatable holder screw holder as shown on the picture labeled A refer to the above picture 2 Fasten the holder with a rubber ring to s...

Page 5: ...and use 3M pads to firmly put it in place Top of Helmet Thread the nylon belt through the curve helmet pedestal then through the hole on the top of helmet buckle and fix it C Mount to Flat based Pedestal Mount the rotatable holder into flat helmet pedestal then fix pedestal firmly onto a surfboard skateboard or etc using a 3M pads D Mount to Handlebar Grip Mount the handlebar grip into the screw h...

Page 6: ...at BulletCam 2 0 is turned off before inserting or removing the memory card To remove or insert a memory card please follow the steps below 1 To insert a memory card please follow correct orientation then slightly push the card until you feel it locked in place 2 To remove the memory card just slightly press the memory card and it will just pop out automatically NOTE If memory card is not inserted...

Page 7: ... 3 When battery runs out the battery icon on the LCD will blink quickly and camera will vibrate until it totally turns off VIDEO RECORDING Normal Mode 1 Under standby mode press button to start recording camera will vibrate once 2 LED light will blink and recorded time will be displayed on the LCD with resolution icon on the upper right screen and battery icon on the bottom of the right screen 3 P...

Page 8: ...er light can help to verify the camera is working or not MENU SETTINGS Video Resolution Setting 1 Under standby mode press and hold button for 3 seconds to enter Menu settings 2 Once resolution icon blinks on the LCD screen press button to select resolution means 720P resolution 30 fps means 1080P resolution 30 fps 3 Press button to confirm and enter the next setting Normal Loop Recording 1 Press ...

Page 9: ...creen When deleting is done it goes straight to the next setting Setting the Year Month and Date Time Year 1 With the last two digits of the year blinks flickers press button to adjust the number 2012 2015 2 Press button to confirm and go to the next setting Month and Date 1 After confirming the year the first two digits of the month will flicker blink on the LCD 2 Press button to adjust the month...

Page 10: ...natively you can remove the micro SD card from the device and insert it to a card reader and connect it to your computer PLAYBACK Using Card Reader 1 Remove the micro SD card from the BulletCam 2 0 2 Insert the micro SD card to the USB card reader Please follow the label on the card reader on how to insert the card 3 Connect the card reader to the USB port of your computer The computer would detec...

Page 11: ...e cases that corrupted files can t be removed by simply deleting the file instead you would need to reformat the memory card If you need to format the memory card just make sure to backup those files that you have not backed up yet before formatting the card 3 Why is my device not charging There are a lot of possibilities why your device may not charge It may be because of a defective USB cable de...

Reviews: