background image

19


Figure-3 

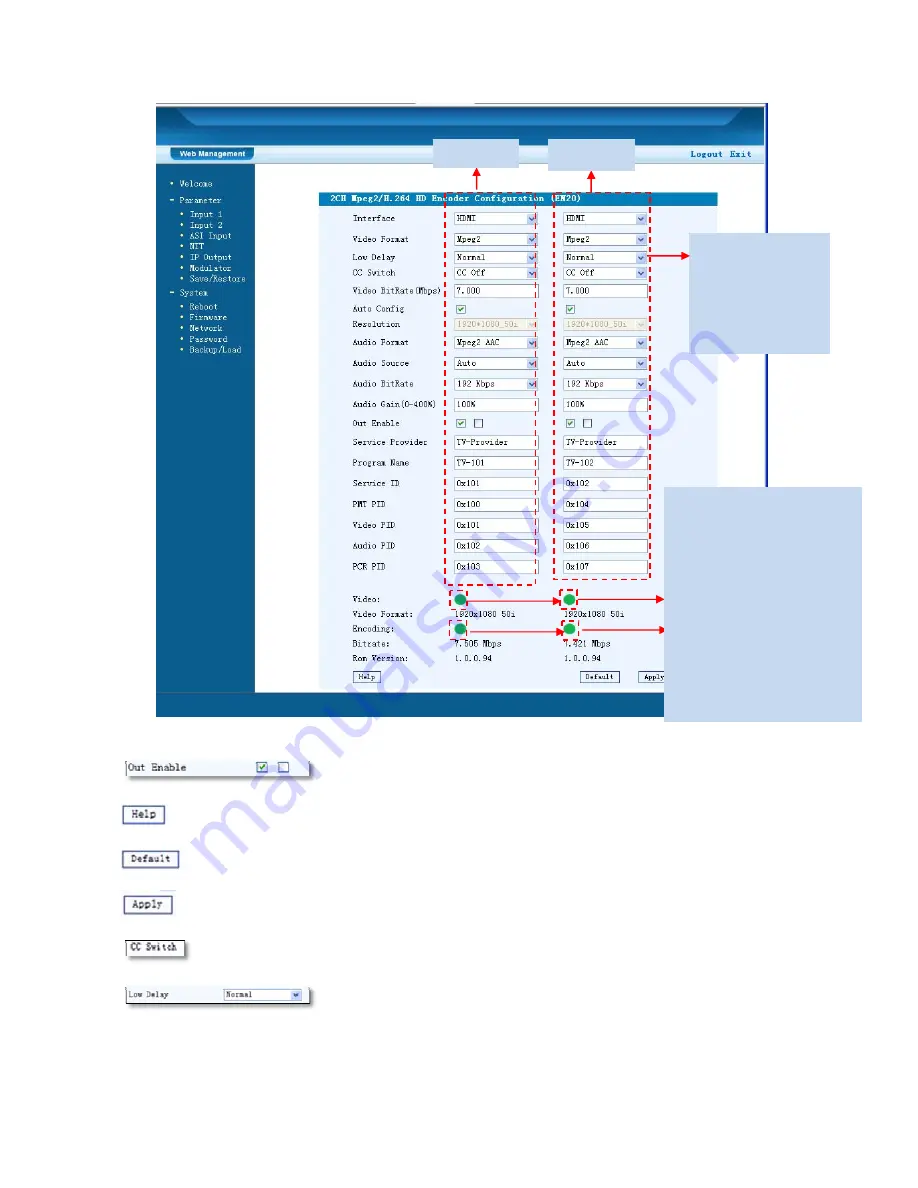
User can choose to output the program from 2 carriers(A, B) or not.


For user to turn to refer detailed explanation of terms on this interface


Click this button to apply the default setting of Input 1


Click this button to apply the modified parameters. 

Please refer to the 

Chapter 5

 attached for detailed information. 

Click this button to select Low delay mode. Please refer to the 

Chapter 6

 attached for detailed information. 


General


Settings


for


the


input


programs:


User


can


edit


any


item


listed


as


needed.

Program


1

Program


2

Video


Status:


Green


light


indicates


the


corresponding


source


cables


are


properly


connected.


Encoding


Status—Green


light


indicates


the


encoding


process


is


running


normally,


which


otherwise


turn


to


red.


Summary of Contents for EPS-HAV1004R

Page 1: ...Users Manual EPS HAV1004R ENCODER MODULATOR USB ELECTROCRAFT AUSTRALIA 36 Binney Road Marayong NSW 2148 T 02 8811 5155 F 02 9831 2139 www electrocraft com au ...

Page 2: ...2 3 DEVICE S INSTALLATION FLOW CHART ILLUSTRATED AS FOLLOWING 5 2 4 ENVIRONMENT REQUIREMENT 5 2 5 GROUNDING REQUIREMENT 6 CHAPTER 3 OPERATION 7 3 1 3 1 LCD MENU STRUCTURE 7 3 1 INITIAL STATUS 9 3 2 GENERAL SETTING FOR MAIN MENU 9 CHAPTER 4 WEB NMS OPERATION 177 4 1 LOGIN 177 4 2 OPERATION 188 CHAPTER 5 OPERATION OF CLOSED CAPTION CC 28 CHAPTER 6 OPERATION OF LOW DELAY SETTINGS 28 CHAPTER 7 APPLICA...

Page 3: ...ther RF frequencies This unit enables the distribution of an external source over a coax RF system The signal from an external source can be viewed via a terrestrial digital set top box Typical applications include pubs clubs sporting venues resorts hospitals etc 1 2 Key features MPEG2 HD MPEG4 AVC H 264 HD video encoding DD AC3 2 0 MPEG4 AAC MPEG2 AAC MPEG1 Layer II audio encoding Support DD AC3 ...

Page 4: ...20_50P Audio L R Encoding MPEG1 Layer II MPEG2 AAC MPEG4 AAC DD AC3 2 0 DD AC3 2 0 5 1 7 1 passthrough Interface 4 Stereo 8 mono 4 SPDIF Sample rate 48KHz Bit rate 64 96 128 192 256 320kbps DVB T Modulator Section Option Standard EN300744 FFT mode 2K 8K Bandwidth 6M 7M 8M Constellation QPSK 16QAM 64QAM Guard Interval 1 4 1 8 1 16 1 32 FEC 1 2 2 3 3 4 5 6 7 8 MER 42dB RF frequency 30 960MHz 1KHz st...

Page 5: ...and Right Buttons Enter Button for confirm Menu Button for back step Lock Button press to lock set Rear Panel Illustration 1 2 3 4 5 6 7 8 9 10 11 12 HDMI input port YPbPr CVBS Pr input port CVBS input port for CC only L R Audio input Stereo or Mono SPDIF Audio input port ASI input port ASI Output port 1 2 Power Switch Power supply Slot RF in port RF out port Grounding ...

Page 6: ...4 ...

Page 7: ...s on 9 After use securely stow away all loose cables external antenna and others 2 2 Power precautions 9 When you connect the power source make sure if it may cause overload 9 Avoid operating on a wet floor in the open Make sure the extension cable is in good condition 9 Make sure the power switch is off before you start to install the device 2 3 Device s Installation Flow Chart Illustrated as fol...

Page 8: ...er and lighting power are independent to each other Device power requires AC 110V 10 50 60Hz or AC 220V 10 50 60Hz Please carefully check before running 2 5 Grounding Requirement 9 All function modules good grounding is the basis of reliability and stability of devices Also they are the most important guarantee of lightning arresting and interference rejection Therefore the system must follow this...

Page 9: ... MENU Cancel current entered value resume previous setting Return to previous menu ENTER Activate the parameters which need modifications or confirm the change after modification LEFT RIGHT Choose and set the parameters UP DOWN Modify activated parameter or paging up down when parameter is inactivated LOCK Lock the screen cancel the lock state After pressing the lock key the LCD will display the c...

Page 10: ...8 ...

Page 11: ...h encoding board respectively 3 2 General setting for Main Menu By pressing Lock key on the front panel user can enter the main menu The LCD will display the following pages User can press UP DOWN buttons to specify menu item and then press ENTER to enter the submenus as below 1 Status Press Enter to enter Status and it displays the working time duration of the device It times upon power on 2 Inpu...

Page 12: ...e submenu YPbPr CVBS and HDMI optional Press Enter key to confirm and the system will automatically search the signal source Video Format the encoding module supports both MPEG2 and MPEG4 AVC H 264 formats Move the triangle mark with LEFT RIGHT keys to specify the intended format and press ENTER to 2 1 Input 1 2 2 Input 2 2 3 Input 3 2 1 Input 1 2 1 1 Program 1 2 1 2 Program 2 Video in status Inte...

Page 13: ...cy on receiving side Please refer to the Chapter 6 attached for detailed information Audio Format MPEG 1 Layer 2 MPEG 2 AAC MPEG 4 AAC AC3 AC3 Passthrough optional Audio Bitrate 64 320Kbps optional Audio Gain 000 to 400 adjustable 2 3 Input 3 represents the ASI input User could parse and select program s to mux out 2 3 Input 3 Program Output Program Name Service Provider Program ID PMT PID PCR PID...

Page 14: ...ing Modulator submenu user can configure the modulating parameters for the 2 carrier output separately As the EPS HAV1004R DVB T Modulating is with 2 carrier outputs 3 1 3 2 represent the Carrier A and Carrier B respectively User can enter 3 1 3 2 to set the corresponding modulating parameters Submenus taking 3 1 as an example are as below 1 GXTV 2 SZTV X Parse Program Get 3 programs 2 3 1 Parse P...

Page 15: ... and press ENTER key to confirm 2K and 8K are the options 2K When the device works as current mode the number of current carrier is 2048 8K When the device works as current mode the number of current carrier is 8192 Guard Interval In communications guard intervals are used to ensure that distant transmissions do not interfere with each other These transmissions may belong to different users as in ...

Page 16: ...1K stepping After entering the RF frequency setting submenu users the can press LEFT RIGHT UP and DOWN buttons to adjust the frequency and confirm by press ENTER button RF Out Level The RF attenuation range is from 30 10dbm 77 97dbµV with 0 1db step After entering this setting submenu user can shift UP DOWN LEFT RIGHT key to set the output level and press ENTER to confirm RF On This interface is t...

Page 17: ...Network ID and choose whether to output the carrier programs through ASI 5 Network Network contains 5 1 NMS and 5 2 IP Stream 5 1 NMS is for setting the network parameters for the connection between the device and PC IP Stream is for configuring the 4 SPTS output respectively 4 1 Output A 4 2 Output B 5 1 5 Web NMS Port 5 1 6 Reset Password 5 1 3 Gateway 5 1 4 MAC Address 5 1 1 NMS IP 5 1 2 Subnet...

Page 18: ...tains 5 submenus where users can save load configurations Data Enable Null PKT Filter Output IP Output Port Service IP Subnet Mask Gateway 6 1 Save Config 6 2 Load Saved CFG 6 3 Factory Reset 6 4 LCD time out 6 5 Version ...

Page 19: ...IP through the front panel Connect the pc and the device with net cable and use ping command to confirm they are on the same network segment I G the PC IP address is 192 168 99 252 we then change the device IP to 192 168 99 xxx xxx can be 0 to 255 except 252 to avoid IP conflict Use web browser to connect the device with PC by inputting the Encoder Modulator s IP address in the browser s address b...

Page 20: ...ng Input 1 it displays the information of the programs from the 1st encoding board as Figure 3 User can click any item here to enter the corresponding interface to check information or set the parameters Device standard and name It displays the signal source interface as per you set in Input 1 2 interface and displays real time encoding bit rate of corresponding ...

Page 21: ...ase refer to the Chapter 5 attached for detailed information Click this button to select Low delay mode Please refer to the Chapter 6 attached for detailed information General Settings for the input programs User can edit any item listed as needed Program 1 Program 2 Video Status Green light indicates the corresponding source cables are properly connected Encoding Status Green light indicates the ...

Page 22: ...the webpage clicking Input 2 it displays the information of the programs from the 2ed encoding board ASI Input Click ASI Input it will display ASI input program information as Figure 4 User can parse and multiplex ASI IN programs in this interface Figure 4 The letters A and B represent the 2 carrier outputs User can configure different program group for each carrier output If this item is selected...

Page 23: ...e input output programs with one time clicking Time limitation to parse the input programs Click this button to trigger a dialog box as below where to add the PIDs which need pass through In some occasions there are some PIDs which won t belong to any program such as EPG NIT tables and so on which user just wants to pass them through the multiplexing module without changing anything This is the ma...

Page 24: ...nd configure other parameters for the programs Figure 6 After setting all the data users need to click on Save to save the setting IP Output Click IP Output from the left menu it will display the screen as Figure 7 where to configure the 4 IP SPTS Output After setting the parameters click Apply to save the setting ...

Page 25: ...rs user needs to click on Apply to save the Modulator parameters Figure 8 To mirror a carrier program output This device is with MPTS IP output The 4 boxes represent respectively IP Channel 1 2 3 4 Click the related box es to enable the corresponding channel s to output programs To configure the output IP address and ports for the 4 IP Channels respectively ...

Page 26: ...r store the data permanently to the device By using Restore Configuration user can restore the latest saved configuration to the device By using Factory Set user can import the default factory configuration Figure 9 Restart the Device Click Reboot from the menu the screen will display as Figure 10 Here when clicking Reboot box it will restart the device automatically Figure 10 ...

Page 27: ... the device update file for this device then click Update to update the device After updating the device user needs to restart the device by using Reboot option Figure 11 Network When user clicks Network it will display the screen as Figure 12 It displays the network information of the device Here user can change the device network configuration as needed Figure 12 Browse Button ...

Page 28: ...ed modification or view of the device information and configurations User can t operate the keyboard LCD while only the device IP address can be noted in the LCD window Backup Load Click Backup Load from the menu it will display the screen as Figure 14 Backup Configuration To back up the device configuration file to a folder Load Configuration If user needs to load the old configuration to the dev...

Page 29: ...27 Figure 14 Browse Button ...

Page 30: ...C CC is from CVBS source output from IRD or STB etc Connecting the CVBS cable to the CC port at the rear panel as shown in below image CC can be mixed with A V inputs to generate programs with CC CC wiring diagram From CVBS input CC switch in Web based NMS CC On Enable CC in CC Off Unable CC ...

Page 31: ...n 2 Mode 1 Mode 2 to activate the low delay function The delay duration is based on the different combination of Video Format Video Bit rate Low delay Mode and the Resolution of signal source which combine together to have a comprehensive impact on the delay Please refer to the below table for reference NOTE The delay duration will also be impacted as the decoding performance of the STB side chang...

Page 32: ...ce Bit Rate Mode Resolution Low Delay Mode Encoding Type DVB T HD STB HDMI VBR 1080i 50 Mode 1 mpeg2 300 H 264 335 Mode 2 mpeg2 407 5 H 264 492 5 720p 50 Mode 1 mpeg2 230 H 264 285 Mode 2 mpeg2 382 5 H 264 395 DVB T HD STB YPbPr VBR 1080i 50 Mode 1 mpeg2 282 5 H 264 395 Mode 2 mpeg2 397 5 H 264 450 720p 50 Mode 1 mpeg2 267 5 H 264 255 Mode 2 mpeg2 385 H 264 422 5 ...

Page 33: ...ation example 1 Residences and Private Homes Video content DVB T distribution 2 Outside Audio Video contents ON AIR DVB T ISDB T distribution 3 Hotel Audio Video contents DVB T ISDB T distribution 4 Bar Audio Video contents distribution ...

Page 34: ...32 5 Cinema Audio Video contents DVB T ISDB T distribution 6 Company Audio Video contents distribution ...

Reviews: