background image

6

Set up procedure

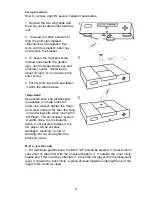
How to remove and UN secure transport necessities.

1. Remove the two wing bolts and
the wing nut located underneath the
unit.

2.  Unscrew the Allen screws hol-
ding the gold sign marked
«Mechanical Cancellation Sys-
tem» with the smallest  Allen key
and remove the bracket.

3. To loosen the transport screw
located underneath the golden
sign, use the largest Allen key and
unscrew counter  clockwise for
about 10 turns. Do not remove this
allen screw.

4. Put the gold sign back and fasten
 it whith the Allen screws.

! Important!

Keep Allen keys and all transport
necessities in a safe place for
future use. Always tighten the trans-
port screw ontopp first, then the wing
 nut and wing bolts when moving the
 CDPlayer. The cancellation system
 weights close to six kilograms
alone. If not securely fastened, the
CD player will be severely
damaged, resulting in void of
warranty. Do not over-tighten the
transport screw.

How to level the unit

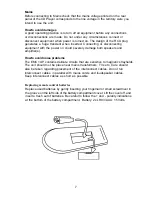
1. For maximum performance, the EMC 1UP should be leveled. 2. Please check
your shelf or table first with the enclosed bobble. 3. If outside the inner circle
please see if this could be corrected. 4. Check the CD player with enclosed spirit
level, if outside the inner circle, a piece of dead material underneath one of the
magic foots could be used.

Summary of Contents for EMC 1UP

Page 1: ...EMC 1UP Owner s Manual UK UK UK...

Page 2: ...emc1up_v1 1_knekkt...

Page 3: ...ck do not expose this appliance to rain or moisture Verify line voltage before use Do not remove cover No user serviceable parts inside Refer servicing to qualified service personnel The warranty is v...

Page 4: ...e legendary 25 watt amplifier It was the first commercial transistor amplifier to use this new design approach The amplifier was immediately recognised as dramatically more musical than any other tran...

Page 5: ...screw must be removed for proper operation When moving the CD player Always re insert and tighten the transport screw to avoid severe dam age to the unit For optimal sonic performance the EMC 1UP shou...

Page 6: ...len keys and all transport necessities in a safe place for future use Always tighten the trans port screw ontopp first then the wing nut and wing bolts when moving the CDPlayer The cancellation system...

Page 7: ...speakers and amplifier s How to avoid noise problems The EMC 1UP contains delicate circuits that are sensitive to magnetic strayfields The unit should not be place near mains transformers TVs etc Care...

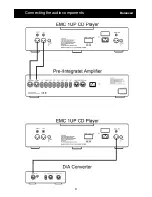
Page 8: ...8 Connecting the audio components Balanced...

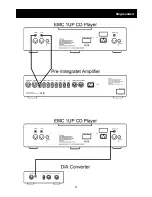
Page 9: ...9 Single ended...

Page 10: ...10...

Page 11: ...ed them and not in the original numeric order If you press STOP 17 two times your program sequence will be erased 5 FAST press this button before you use the search buttons 6 or 13 The search will go...

Page 12: ...lifier s then the signal sources Loading a Disc 1 Load the disc by gently pushing the drawer marked ELECTROCOMPANIET towards the rear of the unit Open is shown on the display 2 Place the disc on the s...

Page 13: ...6 X 4 dB 3 2 X 10 dB Maximum output RMS 7 V 14V THD 1 V out 1 kHz 0 002 Channel separation 1 V out 1 kHz 90 dB Equivalent input noise 4 uV Digital stage Dynamic range 100 dB Signal to noise 100 dB THD...

Page 14: ...electrocompaniet no Web www electrocompaniet com The end user is responsible for all shipping charges insurance re importation and duty charges When shipping a product to the factory for service alway...

Reviews: