1234567890123456
1234567890123456
1234567890123456
1234567890123456
1234567890123456
1234567890123456
1234567890123456
1234567890123456
1234567890123456
1234567890123456
1234567890123456
1234567890123456
1234567890123456
1234567890123456
1234567890123456
1234567890123456
1234567890123456
1234567890123456
1234567890123456
1234567890123456
1234567890123456
1234567890123456
1234567890123456
1234567890123456
1234567890123456
1234567890123456
1234567890123456
1234567890123456
1234567890123456
1234567890123456
1234567890123456
1234567890123456
1234567890123456
1234567890123456
1234567890123456
1234567890123456
1234567890123456
1234567890123456
1234567890123456
1234567890123456
1234567890123456
1234567890123456
1234567890123456
1234567890123456
1234567890123456
1234567890123456
1234567890123456
1234567890123456
1234567890123456
1234567890123456
1234567890123456
1234567890123456
1234567890123456
1234567890123456
1234567890123456
1234567890123456
1234567890123456
1234567890123456
1234567890123456
1234567890123456
1234567890123456
1234567890123456
1234567890123456
1234567890123456
1234567890123456
1234567890123456
1234567890123456
1234567890123456
1234567890123456
1234567890123456
1234567890123456
1234567890123456
1234567890123456
1234567890123456
1234567890123456
1234567890123456
1234567890123456
1234567890123456
1234567890123456
1234567890123456
1234567890123456
1234567890123456
1234567890123456
1234567890123456
1234567890123456
1234567890123456
1234567890123456
1234567890123456
1234567890123456
1234567890123456
1234567890123456
1234567890123456
1234567890123456
1234567890123456
1234567890123456
1234567890123456
1234567890123456
1234567890123456
1234567890123456
1234567890123456
1234567890123456
1234567890123456
1234567890123456
1234567890123456
1234567890123456
1234567890123456
1234567890123456
1234567890123456
1234567890123456
1234567890123456
1234567890123456
1234567890123456
1234567890123456
1234567890123456
1234567890123456
1234567890123456
1234567890123456
1234567890123456
1234567890123456
1234567890123456
1234567890123456
1234567890123456
1234567890123456
1234567890123456
1234567890123456
1234567890123456
1234567890123456
1234567890123456
1234567890123456
1234567890123456
1234567890123456
1234567890123456
1234567890123456
1234567890123456
1234567890123456
1234567890123456
1234567890123456
1234567890123456
1234567890123456
1234567890123456
1234567890123456
1234567890123456
1234567890123456
1234567890123456
1234567890123456
1234567890123456
1234567890123456
1234567890123456
1234567890123456
1234567890123456
1234567890123456
1234567890123456
1234567890123456
1234567890123456
1234567890123456
1234567890123456
1234567890123456
1234567890123456
1234567890123456
1234567890123456
1234567890123456
1234567890123456
1234567890123456
1234567890123456
1234567890123456
1234567890123456
1234567890123456
1234567890123456
1234567890123456
1234567890123456
1234567890123456
1234567890123456
1234567890123456
1234567890123456
1234567890123456
1234567890123456
1234567890123456
1234567890123456
1234567890123456
1234567890123456
1234567890123456
184633
21
ELECTRO FREEZE Models 876, 876B, 876C, 876RH, 876BRH, 876CRH
1. For slush mix, use a clear, straight-
sided glass of any size and draw off a full
glass of frozen product (slush flavor bottles
work well).
2. Allow the glass to stand for 2
minutes at room temperature away from any
heat source.
3. Verify the product consistency by
determining the amount of liquid at the
bottom of the glass.
Examples of settings :
5% liquid
1% liquid (Starts to stack)
0% liquid (Stacks well)
10 Slush Product Information
10.1 Determining Product Consistency
10.2 Adjusting Product Consistency
Product consistency has been preset at the
factory. Further adjustment may be neces-
sary to obtain your desired consistency. To
adjust product consistency, proceed with the
following steps:
1. Allow the freezer to operate until the
compressor shuts off. Dispense sufficient
product to check consistency.
(
Refer to
Section 10.1, Determining Product Consis-
tency.)
CAUTION
To avoid electrical shock or
contact with moving parts,
make sure all switches are in
the “OFF” position and that the
main power supply is
disconnected.
2. Find the small adjustment cover
toward the rear in the center of the left side
panel.
3. Remove the top screw holding the
cover and loosen the bottom, letting the
cover swing away from the access hole.
4. Look into the access hole and you
will see an arm extending from the drive
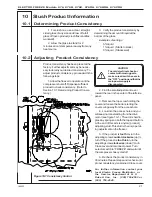
motor (see figure 10-1.) The arm is held in
place by springs on both the top and bottom.
At the end of this arm is a nylon (product)
adjusting stud. This stud is the only operat-
ing adjustment on the freezer.
5. If the product is
too thin,
turn the
adjusting screw
counterclockwise
(up) ½
turn. If the product is
too thick,
turn the
adjusting screw
clockwise
(down) ½ turn.
Close cover and reconnect power. Turn
selector switch to “FREEZE” and wait until
the compressor has cycled off.
6. Recheck the product consistency in
30 minutes. Repeat steps and recheck until
proper consistency is obtained. Close cover.
For further information contact your
local Electro Freeze Distributor or
the Service Department of H. C.
Duke & Son, Inc. (309) 755-4553 or
(800) 755-4545.
Figure 10-1 Consistency Control


