ElectrIQ IQ-WIFIRGBWLEDSTR Setup And User'S Manual Download Page 19

CHANGING  THE  NAME 
OF YOUR DEVICE 

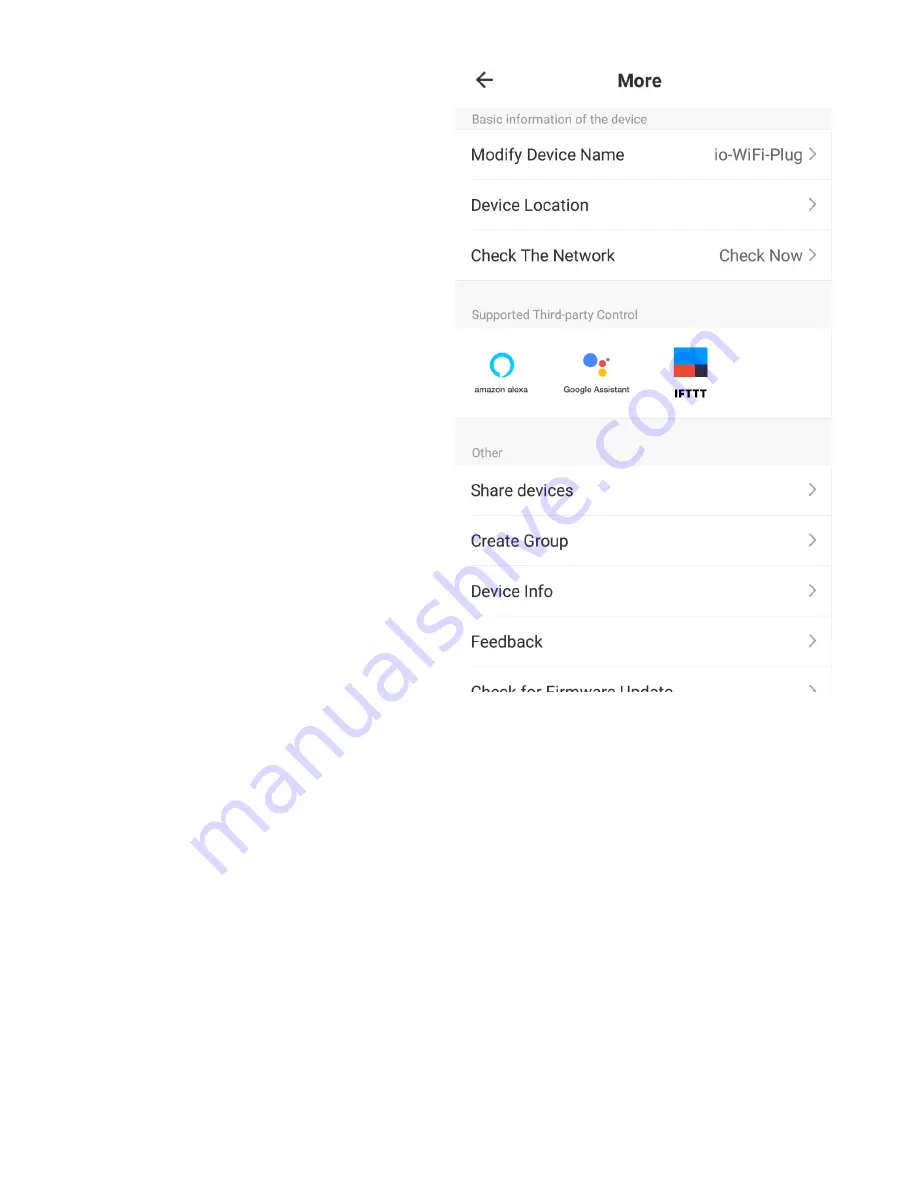
When in any of the device 
screens  further  settings 
for  the  device  can  be 
accessed, by pressing on 
the  three  dots  in  the  top 
right  hand  corner.    The 
top  option  within  this 
allows  you  to  change  the 
name  of  the  device  to 
something relevent to the 
use  of  the  product,  such 
as “Bedroom Light” 

SHARE DEVICES 

Create a QR code to share control of the LED strip with 
a friend or relative. 

LINKING  YOUR  DEVICE  TO  GOOGLE  HOME  OR 
AMAZON ECHO


Please  follow  the  instructions  above  to  access  the 
further  settings  for  your  device.    Pressing  on  the 
“amazon  alexa”  and  “Google  Assistant”  icons  will 
guide you through the setup process for linking up the 
device.


Summary of Contents for IQ-WIFIRGBWLEDSTR

Page 1: ...ETUP AND USER MANUAL IQ WIFIRGBWLEDSTR Thank you for choosing electriQ Please read this user manual before using this item and keep it safe for future reference Visit our page www electriQ co uk for o...

Page 2: ...only Do not position the unit where it would be subjected to extreme moisture temperature or dust Do not use in bathrooms or other humid places Ensure there is no power to the fitting before installa...

Page 3: ...different network names SSID The provider of your router Internet service provider will be able to provide advice specific to your router Fit the LED strip as close as possible to the router during se...

Page 4: ...uya Smart App in your chosen app store IOS Android POWERING THE LED STRIP Connect the connector box to the LED strip ensuring the arrow on the connector is to the left of the strip Then connect the po...

Page 5: ...to be registered following the next steps 1 Press on the register button at the bottom of the screen 2 Read the Privacy policy and press the Agree button 3 Enter your email address or phone number an...

Page 6: ...nter the code into the app 5 Type in the password you would like to create This needs to be 6 20 characters containing letters and numbers 6 The app is now registered It will automatically log you in...

Page 7: ...t different areas are created and named to allow easy management of all your devices When devices are then added they are assigned to one of the rooms you have created 1 Press the ADD HOME button 2 Ty...

Page 8: ...nger to move the orange HOME symbol When the symbol is in the approximate location of your home press the CONFIRM button in the top right corner ADD ANOTHER ROOM Type the name of the room to add and p...

Page 9: ...hat your device is in the correct standby mode for the connection type you are attempting the flashing of the lights on your device will indicate this Connection Type Frequency of Flashes Quick Connec...

Page 10: ...re that your phone is connected to the wifi network and that the LED strip is flashing once per second If not follow the instructions in the factory reset section 1 Open app and press to add device or...

Page 11: ...om of the screen to confirm 3 Enter your wifi password and press confirm Please note this is case sensitive 5 This will then transfer the settings to the bulb Wait for this to complete If connection f...

Page 12: ...our phone is connected to the wifi network and that the bulb is flashing once every 2 seconds If not follow the guide in the factory reset section to change the connection mode 2 Open app and press to...

Page 13: ...he bulb is slowly flashing once per second then press the orange button at the bottom of the screen to confirm 5 Go to network settings in your phone and connect to the SmartLife xxxx connection There...

Page 14: ...ifi password and press Confirm 7 This will then transfer the settings to the bulb 8 Once the connection process has completed go back to the network settings on your phone to ensure your phone has rec...

Page 15: ...work you can now control it from your phone From the main control screen you can turn the bulb on and off by pressing on the power icon to the right hand side of the device CHANGE HOME ENVIRONMENTAL I...

Page 16: ...you to program intelligent behaviour based on the internal and external environment ADD DEVICE Add a device to the app and go through the setup process ROOM MANAGEMENT Allows rooms to be added removed...

Page 17: ...g the unit on and off changing the colour setting a scene or setting a power on or off time Turn the light ON OFF Change colour Use a preset Scene Set the timer so that the LED strip will turn off at...

Page 18: ...the bulb and the intensity of the colour SCENE Allows the bulb to automatically colour change or flash The settings for the scene can be changed by pressing on the 3 lines above the selection TIMER T...

Page 19: ...of the device to something relevent to the use of the product such as Bedroom Light SHARE DEVICES Create a QR code to share control of the LED strip with a friend or relative LINKING YOUR DEVICE TO GO...

Page 20: ...Automation SCENE Scene allows for a one touch button to be added to the Home screen The button can be used to change the settings on a number of devices at the same time A number of scenes can easily...

Page 21: ...4Ghz 5Ghz wifi networks are not supported and that there is a strong wifi signal to the item 5 Check the settings on the router Encription should be WPA2 PSK and authorisation type should be set to A...

Page 22: ...arately as special treatment is necessary Recycling facilities are now available for all customers at which you can deposit your old electrical products Customers will be able to take any old electric...

Reviews: