ElectrIQ eiQ-R900M User Manual Download Page 11

11 


Notes: 

1.    Charge the robot for at least 24 hours before the first use.   
2.    Each time the robot is fully depleted charge for at least 3 hours. 
3.    Never use the robot in temperatures less than 0

 or over 40

℃ as this will 

reduce the battery life and performance. 
4.    It is normal for the temperature of the charger to increase during the charging 
process   

Notes

: All the settings are disabled while battery is charging. LCD screen will be on 

and the timer and the battery icon is flashing and the charged percentage is showing.
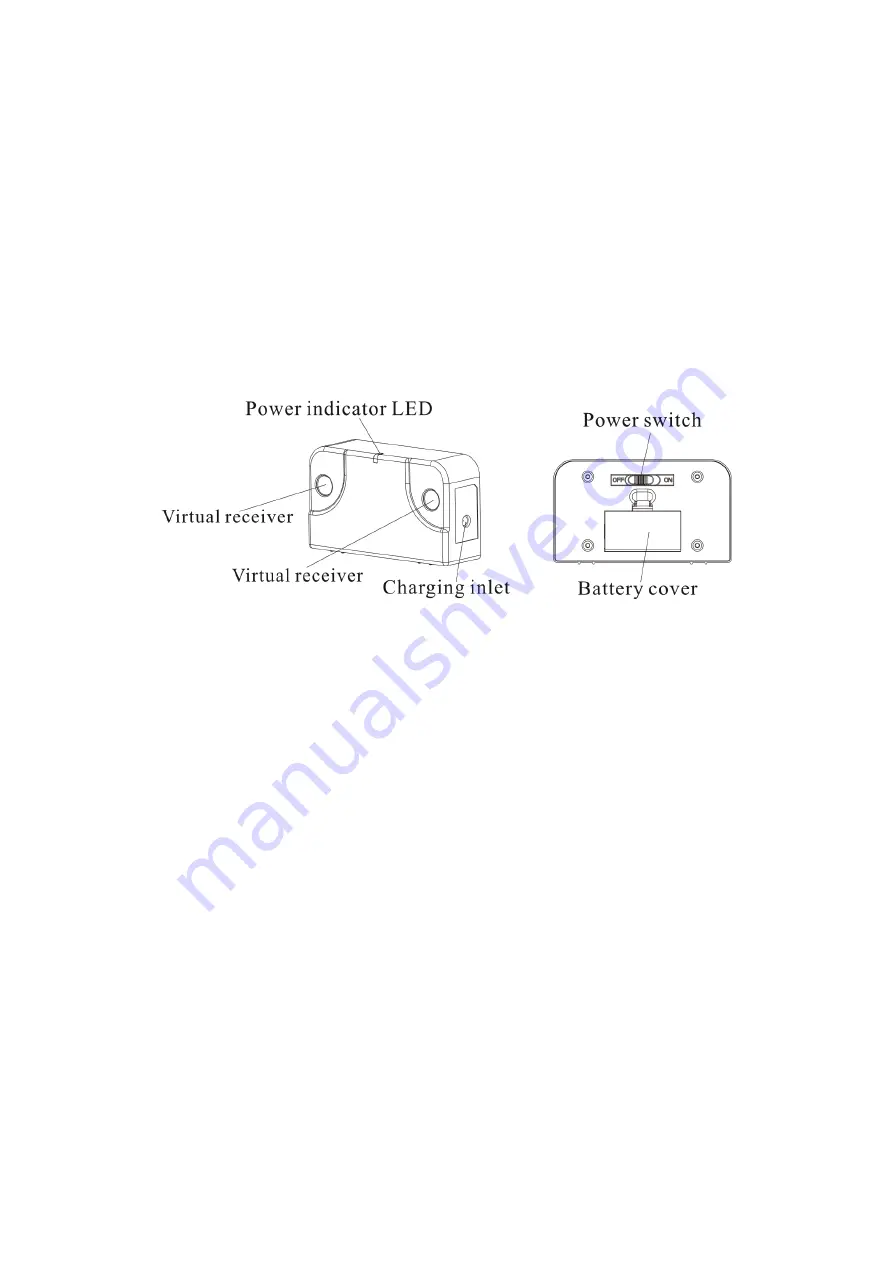


Zone divider 


The zone divider creates an invisible ultrasonic barrier that eiq-R900M will not cross. 
1.  The zone divider is powered by 2 AA batteries. Make sure to install the AA 
batteries with correct polarity. 
2.  To turn on the zone divider, slide the power switch to “ON” position. 
3.  When turned on, the blue LED light blinks for 70 seconds, then turns into 
standby mode. When eiq-R900M starts working, the Virtual Wall will turn on and 
shows blue LED light. 
4.  The best effective distance of Virtual Wall barrier is about 3M (10 ft). 
5.  The LED light will blink when the Virtual Wall is low on battery. 


Summary of Contents for eiQ-R900M

Page 1: ...with self charging home dock USER MANUAL Thank you for choosing ElectriQ Please read this user manual before using this robotic vacuum cleaner and keep it safe for future reference Visit our page www...

Page 2: ...TIONS 3 3 PARTS AND ASSEMBLY 5 4 FUNCTIONS 7 5 FEATURES AND CLEANING MODES 8 6 BATTERY INSTALLATION AND CHARGING 9 7 ZONE DIVIDER 11 8 CONTROL PANEL 13 9 SCHEDULING 16 10 CLEANING AND MAINTENANCE 17 1...

Page 3: ...t dirt is gathered even from corners and borders The middle suction vacuum will ensure dirt and debris are efficiently collected This robot features smart ultrasonic navigation sensors ensuring large...

Page 4: ...ot use the appliance for any other purposes than its intended use Do not use the appliance in places with high humidity 80 RH Do not immerse the robot in water or other liquids If the robot is immerse...

Page 5: ...1 The Robot 2 Charging dock 3 User Manual 4 RemoteControl 5 Zone divider 6 Power supply adaptor 7 Battery 8 Spare parts box 9 Cleaning brush 10 Hair Removal Tool inside the dock 11 Wet Mopping Base A...

Page 6: ...6 Functions...

Page 7: ...e use if needed to limit the access of the robotic vacuum cleaner in certain areas 7 Remote Cleaning Features 1 Side brushes and powerful suction inlet powerful suction and full coverage of cleaning 2...

Page 8: ...ry mop Cleaning Modes 1 Auto Mode Once the robot is activated without specific cleaning instructions it will automatically execute the auto function by repeating the five different modes The combinati...

Page 9: ...e robot may get blocked 6 Do not use on wet or greasy dust Battery installation and charging The robot battery is user replaceable If the battery stops keeping its hold please re order replacement fro...

Page 10: ...ged in Docking Test Leave the robot on the floor somewhere near the dock Press the Home button on the remote control The robot will return to the dock automatically If the robot fails to dock check th...

Page 11: ...battery icon is flashing and the charged percentage is showing Zone divider The zone divider creates an invisible ultrasonic barrier that eiq R900M will not cross 1 The zone divider is powered by 2 AA...

Page 12: ...DC Plug into DC Inlet the LED light will blink Step 4 When recharge is complete LED will glow continuously 6 When eiq RM900M is cleaning the zone divider must position at least 1m 3 ft away from charg...

Page 13: ...Push button and close the cover Removal Removal Press the Pull button then pull out the rolling brush Control Panel Power Button Pressthe Power Buttonto activate the robot The button will light up bl...

Page 14: ...2 Special Bounce 3 Wall Following 4 Zig zag 5 PolygonalSpiral A Automatic thecombination of patterns 1 5 The user may use their remote control to select a specific cleaning pattern Thenumber or lette...

Page 15: ...robot s display panel 1 Spot Spiral 2 Special Bounce 3 Wall Following 4 Zig zag 5 Polygonal Spiral 6 Automatic the combination of patterns 1 5 UV Button press this button to activate or to shut down t...

Page 16: ...display will show Mo Monday blinking 3 If Monday is the chosen day press the Week button again Then Monday will be programmed in 4 The setting function will automatically change to the next following...

Page 17: ...a damp cloth and dry thoroughly 3 Clean all the brushes and empty the rubbish container Vacuum or wipe with a cleaning wipe the inside of the container 4 DO NOT immerse the robot or the power supply i...

Page 18: ...ush and install them back Wheels and Sensor 1 Check and remove all debris and dirt 2 There are four ground sensors Please clean them gently using a wet cloth or tissue Do not use any solvents as they...

Page 19: ...the mop attachment when cleaning carpets Mop clothes are washable Please wash at 40 C and do not spin dry Using 2 hands push and lift in the same time Mop set has an arrow mark follow its direction R...

Page 20: ...20...

Page 21: ...stuck or jammed Place the dock in a proper location and leave sufficient clearance space for the Robot to return to it Remove any obstacles in front of the dock Check and clean the Robot s wheels The...

Page 22: ...umper E4 Battery Over Heating Stop using the robot for at least 60 minutes and then restart it again If the message still shows up please contact your local warranty centre provider E5 Left Wheel Over...

Page 23: ...amenity sites run by their local councils Please remember that this equipment will be further handled during the recycling process so please be considerate when depositing your equipment Please conta...

Reviews: