ElectrIQ 1535026 User Manual Download Page 8


OPERATION 


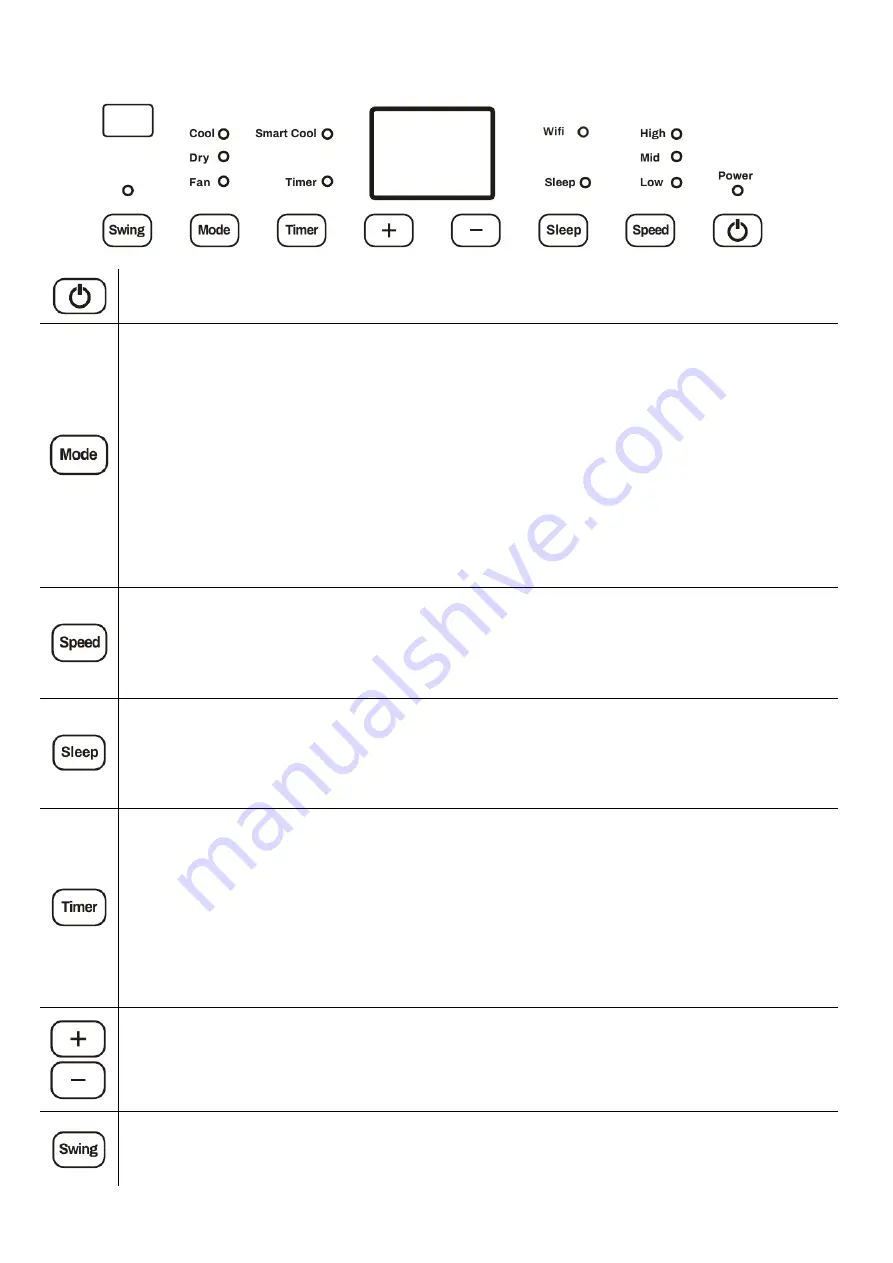
Press the POWER button to turn the unit ON or OFF. 


Press the MODE button to cycle between the 4 modes, the indicator for the selected mode will 
be illuminated.  

COOL: 

The room is cooled with the cold air expelled through the front air outlet while hot air is 

expelled through the vent pipe. The desired room temperature can be set between 17 and 30 
degrees using the + and 

 buttons, and the fan speed can be changed using the SPEED button.


FAN: 

The fan speed can be changed pressing the SPEED button.


DRY (DEHUMIDIFY): 

Should be operated without the vent hose, but with continuous drainage 

to remove moisture from the air. The display will show dH while in dry mode. The unit will 
operate at low fan speed in DRY mode.


SMART COOL: 

An intelligent cooling mode where the fan speed is automatically adjusted based 

on the amount of cooling required. Attempts to change the fan speed will move the unit into 
COOL mode. 


Repeatedly press the SPEED button to cycle through the five fan speeds. Each time the SPEED 
button is pressed, the fan speed will be displayed. The fan speed can be changed between F1 
(Low) to F5 (High). The LED indicators will also illuminate to show the fan speed as below:  

F1 

Low,  F2 

 Low and Mid,  F3 

 Mid,  F4 

 Mid and High,  F5 

 High. 

The fan speed cannot be changed in SMARTCOOL and DRY modes. 


Press to enter sleep mode. The sleep indicator will be illumined and all other indicators will be 
turned off. In sleep mode, the appliance works at low fan speed. Press SLEEP again to exit sleep 
mode.  
The SLEEP button is also used to set up the WIFI function. See the WIFI SMART CONTROL 
section for further information. 


The timer functions cannot be combined or repeated.   


POWER ON TIMER  

With the appliance in standby, press the TIMER button to set the power-on timer. Use the + and 
- buttons to adjust the duration of the timer (1 to 24 hours). The Timer indicator will turn on 
and the unit will start after the selected number of hours.  

POWER OFF TIMER  

With the appliance running with the desired settings, press the TIMER button to set the power-
off timer. Use the + and - buttons to adjust the duration of the timer (1 to 24 hours). The timer 
indicator will illuminate and the unit will stop after selected number of hours. 


Used to adjust the temperature in COOL/SMART COOL mode and to set the duration of the 
TIMER.  The buttons are not used in FAN or DRY modes. Press both buttons together to change 
between displaying the temperature in Celsius and Fahrenheit. 


Press this button to enable the swing function. The louvres will slowly move from side to side. If 
swing is pressed again the louvres will stop in their current position.  
Press and hold the swing button to turn off the status indicators on the control panel. 

Summary of Contents for 1535026

Page 1: ...ECOSILENT8WE ECOSILENT10W 10 000 BTU ECOSILENT10WE Thank you for choosing electriQ Please read this user manual before using this innovative Air Conditioner and keep it safe for future reference Visi...

Page 2: ...REMOTE CONTROL 9 WIFI APP CONTROL 10 SETTING UP THE APP 10 CONNECTING THE AIR CONDITIONER 12 CONTROLLING YOUR DEVICE 14 SMART SCENES 17 CLEANING AND MAINTENANCE 20 EMPTYING THE INTERNAL WATER TANK 21...

Page 3: ...th this appliance Do not clean the unit by spraying it or immersing it in water Never connect the unit to an electrical outlet using an extension cord If an outlet is not available one should be insta...

Page 4: ...ised the refrigerant system Any repairs or maintenance must only be carried out on the unit by a suitably qualified engineer Before opening and servicing the unit the authorised engineer must be in po...

Page 5: ...oved Energy Efficiency 24 Hours Start Stop Timer Digital Thermostat Smart WIFI App control Castors and Handles for Enhanced Portability Auto Restart to retain the settings in the event of power failur...

Page 6: ...t outlet on the rear of the appliance by putting into position and twisting to lock in place 3 Make sure the unit is upright and there are no obstructions to the air inlets and outlet grills INSTALLAT...

Page 7: ...our air conditioner should be used without the vent pipe in dry mode When using dry mode ensure that an external water tank is used monitored and regularly emptied before overflowing Permanent plumbin...

Page 8: ...cannot be changed in SMARTCOOL and DRY modes Press to enter sleep mode The sleep indicator will be illumined and all other indicators will be turned off In sleep mode the appliance works at low fan s...

Page 9: ...ll enter auto defrost and the heating symbol will flash on the control panel AUTOMATIC THERMAL PROTECTION To protect the service life of the machine the machine has automatic thermal protection If the...

Page 10: ...OR SETUP The air conditioner has two different setup modes EZ Quick Connection and AP Access Point The quick connection is a quick and simple way to set the unit up The AP connection uses a direct loc...

Page 11: ...mail address or phone number and press continue to register 4 A verification code will be sent by the method selected in step 3 Enter the code into the app 6 The app is now registered It will automati...

Page 12: ...p 2 Select the type of device as Air Conditioner WIFI within the Large Home Appliance tab 3 Select your network enter your WIFI password and press Next 4 Ensure the WIFI light on the air conditioner i...

Page 13: ...Ensure the WIFI light on the air conditioner is slowly flashing once per three seconds then select AP Mode in the top right corner before pressing on the orange button at the bottom of the screen to...

Page 14: ...Allows you to program intelligent behaviour based on the internal and external environment Add Device Add a device to the app and go through the setup process Profile Provides the option for changing...

Page 15: ...desired temperature Current Room Temperature Displays the current room temperature Back Returns to the Home Screen Desired Temperature Shows what temperature the unit is currently set to MODE Change t...

Page 16: ...g the ADD ANOTHER ROOM option at the bottom See ADD ANOTHER ROOM below 5 Untick any rooms that are not required on the app 6 Press DONE in the top right corner SETTING YOUR LOCATION ADD ANOTHER ROOM U...

Page 17: ...ing the user to easily change between a number of preset configurations Below is an example of how to set up a scene 1 Press on the Smart Scene tab at the bottom of the Home screen 3 Select the type o...

Page 18: ...o add a smart scene 3 Select the type of automation required such as on schedule for setting up a timed operation 5 Chose the function set the value for the function and then press the back button in...

Page 19: ...ROUBLESHOOTING 1 Check whether the device is powered on and is in the correct WIFI connection mode if not please refer to the CHANGING BETWEEN CONNECTION MODES section on page 12 2 Ensure the WIFI pas...

Page 20: ...d once every two weeks or as often as necessarily in your environment CLEAN THE UPPER FILTER SCREEN FRAME Grip the edge of the evaporator filter screen frame with both hands Pull out to remove the fil...

Page 21: ...ter tank in cooling mode If the unit is vented correctly most of the water is reused to cool the condenser coils and any excess is evaporated Please do not use continuous drainage if you intend to use...

Page 22: ...ce Put the air conditioning on a flat and hard place to reduce noise Compressor does not work Overheat protection starts Wait for 3 minutes until the temperature is lowered and then restart the machin...

Page 23: ...triQ co uk support Please for your own convenience make these simple checks before calling the service line If the unit still fails to operate call the number below or complete the online form 0330 39...

Page 24: ...nt R290 280g R290 220g Sound power level 61dB A Thermostat 17 30oC Maximum working pressure of suction exhaust side 1 0 3 5MPa Maximum Allowable Pressure 3 5Mpa Power Supply AC 220 240V 50Hz Net Weigh...

Reviews: