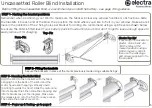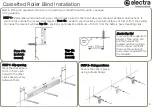
STEP 1- Marking the bracket positions
Remember when positioning your blind to make sure the fabric will clear any window handles or obstructions. Slide
the brackets into each end of the blind, then position the blind where you’d like to fix it in your window. Make a pencil
mark in the positions of the 2 fixing holes per bracket for drilling. We recommend using a spirit level as shown below
to ensure the blind is fitted level .
If your battery pack is fixed behind your blind, don't forget to leave enough space to
easily remove it for charging.
Uncassetted Roller Blind Installation
Electra Top Tip!
If securing the brackets to
plaster, stone, brick, etc.,
drill the holes at the
marked positions using a
5.5mm masonry drill bit,
then use the wall plugs
and screws supplied to fix
the brackets.
STEP 2- Fitting the brackets
Secure the brackets in place at the marks previously made using suitable fixings.
5
Face-Fix
Top-Fix
STEP 3- Mounting the Roller Blind
Hold the blind to the brackets with the fabric
hanging from the back of the blind and the
motor head aerial hanging vertically down
(pointing towards the floor). Slide the motor end
into its bracket first, then slide the opposing end
into its bracket as per the diagram. Make sure
the release lever is to the front for easy access.
Then slide the bracket covers on.
STEP 4 - Power up & Testing- go to page 8
Before fitting the uncassetted blind, we recommend you install the battery - see page 4 for guidance.
Summary of Contents for Roller
Page 16: ...electrablinds co uk ...


