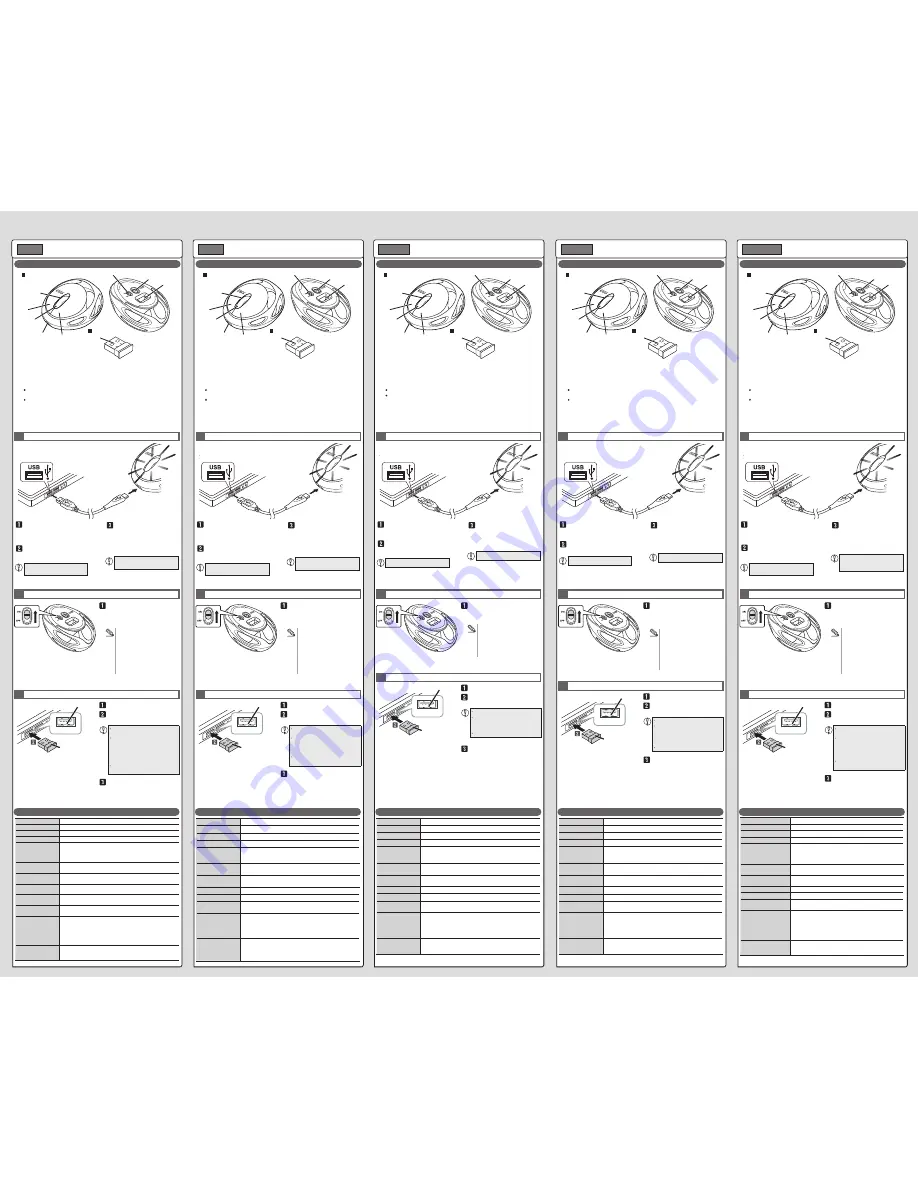
Name and function of each part
각 부분의 명칭 및 기능
各部分的名称及其作用
各部位名稱及功能
Nama dan fungsi setiap bagian
Wireless Mouse
Manual
ENGLISH
The power indicator light turns off after
turning on in red for six seconds.
Specifications
1
Charging
2
Turning the power on
3
Connecting to a PC
Plug in the connector in the correct
place with the correct side facing up.
If you feel a strong resistance when
inserting the USB connector, check
that the shape and orientation of the
connector is correct. Using excessive
force may damage the connector and
cause injury.
Do not directly touch the terminal area
of the USB connector.
Slide the rear power switch to the
ON position.
Start the PC.
Insert the receiver unit into the
PC's USB port.
The driver will be automatically
installed, and you will then be able
to use the mouse.
1
Plug the USB [A] connector of
the charging USB cable into
the USB port of the PC.
Turn on the power of the PC, if
not already.
USB port
Receiver unit
Insert the receiver into the USB port.
Power-saving mode
When the mouse is left untouched
for a fixed period of time while the
power is ON, it automatically shifts to
power-saving mode. The mouse is
released from the power-saving
mode when it is touched.
* Mouse operation may be unstable
for a few seconds after returning
from the power-saving mode.
2
3
4
5
6
7
8
9
Plug the included charging
microUSB cable into the
charging microUSB connector
of this product.
Ensure the correct orientation and
plug-in location of the connector.
It take approximately four hours
and a half to complete charging.
The power indicator light turns on
in green to start charging.
It turns off when charging is
complete.
Mouse
Receiver unit
Resolution
1800 dpi
Interface
USB
Radio frequency
2.4 GHz band
Radio wave method
GFSK
Operation distance
Non-magnetic surface (e.g. wooden desk): approx. 10 m
Magnetic surface (e.g. steel desk): approx. 3 m
* These values were obtained in ELECOM's test environment and are not
guaranteed.
Mouse dimensions
(W × D × H)
approx. 65 × 86 × 39 mm
Receiver unit dimensions
(W × D × H)
approx. 15 × 18 × 6 mm
Operating temperature/
humidity
5°C to 40°C/90%RH or less (without condensation)
Storage temperature/
humidity
-10°C to 60°C/90%RH or less (without condensation)
Batteries
Built-in lithium-ion battery
The battery cannot be removed or replaced.
Operating time
when fully charged
Continuous operating time : approx. 56 hours
Continuous standby time : approx. 90 days
Estimated usage time : approx. 94 days
The above is assuming the computer is used for eight hours a day with
5% of that time spent operating the mouse.
Supported OS
Windows
®
10, Windows
®
8.1, Windows
®
RT8.1, Windows
®
7,
Windows Vista
®
, Windows
®
XP, macOS Sierra (10.12)
(Updating the OS or installing a service pack may be necessary.)
무선마우스
취급설명서
한국어
건전지 잔량 표시 램프(휠 주위)가
적색으로 6초간 점등한 후 소등합니다.
기본 사양
1
충전하기
2
전원 켜기
3
컴퓨터 접속
커넥터 방향과 삽입 방향을 정확히
확인하십시오.
삽입 시에 강한 저항을 느낄 때에는
커넥터의 모양과 방향이 올바른지
확인하십시오. 무리하게 삽입하면
커넥터가 파손되거나 고장날 수 있습니다.
USB 커넥터의 단자 부분을 만지지
마십시오.
바닥면의 전원 스위치를 ON 위치로
슬라이드시킵니다.
컴퓨터를 부팅합니다.
리시버 유닛을 컴퓨터 USB 포트에
삽입합니다.
드라이버가 자동으로 설치되며,
마우스를 사용할 수 있습니다.
1
충전용 USB 케이블의 USB[A]
커넥터를 컴퓨터의 USB 포트에
접속합니다.
컴퓨터 전원이 꺼져있을 경우에는
전원을 켭니다.
USB 포트
리시버 유닛
이 부분에 삽입합니다.
마우스의 절전 모드에 대해
전지의 소모를 억제하기 위해, 전원
스위치가 ON 상태에서 조작 없이
일정 시간이 지나면, 마우스가
자동으로 절전 모드로 이행합니다.
마우스를 움직이면 절전 모드에서
벗어납니다.
※절전 모드에서 벗어난 후 2~3
초간은 마우스 조작이 불안정할 수
있습니다.
2
3
4
5
6
7
8
9
본 제품의 충전용 microUSB
커넥터에 부속 충전용 USB
케이블의 USB[microB]
커넥터를 접속합니다.
커넥터 방향과 삽입 장소를 정확히
확인하십시오.
충전이 완료되기까지 약 4시간 30분이
소요됩니다.
건전지 잔량 표시 램프(휠 주위)가
녹색으로 점등하며 충전을
시작합니다.
충전이 완료되면 소등합니다.
마우스 본체
리시버 유닛
无线鼠标
使用说明书
中文・简体
电池余量指示灯(滚轮周围)点亮红色
6 秒后,熄灭。
基本规格
1
充电
2
接通电源
3
连接到计算机
请仔细确认接头的方向和插入部位。
插入时如果感到强的阻力,请确认接头
的形状和方向是否正确。强行插入可能
导致接头破损或者人身受伤。
请不要触摸 USB 接头的端子部。
使底面的电源开关滑到 ON 处。
启动计算机。
将接收单元插入计算机的 USB 端
口。
驱动程序将自动安装,自此即可使用
鼠标。
1
将充电 USB 电缆的 USB[A] 接
头接在计算机的 USB 端口上。
计算机的电源没有接通时,接通
电源。
USB 端口
接收器
插入这一部分。
关于鼠标的省电模式
为了抑制电池消耗,在将电源开关
置于 ON 的状态时隔一段时间不操
作,鼠标自动进入省电模式。
移动鼠标,从省电模式恢复。
※从省电模式恢复后的 2-3 秒期间,
鼠标操作有时不稳定。
2
3
4
5
6
7
8
9
将附带的充电 USB 电缆的 USB
[microB] 接头接在本产品的充
电 microUSB 接头上。
请仔细确认接头的方向和插入部位。
充电结束大约耗时 4.5 小时。
电池余量指示灯(滚轮周围)点亮
绿色,开始充电。
充电结束后,熄灭。
鼠标本体
接收器
無線滑鼠
使用說明書
中文 ・繁體
電池殘餘量顯示燈 ( 滾輪周邊 ) 紅燈
亮起 6 秒後,隨即熄滅。
基本規格
1
充電
2
打開電源
3
連結電腦
請確認連接器方向與插入部位。
插入時,感到強大阻力的情況下,請
確認連接器的形狀和方向是否正確。
若強行塞入,可能造成連接器破損或
受傷。
請勿觸碰 USB 連接器的端子部。
請將底部電源開關撥至 ON 的位置。
開啟電腦。
將接收器插入電腦 USB 埠。
驅動器自動安裝後,即可使用滑鼠。
1
請將充電用 USB 電纜的 USB
[A]連接器插入電腦的USB埠。
若未開啟電腦的電源,請先打
開電源。
USB 埠
接收器
插入此部分。
關於滑鼠的省電模式
為了減少電池耗電,電源開關在
ON 的狀態下沒有操作,經過一定
時間之後,滑鼠會自動變成省電模
式。
若是移動滑鼠,就會從省電模式復
原。
※從省電模式復原後的 2 ~ 3 秒,
滑鼠操作可能變得不穩定。
2
3
4
5
6
7
8
9
請將內含之充電用 USB 電纜的
USB[microB]連接器插入本
製品充電用 microUSB 連接器。
請確認連接器方向與插入部位。
至充電完成為止約需4小時30分鐘。
電池殘餘量顯示燈 ( 滾輪周邊 ) 亮
起綠燈,即開始充電。
充電完成後,顯示燈隨即熄滅。
滑鼠本體
接收器
Mouse Nirkabel
Manual
Bahasa Indonesia
Indikator daya sisa baterai mati setelah
menyala merah selama enam detik.
Spesifikasi dasar
1
Mengisi daya
2
Nyalakan daya
3
Menyambungkan ke PC
Pastikan untuk memeriksa arah konektor
dan letak penyisipan.
Jika Anda kesulitan memasukkan konektor
USB, pastikan bahwa bentuk dan arah
konektor sudah benar. Jika dipaksakan
konektor dapat rusak dan menyebabkan
cedera.
Jangan sentuh area terminal konektor USB
secara langsung.
Geser sakelar daya di belakang ke
posisi MENYALA.
Nyalakan PC.
Sisipkan unit penerima ke dalam
port USB PC.
Driver akan otomatis terpasang dan
Anda dapat menggunakan mouse.
1
Pasang konektor USB [A] kabel
USB pengisian daya baterai ke
port USB PC.
Nyalakan daya PC jika belum
menyala.
Port USB
Unit penerima
Sisipkan penerima ke port USB.
Mode hemat daya
Apabila mouse tidak disentuh selama
beberapa waktu saat daya dalam posisi
ON, mouse otomatis berpindah ke
mode hemat daya. Apabila disentuh,
mouse tidak dalam mode hemat daya
lagi.
* Pengoperasian mouse mungkin tidak
stabil selama beberapa detik setelah
kembali dari mode hemat daya.
2
3
4
5
6
7
8
9
Pasang kabel pengisian
microUSB yang disertakan ke
konektor pengisian daya baterai
microUSB produk ini.
Pastikan arah dan tempat colokan
konektor sudah benar.
Pengisian daya baterai memerlukan
waktu sekitar empat jam setengah
untuk menyelesaikan pengisian.
Indikator daya sisa baterai menyala
hijau untuk memulai pengisian.
Indikator mati saat pengisian selesai.
Mouse
Unit penerima
解析度
1800 dpi
適用介面
USB
電波頻率
2.4GHz 頻段
電波方式
GFSK 方式
電波距離
非磁性物體(木桌等):約 10m
磁性物體(鐵桌等):約 3m
※ 這是本公司環境下的測試值,並非保證。
滑鼠本體 外型尺寸
(寬 × 深 × 高)
約 65 × 86 × 39 mm
接收器 外型尺寸
(寬 × 深 × 高)
約 15 × 18 × 6 mm
動作溫度 / 濕度
5℃~ 40℃ / ~ 90%RH(必須無水氣凝結)
存放溫度 / 濕度
-10℃~ 60℃ / ~ 90%RH(必須無水氣凝結)
使用電池
內建充電式鋰離子電池
( 電池無法取出或更換 )
操作時間
充飽電後預期可使用時間
連續操作時間 : 約 56 小時
連續待機時間 : 約 90 天
預期可使用時間 : 約 94 天
假設 1 天使用 8 小時電腦,其中 5% 時間使用滑鼠
支援 OS
Windows® 10,Windows® 8.1,Windows® RT8.1,Windows® 7,
Windows Vista®,Windows® XP,macOS Sierra(10.12)
(可能必須更新至各 OS 的最新版本,或者安裝服務包。)
Resolusi
1800 dpi
Antar muka
USB
Frekuensi radio
Pita 2,4 GHz
Metode gelombang radio
Modulasi GFSK
Jangkauan gelombang radio
Permukaan yang tidak mengandung magnet (meja kayu, dll.): sekitar 10 m
Permukaan magnetik (meja baja, dll.): sekitar 3 m
* Nilai ini didasarkan pada pengujian Elecom dan bukan untuk menjamin
performa.
Dimensi mouse
(L × P × T)
sekitar 65 × 86 × 39 mm
Dimensi unit penerima
(L × P × T)
sekitar 15 × 18 × 6 mm
Suhu operasi/kelembapan
Suhu 5°C hingga 40°C/ 90% RH atau kurang (tanpa kondensasi)
Suhu/kelembapan penyimpana
Suhu -10°C 60°C/ 90% RH atau kurang (tanpa kondensasi)
Baterai
Baterai litium-ion tertanam
Baterai tidak dapat dilepas ata.
Waktu pengoperasian
saat terisi penuh
Waktu pengoperasian berkelanjutan : sekitar 56 jam
Waktu siaga berkelanjutan : sekitar 90 hari
Perkiraan masa pakai baterai : sekitar 94 hari
Bila komputer digunakan selama 8 jam sehari, dengan 5% waktu tersebut
dihabiskan untuk mengoperasikan mouse menggunakan baterai alkaline.
OS yang didukung
Windows® 10, Windows® 8.1, Windows® RT8.1, Windows® 7,
Windows Vista®, Windows® XP, macOS Sierra (10.12)
(Mungkin perlu memperbarui OS atau memasang paket layanan.)
카운트 수
1800 카운트
대응 인터페이스
USB
전파 주파수
2.4GHz 대
전파 방식
GFSK 방식
전파 도달 거리
비자성체 ( 나무판 등 ): 약 10m
자성체 ( 철판 등 ): 약 3m
※폐사 환경에서의 테스트 값이며 보증 값은 아닙니다 .
마우스 본체 외형 치수
( 폭 x 깊이 x 높이 )
약 65 × 86 × 39 mm
리시버 유닛 외형 치수
( 폭 x 깊이 x 높이 )
약 15 × 18 × 6 mm
동작 온도 / 습도
5℃~ 40℃ / ~ 90% RH( 단 , 결로가 없을 때 )
보존 온도 / 습도
-10℃~ 60℃ / ~ 90% RH( 단 , 결로가 없을 때 )
사용 전지
내장 리튬 이온 충전지
( 전지는 분리도 교환도 할 수 없습니다 )
동작 시간
충전 완료 시부터의 기준
연속 동작 시간 : 약 56 시간
연속 대기 시간 : 약 90 일
예상 사용 가능 시간 : 약 94 일
1 일 8 시간 컴퓨터 조작 중 5% 를 마우스 조작에 할당한 경우
대응 OS
Windows® 10、Windows® 8.1、Windows® RT8.1、Windows® 7、
Windows Vista®、Windows® XP、macOS Sierra(10.12)
( 각 OS 의 최신 버전으로의 업데이트나 서비스팩의 설치가 필요할 수
있습니다 .)
分辨率
1800 DPI
支持接口
USB
电波频率
2.4GHz 频段
电波方式
GFSK 方式
电波传播距离
非磁性体(木桌等):约 10 m
磁性体(铁桌等):约 3 m
※ 这是在本公司环境下的测试值,并非保证值。
鼠标本体 外观尺寸
(宽 × 深 × 高)
约 65 × 86 × 39 mm
接收单元 外观尺寸
(宽 × 深 × 高)
约 15 × 18 × 6 mm
工作温度 / 湿度
5℃~ 40℃ ,相对湿度最高 90%(但须无结露)
存放温度 / 湿度
-10℃~ 60℃,相对湿度最高 90%(但须无结露)
使用电池
内置锂离子充电电池
(电池无法取出或更换)
工作时间
充满电后的大致工作时间
连续工作时间 : 约 56 小时
连续待机时间 : 约 90 天
估计可用时间 : 约 94 天
假设 1 天使用计算机 8 小时,其中 5% 的时间在操作鼠标
支持的操作系统
Windows® 10,Windows® 8.1,Windows® RT8.1,Windows® 7,
Windows Vista®,Windows® XP,macOS Sierra(10.12)
(有时需要升级到各操作系统的最新版本,或者安装服务包。)
Product number: M-EG30DR
제품번호
:
M-EG30DR
/elecom9
产品编号
: M-EG30DR
/elecom9
產品編號
: M-EG30DR
/elecom9
Nomor produk: M-EG30DR
/elecom9
3 Wheel
4 Power indicator light (around the wheel)
1 Left button
2 Right button
It turns on in green while charging. It
turns off when charging is complete.
5 microUSB connector for charging
6 Power switch
7 Optical sensor
8 Receiver unit storage compartment
9 USB connector (male)
The base of the wheel illuminates in red
for a few seconds when the power is
turned on.
It flashes red when the battery level
gets low.
3
휠
4
건전지 잔량 표시 램프(휠 주위)
1
좌 버튼
2
우 버튼
충전 중에는 녹색으로 점등합니다. 충전이
완료되면 소등합니다.
5
충전용 microUSB 커넥터
6
전원 스위치
7
광학식 센서
8
리시버 유닛 수납부
9
USB 커넥터(수컷)
전원을 켜면(ON) 휠 주위가 일정 시간
적색으로 점등합니다.
사용 중에 전지 잔량이 적어지면, 적색으로
점멸합니다.
3
滚轮
4
电池余量指示灯(滚轮周围)
1
左键
2
右键
充电中绿色点亮,充电结束后熄灭。
5
充电 microUSB 接头
6
电源键
7
光学传感器
8
接收单元存放部
9
USB 连接器(公)
接通 (ON) 电源时,滚轮周围点亮红色
一段时间。
使用中如果电池余量变少,会闪烁红色。
3
滾輪
4
電池殘餘量顯示燈 ( 滾輪周邊 )
1
左鍵
2
右鍵
充電中會亮起綠燈。充電完成後則隨即
熄滅。
5
充電用 microUSB 連接器
6
電源開關
7
光學式感應器
8
接收器收納部位
9
USB 連接器(公)
開啟 (ON) 電源時,滾輪周邊會於一定
時間亮起紅燈。
使用時,若電池殘餘電量變少,就會閃
爍紅燈。
3
Roda
4
Indikator daya sisa baterai (di seputar roda)
1
Tombol kiri
2
Tombol kanan
Menyala hijau saat mengisi daya baterai.
Indikator mati saat pengisian selesai.
5
Konektor microUSB untuk mengisi daya
6
Pengalih daya
7
Sensor optik
8
Kompartemen penyimpanan
unit penerima
9
Konektor USB (jantan)
Bagian bawah roda akan menyala merah
selama beberapa detik apabila daya
dihidupkan.
Lampu akan berwarna merah apabila daya
baterai mulai melemah.
/elecom9


