background image


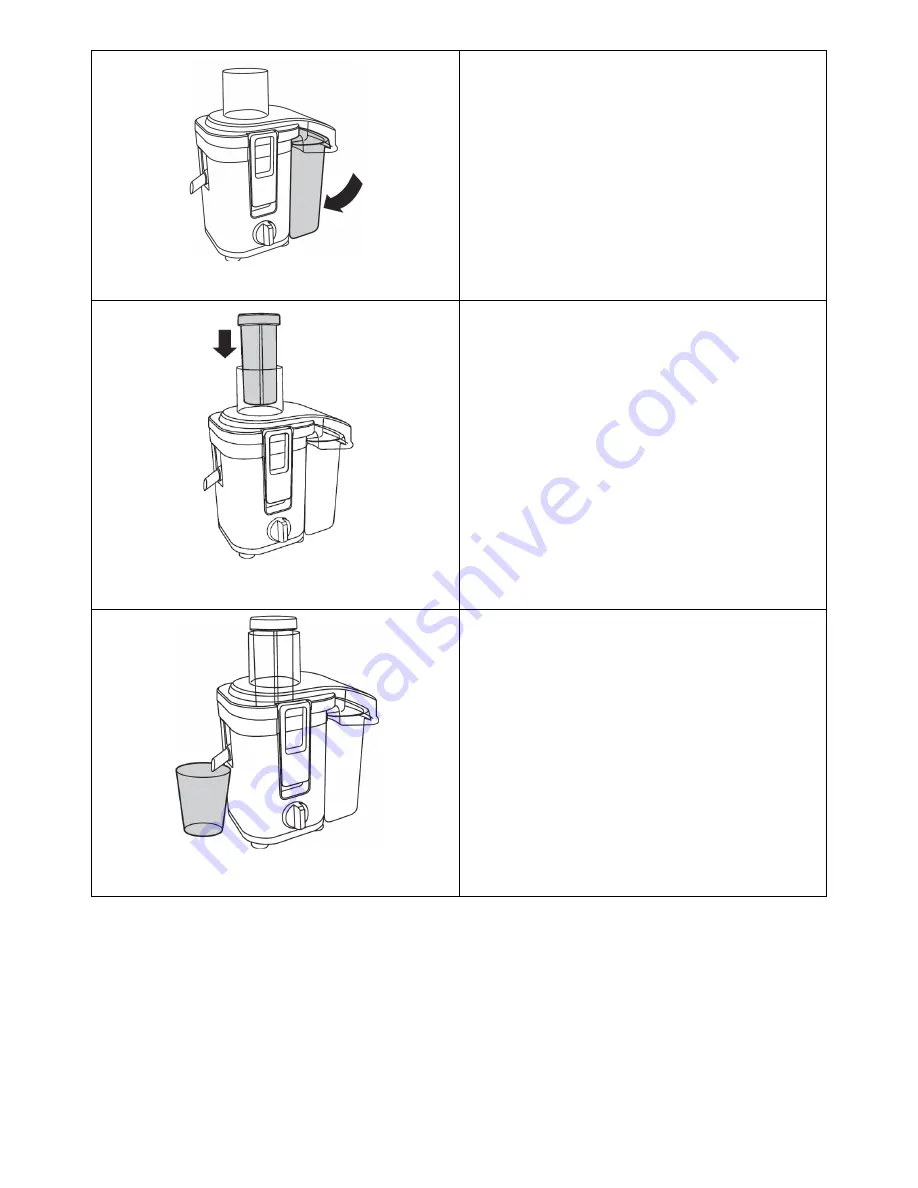
(Figure 7)


  Swing the pulp container downwards. The pulp 

container has a round protrusion on the bottom 

which will fit into the round opening in the pulp 

container support tray on the motor base when 

it is correctly fitted. 


(Figure 8) 


  Slide the food  pusher  into the  pulp  chute.  The 

food  pusher  has  a  groove  in  it  which  must  be 

lined  up  with  the  protrusion  inside  the  pulp 

chute. 


(Figure 9) 


  Place  a  glass  or  jug  container  under  the  juice 

outlet spout.   


NOTE: Never put any fruits and vegetables 

inside the pulp chute until the appliance is 

power on. 


Summary of Contents for EJE-9811A

Page 1: ...y before operating your set Retain it for future reference Record model number and serial number of the set See the label attached on the set and quote this information to your dealer when you require...

Page 2: ...etables inside the pulp chute until the appliance is power on 13 Only use the food pusher as supplied Never put your fingers or any other sharp objects into the pulp chute 14 Beware when handling the...

Page 3: ...steel grater and filter Dishwasher safe 5 Spout cover Dishwasher safe 6 Juice outlet spout To juice out fruits and vegetables 7 Motor base Do not immerse this part in water or any other liquids 8 Pulp...

Page 4: ...e 2 Install the stainless steel grater and filter assembly into the motor base Twist the filter assembly and gently push down until it is seated on the motor base NOTE The top edge of the grater shoul...

Page 5: ...cer cover Figure 5 Press the bottom of the safety locking arms inwards to lock them in place If the arms do not fit into place easily do not force to lock Check again and make sure the juicer cover is...

Page 6: ...t tray on the motor base when it is correctly fitted Figure 8 Slide the food pusher into the pulp chute The food pusher has a groove in it which must be lined up with the protrusion inside the pulp ch...

Page 7: ...either to speed 1 or 2 depending on the type of fruits or vegetables to be juiced figure 3 WARNING Never put any fruits or vegetables in the pulp chute until the appliance is power on 6 Insert the fr...

Page 8: ...be extracted from the pulp 4 Plastic bag can be put in the pulp container for easy clean up 5 Do not allow the pulp container to overfill as this may cause damage or prevent the correct operation 6 T...

Page 9: ...ture of centrifugal juicing It is best to juice them with a combination of other fruits and vegetables 4 All fruits and vegetables produce different amount of liquids This varies within the same group...

Page 10: ...bulb 2cm piece of ginger peeled Process all the ingredients through the juicer and serve immediately Taste Sensation Watermelon Apricot and Strawberry 2 cups roughly chopped watermelon seeded 6 apric...

Page 11: ...ed and stone removed 2 grapefruits peeled Process apple peaches and grapefruit Serve immediately Pineapple Peach and Pear Juice serves 3 small pineapple 2 peaches halved and stone removed 2 small ripe...

Page 12: ...pples 4 sticks celery Process beetroot apples and celery Serve immediately Blueberry Blackberry Strawberry and Lime Juice serves 3 500g blackberries 500g blueberries 500g strawberries 1 lime peeled Pr...

Page 13: ...ed milk Process grapes kiwis and strawberries Mix in milk and serve immediately Kiwi Cucumber and Pomegranate serves 2 250g kiwi fruits peeled 125g cucumber 1 tablespoon pomegranate seeds Slices of li...

Page 14: ...PORTANT Before disassembling the appliance make sure that the control switch is turned to speed 0 position the plug has been removed from the wall outlet and the motor has completely stopped operating...

Page 15: ...the outer rim to clean away pulp from the filter and cutting blades After cleaning the filter hold it up towards a light to ensure the fine mesh holes are not blocked If the holes of the filter are bl...

Page 16: ...15...

Reviews: