background image


w w w . e l a t i o n l i g h t i n g . c o m


11


EWDMX IP™ User Manual ver 1 

D E V I C E   I N S T A L L A T I O N  


F L A M M A B L E   M A T E R I A L   W A R N I N G  

Keep fixture at  least 5.0 ft (1.5m) away from any 
flammable materials, decorations, pyrotechnics, etc. 


E L E C T R I C A L   C O N N E C T I O N S  

A qualified electrician should be used for all 
electrical connections and/or installations. 

C A U T I O N S  


For added protection, mount the device in areas outside walking paths, seating 
areas, or in areas were unauthorized personnel might reach the fixture. 


Before mounting the device to any surface, make sure the installation area can 
hold a minimum point load of 10 times the weight of the fixture. 


Device installation must always be secured with a secondary safety attachment, 
such as an appropriate safety cable. 


Never stand directly below the device when mounting, removing or servicing. 


The applicable operating temperature for the device is between 

-10°C to 45°C

Do not use the device under or above this temperature range. 


Ensure ALL connections and end caps are properly sealed with a dielectric 
grease (available at most electrical suppliers) to prevent water corrosion and/or 
electrical short circuit. 

INSTALLATION VIA INCLUDED BRACKET 


TRUSS MOUNTING INSTALLATION 

1) Insert the quick-lock fasteners of the


included bracket into the respective holes on 
the bottom of the device. Tighten the 
quick-lock fasteners fully clockwise.


2) Loop the safety cable through the opening 
on the bottom of the base indicated by red 
arrow,  and over trussing system  or a safe 
fixation spot. Hook end of the safety cable on 
to the attached carabineer. 

PERMANENT INSTALLATION 

1) Remove attached mounting  bracket and 
set on a flat surface or secure to a wall using 
the 2 slotted screw-mounting points.


Summary of Contents for EWDMX IP

Page 1: ...EWDMX IP user manual E L A TI O N EWDMXIP user manual ...

Page 2: ...of their respective companies ELATION PROFESSIONAL and all affiliated companies hereby disclaim any and all liabilities for property equipment building and electrical damages injuries to any persons and direct or indirect economic loss associated with the use or reliance of any information contained within this document and or as a result of the improper unsafe insufficient and negligent assembly ...

Page 3: ...er Manual ver 1 C O N T E N T S General Information 4 Warranty 7 Safety Instructions 8 General Guidelines 9 Device Overview 10 Device Installation 11 Installation Location Guidelines 12 Operation Guide 13 Technical Specifications 16 Optional Accessories 17 ...

Page 4: ...entering the fixture and the second digit Water Protection indicates the extent of protection against water entering the fixture An IP65 rated device such as the EWDMX IP is one which has been designed and tested to protect against the ingress of dust 6 and high pressure water jets from any direction 5 M A R I N E C O A S T A L E N V I R O N M E N T I N S T A L L A T I O N S Please note although t...

Page 5: ...d below Please do not discard the shipping carton in the trash Please recycle whenever possible BOX CONTENTS 1 IP Rated Power Cable 1 IP Rated 3pin Male DMX Input Cable 1 Clamp Mounting Bracket 2 Screws 1 Safety Cable Manual Warranty Card CUSTOMER SUPPORT Elation Professional provides a customer support line to provide set up help and to answer any question should you encounter problems during you...

Page 6: ... a piece of paper and included in the shipping container If the unit is under warranty you must provide a copy of your proof of purchase invoice Items returned without a R A number clearly marked on the outside of the package will be refused and returned at customer s expense You may obtain a R A number by contacting customer support I M P O R T A N T N O T I C E There are no user serviceable part...

Page 7: ...er by Elation Professional if the product is damaged because not properly maintained as set forth in the product instructions guidelines and or user manual D This is not a service contract and this warranty does not include any maintenance cleaning or periodic check up During the periods as specified above Elation Professional will replace defective parts at its expense and will absorb all expense...

Page 8: ...ons to this device will void the original manufactures warranty and increase the risk of damage and or personal injury Always disconnect from main power source before performing any type of cleaning procedure and or when this device is not in use Only handle the power cord by the plug end never pull out plug by tugging wire the cord Do not operate device if the power cord has become frayed crimped...

Page 9: ...ualified Most damages are the result of operations by nonprofessionals DO NOT shake device avoid brute force when installing and or operating When installing device overhead in a suspended location always install with an appropriate safety cable When installing the fixture in a suspended environment always use mounting hardware that is no less than M10 x 25 mm also be sure the hardware is insert i...

Page 10: ...LASH Unlinking All Wireless Receivers RAPID FLASH Linking With All Wireless Receivers LINK RX Receiver MODE LED INDICATOR ON Not Linked To A Wireless Transmitter FLASH Linked To A Wireless Transmitter RAPID FLASH Linking To A Wireless Transmitter DATA Both modes TX RX Indicates presence of a wireless DMX signal G4 Both Modes TX RX Indicates G4 mode is active RDM Both Modes TX RX Indicates presence...

Page 11: ...ppropriate safety cable Never stand directly below the device when mounting removing or servicing The applicable operating temperature for the device is between 10 C to 45 C Do not use the device under or above this temperature range Ensure ALL connections and end caps are properly sealed with a dielectric grease available at most electrical suppliers to prevent water corrosion and or electrical s...

Page 12: ...position the wireless antenna a minimum of 9 8 ft 3m above audiences and or above ground level Careful planning and testing of the selected installation location is critical to ensure optimum and reliable wireless DMX operation The maximum wireless DMX range is up to 1 640 ft 500m based on general testing of the EWDMX IP in an outdoor urban area with normal interference installed in a location 9 8...

Page 13: ...econds on the RECEIVER check if the RECEIVER is in range and repeat the procedure CLEARING A RECEIVER LINK TO A TRANSMITTER On the TRANSMITTER unit press the RED FUNCTION button and hold for 3 seconds All display LEDs will go out and the LINK LED will be blinking slowly Release the RED FUNCTION button at this point and all connected RECEIVERS will be unlinked TO UNLINK AN INDIVIDUAL RECEIVER On th...

Page 14: ...he LINK light blink slowly Do not release the RED FUNCTION button at this point as this will disconnect all RECEIVERS Wait until you see the ALL of the LEDs light up then the RED CTL light illuminate before releasing the RED FUNCTION button 2 Press and release the RED FUNCTION button to change between the 3 modes Note that each time the RED FUNCTION is pressed the unit will toggle between all the ...

Page 15: ... RDM PWR and three middle SIGNAL indicators are static ON 3 On the RECEIVER RX and PWR indicators are static ON If not please unlink the individual RECEIVER 4 If all LED indicators above light formally press the RED FUNCTION button on the TRANSMITTER quickly LINK lights on TRANSMITTER and RECEIVER will blink Successfully switch to RDM mode if RX LINK DATA G4 RDM PWR and SIGNAL indicators are stati...

Page 16: ...Support 2 4GHz Radio License Free Worldwide TDMA Time Division Multiple Access W DMX G4 Protocol Support Rugged Hard Plastic Case Single DMX 512 Universe CONTROL CONNECTIONS Multi Function Single Push Button Antenna Port IP Rated 3pin Male 3pin Female Attached DMX In Out Cables IP Rated 3pin Attached Power In Cable SIZE WEIGHT Length 9 4 240mm Width 6 7 170mm Vertical Height 2 2 56 5mm Weight 4 6 ...

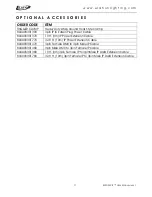
Page 17: ...01390 3pin IP to Edison Plug Power Cable 804090301370 10 ft 3m IP Power Extension Cable 804090301770 32 8 ft 10m IP Power Extension Cable 804090301470 3pin Female DMX to 3pin Male IP Cable 804090301480 3pin Male DMX to 3pin Female IP Cable 804090301380 10 ft 3m 3pin Female IP to 3pinMale IP Data Extension Cable 804090301780 32 8 ft 10m 3pin Female IP to 3pin Male IP Data Extension Cable ...

Page 18: ......

Reviews: