background image

en

11 

Activation 

The devices are activated by connecting the radio cylinder to the 

ekey 

home

/

net

 system in order to set up an operational 

ekey lock

 system. 

The devices can only be activated if you have assembled and cabled the 
components of the 

ekey lock radio modules

, the mechanical knob with 

permanently assembled cylinder, and the 

ekey home/net

 components. 


NOTICE 

The radio emitting module is configured prior to delivery. You do not have 
to enroll the radio emitting module on the module knob. If you have had 
to replace the radio emitting module, you will have to enroll the new radio 
emitting module. Contact your dealer for assistance. 


Mount the 

ekey home/net

 components in accordance with the supplied 

mounting instructions. 


Step 

Instruction 

1st


Activate the 

ekey home/net

 components. 


See the corresponding operating instructions for instructions on activating 

the 

ekey home/net

 components. 


The devices have been activated. Your 

ekey lock

 system is ready for 

operation. 

Activating the 
devices 


Summary of Contents for ekey lock

Page 1: ...OPERATING INSTRUCTIONS en ekey lock...

Page 2: ...Tamper proofing 3 Product description 4 System overview 4 Scope of delivery 5 Proper use and area of application 5 Radio cylinder 6 Wireless transponder 7 Technical specifications 8 Installation 10 Ac...

Page 3: ...horized modifications are carried out on the system devices by the operator These operating instructions are not subject to updating We reserve the right to make technical modifications and change the...

Page 4: ...knob radio emitting module and mechanical knob with permanently assembled cylinder Safety information DANGER All ekey lock devices are to be operated with safety extra low voltage SELV Only use power...

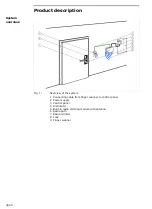
Page 5: ...view of the system 1 Connecting cable from finger scanner to control panel 2 Power supply 3 Control panel 4 Distributor 5 Built in radio emitting module with antenna 6 Radio path 7 Radio cylinder 8 Lo...

Page 6: ...knobs and the cylinder or to enroll new transponders If you lose these cards you will not be able to remove the knobs and the cylinder without causing irreparable damage This product is an accessory...

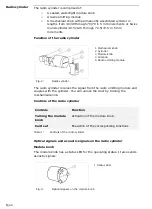
Page 7: ...Radio cylinder The radio cylinder receives the signal from the radio emitting module and couples with the cylinder You can unlock the door by turning the mechanical knob Controls of the radio cylinder...

Page 8: ...e equipped with the radio cylinder if the ekey finger scanner the ekey keypad or the ekey control panel is not operational This may be the case in the event of a power failure or a technical fault Con...

Page 9: ...20 Storage service life Years 4 Wireless transmission AES128 encryption MHz 868 RFID frequency MHz 13 56 IP code IP 65 Table 3 Technical specifications Module knob Name Unit Values Supply VAC VDC 5 1...

Page 10: ...lues Supply VDC 3 1 CR2032 lithium battery Temperature range C 0 to 70 Number of operations per battery charge Approx 10 000 Range m Max 5 typical 1 IP code IP 41 Table 5 Technical specifications Wire...

Page 11: ...ou have a door with a security set featuring a core pull out protection rosette on the outside replace the set ATTENTION Some locking systems are not suitable for in wall mounting of the radio cylinde...

Page 12: ...onfigured prior to delivery You do not have to enroll the radio emitting module on the module knob If you have had to replace the radio emitting module you will have to enroll the new radio emitting m...

Page 13: ...ion required The door opens The system is in normal mode The cylinder decouples again The mechanical knob rotates unengaged Using the code pad Step Action Description Display 1st Enter a stored user c...

Page 14: ...d emergency opening solutions which will enable the door to be opened in the event of the following problems You can also connect a 9 V block battery via the mechanical knob to supply power to the mod...

Page 15: ...f the module knob must be intact for the wireless transponder to function ATTENTION The radio cylinder can also become inoperative The lock unit or the door might have to be damaged beyond repair befo...

Page 16: ...oustic signal 3rd Press the button on the wireless transponder within 15 s Status LED flashes green High acoustic signal sounds twice 4th Hold the activation card in front of the module knob High acou...

Page 17: ...activation card in front of the module knob within 5 s Status LED flashes green Low acoustic signal followed by high acoustic signal 3rd Press the button on the wireless transponder within 15 s Status...

Page 18: ...There is no connection between the wireless transponder or radio emitting module and the module knob Enroll a wireless transponder or contact your dealer The module knob is not responding The module...

Page 19: ...ule knob beeps 5 times and the red status LED flashes 5 times The door opens immediately NOTICE Replace the batteries as quickly as possible Phase 2 The radio emitting module is activated by the door...

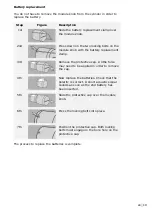
Page 20: ...ment clamp 3rd Remove the protective cap A little force may need to be applied in order to remove the cap 4th Now replace the batteries Check that the polarity is correct A short acoustic signal sound...

Page 21: ...ontact your dealer for further information as necessary Declaration of conformity ekey biometric systems GmbH hereby declares that the product conforms to the relevant European Union directives Copyri...

Page 22: ...lzano Tel 39 0471 922 712 italia ekey net Germany ekey biometric systems Deutschland GmbH Industriestra e 10 D 61118 Bad Vilbel Tel 49 6187 906 96 0 office ekey net Eastern Adriatic region ekey biomet...

Reviews: