background image

9

Chapter 1  Introduction

Functions

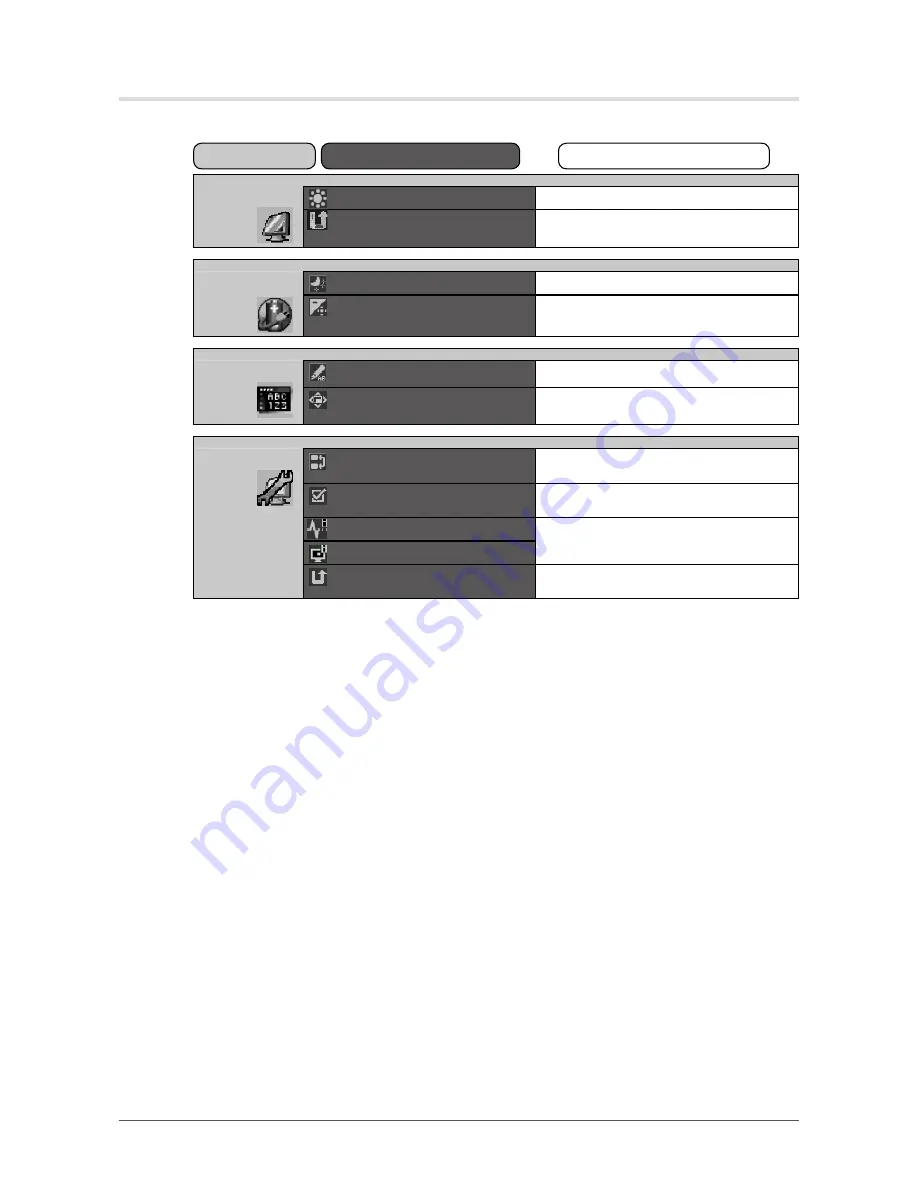
The following table shows all the Adjustment menu’s adjustment and setting menus.

Main Menu


Item

Adjusting/Setting

Mode

Brightness

“2-3. Adjusting Brightness” (

page 11

)

Mode Reset

“3-8. Restoring the Default Setting”  

(

page 16

)

PowerManager

Power Save

“4-1. Setting the Power Saving” (

page 17

)

Power Indicator

“4-2. Setting Power Indicator” (

page 17

)

Menu Settings

Language

“3-6. Setting Language” (

page 15

)

Menu Position

“3-7. Setting the Display Position of the 

Adjustment Menu” (

page 15

)

Tools

Input Selection

“6-2. Connecting Two PCs to the Monitor” 

(

page 21

)

Mode Preset

“3-3. Enabling/Disabling Mode Selection” 

(

page 14

)

Signal Info

“6-4. Displaying Monitor Information”  

(

page 24

)

Monitor Info
All Reset

“3-8. Restoring the Default Setting”  

(

page 16

)

Summary of Contents for gs521-bl

Page 1: ...volume carefully to familiarize yourself with safe and effective usage Please refer to the Setup Manual for basic information ranging from connection of the monitor to a PC to using the monitor The l...

Page 2: ...prior arrangements are made pursuant to EIZO NANAO CORPORATION s receipt of said information Although every effort has been made to ensure that this manual provides up to date information please note...

Page 3: ...id displaying the same image for extended periods of time Periodic cleaning is recommended to keep the monitor looking new and to prolong its operation lifetime Refer to Cleaning on the next page The...

Page 4: ...ional ScreenCleaner is recommended for cleaning the cabinet and panel surface ScreenCleaner is supplied with GS521 CLG If necessary the stains on the cabinet and panel surface can be removed by moiste...

Page 5: ...Preset 14 3 4 Locking Switches Key Lock 14 3 5 Setting the EIZO Logo Display Logo 15 3 6 Setting Language Language 15 3 7 Setting the Display Position of the Adjustment Menu Menu Position 15 3 8 Rest...

Page 6: ...DisplayPort applicable to 8 bit or 10 bit not applicable to audio signals 2 signal input terminals DVI D x 1 DisplayPort x 1 CAL Switch function for selecting an optimal calibration mode 2 2 Selectin...

Page 7: ...supplied USB cable Refer to the description later RadiCS Monitor File for Windows This is the monitor setting file required when using RadiCS For information about installing this file see the RadiCS...

Page 8: ...Adjustment Menu Press The adjustment menu appears Current mode Menu title Settings Menu Item 2 Adjusting Setting 1 Choose a menu to adjust set with and press 2 Choose an item to adjust set with and pr...

Page 9: ...Save 4 1 Setting the Power Saving page 17 Power Indicator 4 2 Setting Power Indicator page 17 Menu Settings Language 3 6 Setting Language page 15 Menu Position 3 7 Setting the Display Position of the...

Page 10: ...sktop except for icons 2 From the displayed menu click Personalize 3 On the Personalization window click Display Settings 4 On the Display Settings dialog select the Monitor tab and select desired res...

Page 11: ...u can switch the current mode with or while the mode menu is being displayed 1 DICOM 2 Native 3 CAL NOTE The Adjustment menu and the Mode menu cannot be displayed at the same time You can disable a sp...

Page 12: ...n the monitor The Optional Settings menu appears 3 Choose Orientation from the Optional Settings menu and press 4 Select Landscape Portrait SW or Portrait HW with or and press Monitor Orientation Disp...

Page 13: ...lect On or Off with or and press 9 Press twice and use or to select Finish from the Optional Settings menu 10 Press to exit The Optional Settings menu is closed DVI Connection SDG Packed Pixel Procedu...

Page 14: ...lay mode unchanged Procedure 1 Choose Tools from the Adjustment menu and press 2 Choose Mode Preset from the Tools menu and press 3 Select the mode to change its settings with or and press 4 Select On...

Page 15: ...allows you to select a language for the adjustment menu or displaying message Selectable languages English German French Spanish Italian Swedish Japanese Simplified Chinese Traditional Chinese Proced...

Page 16: ...factory settings Procedure 1 Choose Mode from the Adjustment menu and press 2 Choose Mode Reset from the Mode menu and press 3 Select Execute with or 4 Press to exit the adjustment The adjustment valu...

Page 17: ...uts signal inputs Standard Digital signal DVI DVI DMPM DisplayPort DisplayPort Standard V1 1a Procedure 1 Choose PowerManager from the Adjustment menu and press 2 Choose Power Save from the PowerManag...

Page 18: ...Check whether the signal cable is connected properly Switch the input signal with The message shows that the input signal is out of the specified frequency range Example Check whether the signal sett...

Page 19: ...he monitor connected with the USB cable is not detected USB devices connected to the monitor does not work Check whether the USB cable is connected correctly page 23 Change the USB port to another one...

Page 20: ...tilt angles of the monitor Up 45 degrees down 45 degrees horizontal display and vertical display rotated 90 degrees counter clockwise Connect the cables after attaching an arm or a stand Do not adjus...

Page 21: ...monitor Connection examples DVI connector Signal cable supplied DD200 DL To PC 1 To PC 2 Signal cable supplied PP200 DVI D connector DisplayPort connector DisplayPort connector Digital Digital To swit...

Page 22: ...Manual The monitor detects only the PC s signals currently displaying automatically Select an active input signal with Procedure 1 Choose Tools from the Adjustment menu and press 2 Choose Input Select...

Page 23: ...their manufactures Devices connected to the USB port upstream and downstream work when the monitor is in power saving mode or when the power switch of the monitor is Off Therefore power consumption of...

Page 24: ...2 Choose Signal Info from the Tools menu and press The Signal Info screen appears Example Displaying monitor information Monitor Info This function displays the information about the monitor 1 Choose...

Page 25: ...50 60Hz 1 1 0 9 A 200 240 VAC 10 50 60Hz 0 6 0 5 A Power Consumption Screen Display On 100W or less with USB load 90W or less without USB load Power saving mode 1 0W or less for DVI D single signal in...

Page 26: ...current Downstream Max 500mA 1 port Classification of Equipment Type of protection against electric shock Class I EMC class EN60601 1 2 2007 Group 1 Class B Classification of medical device MDD 93 42...

Page 27: ...Pin Assignment DVI D connector 1 2 3 4 5 6 7 8 9 10 11 12 13 14 15 16 19 20 21 17 18 22 23 24 Pin No Signal Pin No Signal Pin No Signal 1 T M D S Data 2 9 T M D S Data1 17 T M D S Data0 2 T M D S Dat...

Page 28: ...G1 20 DP PWR 7 ML Lane1 14 CONFIG2 USB port Upstream Series A connector Series B connector Downstream Contact No Signal Remarks 1 VCC Cable power 2 Data Serial data 3 Data Serial data 4 Ground Cable g...

Page 29: ...Digital Monitor Power Management DVI DMPM is a digital interface power saving function The Monitor ON operating mode and Active Off power saving mode are indispensable for DVI DMPM as the monitor s po...

Page 30: ...ference to radio communications However there is no guarantee that interference will not occur in a particular installation If this equipment does cause harmful interference to radio or television rec...

Page 31: ...onic emissions IEC EN61000 3 2 Class D Voltage fluctuations flicker emissions IEC EN61000 3 3 Complies Guidance and manufacturer s declaration electromagnetic immunity The RadiForce series is intended...

Page 32: ...smitters as determined by an electromagnetic site surveya should be less than the compliance level in each frequency rangeb Interference may occur in the vicinity of equipment marked with the followin...

Page 33: ...50kHz to 80MHz d 1 2 P 80MHz to 800MHz d 1 2 P 800MHz to 2 5GHz d 2 3 P 0 01 0 12 0 12 0 23 0 1 0 38 0 38 0 73 1 1 2 1 2 2 3 10 3 8 3 8 7 3 100 12 12 23 For transmitters rated at a maximum output powe...

Page 34: ...ht damage modification alteration abuse misuse accident incorrect installation disaster faulty maintenance and or improper repair by third party other than EIZO and Distributors b Any incompatibility...

Page 35: ...r neuen Bestimmungen die nach dem Kauf in Kraft treten c Jegliche Verschlechterung des Sensors d Jegliche Verschlechterung der Bildschirmleistung die durch Verschlei teile wie den LCD Panel und oder d...

Page 36: ...personne autre que EIZO ou ses Distributeurs b Toute incompatibilit du Produit r sultant d am liorations techniques et ou r glementations possibles c Toute d t rioration du capteur d Toute d t riorat...

Page 37: ...incompatibilidad del Producto debida a posibles innovaciones t cnicas y o reglamentaciones c Cualquier deterioro del sensor d Cualquier deterioro en el rendimiento de la visualizaci n causado por fal...

Page 38: ...azioni improprie eseguite da terze parti che non siano EIZO o i suoi Distributori b Qualsiasi incompatibilit del Prodotto dovuta a possibili innovazioni tecniche e o normative c Qualsiasi deterioramen...

Page 39: ...a innovationer och eller best mmelser c Alla f rs mringar av sensorn d Alla f rs mringar av bildens prestanda beroende p f rbrukningsdelar s som LCD panel och eller bakgrundsbelysning etc t ex f r ndr...

Page 40: ...40 EIZO NANAO EIZO EIZO EIZO i ii LCD EIZO 5 LCD 30000 30000 5 30000 30000 5 EIZO 7 EIZO EIZO EIZO a EIZO b c d LCD e f g h i LCD EIZO EIZO EIZO EIZO EIZO EIZO...

Page 41: ...5th Edition February 2012 03V23061E1 U M GS521 Copyright 2010 2012 EIZO NANAO CORPORATION All rights reserved...

Reviews: