background image

10

2.  INSTALLATION

2. INSTALLATION

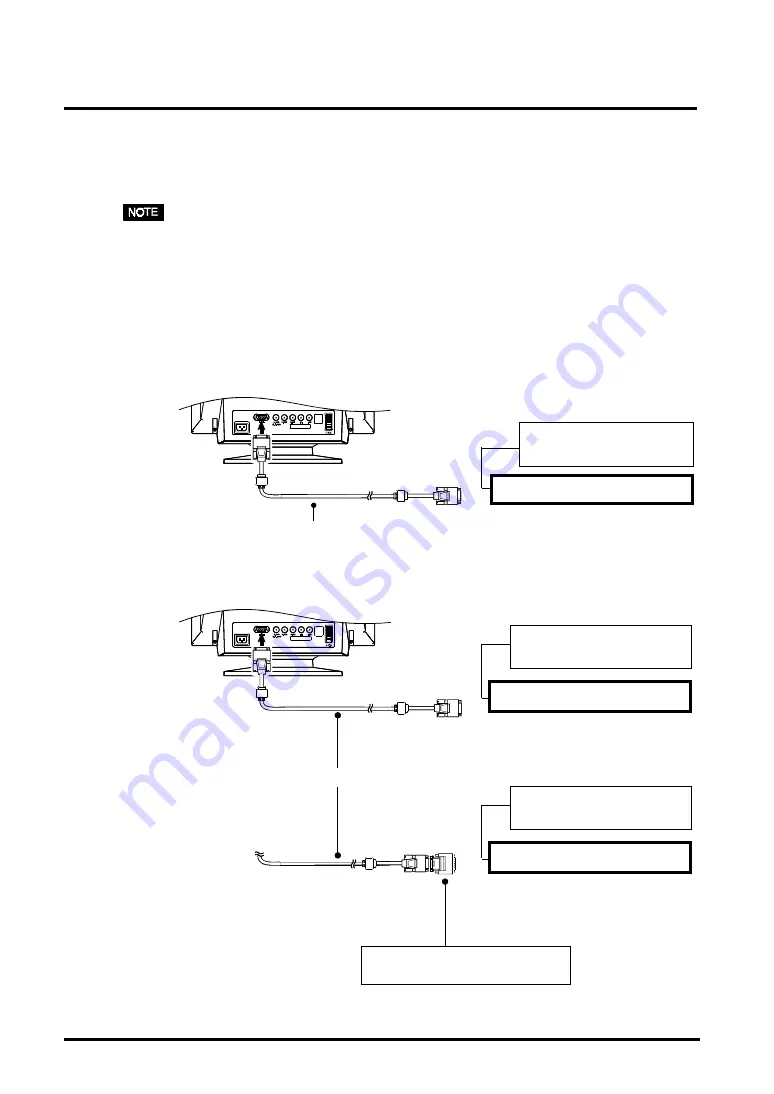
2-1. Connecting the monitor to the PC

• Be sure that the power switches of both of the PC and the monitor are OFF.

1.

Plug the signal cable into the connector at the rear of the monitor
and the other end of the cable into the video connector on the PC.

After connecting, secure the connection with the screw-in fasteners.

• Standard graphics board

• Macintosh

Signal Cable (Enclosed)

Macintosh Adapter (Optional)
Please consult EIZO dealer.

Signal Cable (Enclosed)


Standard graphics board

Video Output Connector
D-Sub mini 15 pin

Macintosh (Blue & White)

Video Output Connector
D-Sub mini 15 pin

Macintosh

Video Output Connector
D-Sub 15 pin

Summary of Contents for FLEXSCAN T765 -

Page 1: ......

Page 2: ...rial or information confidential unless prior arrangements are made pursuant to Eizo Nanao Corporation s receipt of said information Although every effort has been made to ensure that this manual prov...

Page 3: ...he monitor to the PC 10 2 2 Getting Ready for Operation 12 3 SCREEN ADJUSTMENT 13 3 1 How to use the ScreenManager 13 3 2 Color 15 3 3 Fine Contrast 16 3 4 Power Save 17 3 5 Adjustment Lock 18 3 6 Con...

Page 4: ...range noises disconnect all power connections immediately and contact your dealer for advice Attempting to use a malfunctioning unit can be dangerous Do not dismantle the cabinet or modify the unit Di...

Page 5: ...rcraft trains automobiles etc Do not install in a dusty or humid environment Do not place in a location where the steam comes directly on the screen Do not place near heat generating devices or a humi...

Page 6: ...s of the power cord be certain to plug the power cord to the provided unit connector and directly to a wall outlet Not doing so may result in fire or electric shock Handle the power cord with care Do...

Page 7: ...k the ventilation slots and prevents proper airflow leading to fire or other damage Do not sit on the cabinet or place any heavy objects on the cabinet A unit with heavy objects on it may fall or be d...

Page 8: ...See page 17 Adjustment lock function to prevent any accidental changes See page 18 Dual inputs with individual color configuration See page 18 The utility software ScreenManager Pro for USB for Windo...

Page 9: ...or Indicated color Power on status Green Power is on Normal mode Flashing Green Power save mode 1 Advance notice of monitor s off Timer 2 Yellow Power save mode 2 Flashing Yellow Power save mode with...

Page 10: ...r end of the cable into the video connector on the PC After connecting secure the connection with the screw in fasteners Standard graphics board Macintosh Signal Cable Enclosed Macintosh Adapter Optio...

Page 11: ...e been made properly Refer to the TROUBLESHOOTING See page 21 for additional advice Generally for maximum viewing comfort position the monitor slightly below eye level Staring at the monitor for prolo...

Page 12: ...large or too small Readjust the refresh rates Readjust the preferred refresh rates in accordance with the following look up table Refer to the PC or graphics card manuals on how to change the refresh...

Page 13: ...ing Up Down Left and Right keys 2 Press the Enter key to display each adjustment setting menu or Sub menu 3 Make the required adjustments settings by using the control pad 4 To save the adjustments se...

Page 14: ...22 Signal Filter 2 To decrease the vertical bars p 22 Color Color Mode To select the adjustment mode from standard custom or sRGB p 15 Standard p 15 Temperature To set the color temperature p 28 p 15...

Page 15: ...d Cut off p 28 Change the Color Mode to Custom The values shown in percentages for both the Cutoff and Gain are available only as a reference tool Adjustment Procedure 1 First set the monitor to maxim...

Page 16: ...images games DVDs Still images that are dark When changing the mode or adjusting the contrast the brightness of the screen might change for a split second The color temperature and the brightness can...

Page 17: ...PEND Power save Mode 1 Flashing green OFF Power save Mode 2 Yellow To use the Monitor s off timer system Select ON in the Off Timer menu Without the PC s power saving system the off timer allows the m...

Page 18: ...ting the active input Every time the BNC D Sub selection button is pressed the input changes in order Automatically selecting the priority input signal for screen The monitor will automatically detect...

Page 19: ...nding on the PC OS or peripherals Please consult the manufacturer of each device about the USB support When the monitor is not on the peripherals connected to the downstream ports will not operate Eve...

Page 20: ...eripherals such as a mouse keyboard etc Downstream connector Front port Rear port 3 After setting up the monitor s USB hub is available for connecting USB compliant peripherals to the downstream ports...

Page 21: ...MODE button or control pad or turning the monitor off and then on p 17 These messages appear when the signal is not inputted correctly even if the monitor functions properly Error messages will remai...

Page 22: ...rlaced signal try adjusting the graphics board to increase the refresh rate if possible Refer to the graphics board manual for information Reduce the moir using the Moir Reduction Change the horizonta...

Page 23: ...ill be returned to the factory default setting p 26 Adjust the Uniformity Try adjusting the Convergence The Convergence function adjusts the entire screen It is not possible to limit adjustment to spe...

Page 24: ...ly tapping do not hit the side of the monitor If neither of these methods works try executing the following procedure 1 Display a bright white field over the area where the black line s appear with a...

Page 25: ...methanol or isopropyl alcohol abrasive cleaners or other strong solvents as these may cause damage to the cabinet or CRT Cabinet To remove stains wipe the cabinet with a soft lightly moistened cloth u...

Page 26: ...W x 455 mm H x 478 mm D 17 8 W x 17 9 H x 18 8 D Weight 27 5 kg 60 7 lbs Temperature operating 0 C to 35 C 32 F to 95 F storage 20 C to 60 C 4 F to 140 F Humidity 30 to 80 R H Non condensing Certifica...

Page 27: ...eo 9 No pin Green composite sync 10 Ground 3 Blue video 11 Shorted 4 Ground 12 Data SDA 5 No pin 13 H Sync H V Composite sync 6 Red gound 14 V Sync 7 Green ground 15 Clock SCL Preset Timing Dimensions...

Page 28: ...percentages of red green and blue to make colors White is usually produced by adding the same amount of all three colors where black is usually produced by adding no color However colors are not only...

Page 29: ...of dots increases a 640 x 480 dot x line resolution uses larger pixels than a 1024 x 768 resolution The display size of a given font therefore varies according to the resolution Higher resolutions al...

Page 30: ...ssary 28 I Input Priority 14 18 Installation 10 M Main menu 13 Menu position 14 Moir 14 28 O OffTimer 14 17 Others 14 P Pin Assignment 27 Position 14 Power consumption 26 Power indicator 9 PowerManage...

Page 31: ...personal computers The labelling scheme was developed as a joint effort by the TCO The Swedish Confederation of Professional Employees Svenska Naturskyddsforeningen The Swedish Society for Nature Con...

Page 32: ...ous system and is toxic in high doses The relevant TCO 99 requirement states that batteries the colour generating layers of display screens and the electrical or electronics components must not contai...

Page 33: ...s no guarantee that interference will not occur in a particular installation If this equipment does cause harmful interference to radio or television reception which can be determined by turning the e...

Page 34: ...it Augenbelastung bei zu geringem Zeichenkontrast Recycle Auskunft Die R cknahme dieses Produktes nach Nutzungsende bernimmt EIZO in Deutschland zusammen mit dem Partner von Roll MBB Recycling GmbH Do...

Reviews: