background image

English

PC

Signal Cable (FD-C39
enclosed)

Video Output 
Connector / DVI

Input Connector
(monitor) /  DVI

• 

Digital graphics board 

• 

Power Mac G4 (DVI)

Cable Holder

Digital Input 

Signal Cable

Connector

NOTE

• 

The monitor is not compatible with a Power Mac G4/G4 Cube ADC (Apple
Display Connector)

2.

Plug the power cord into the power connector on the rear of the
monitor.

3.

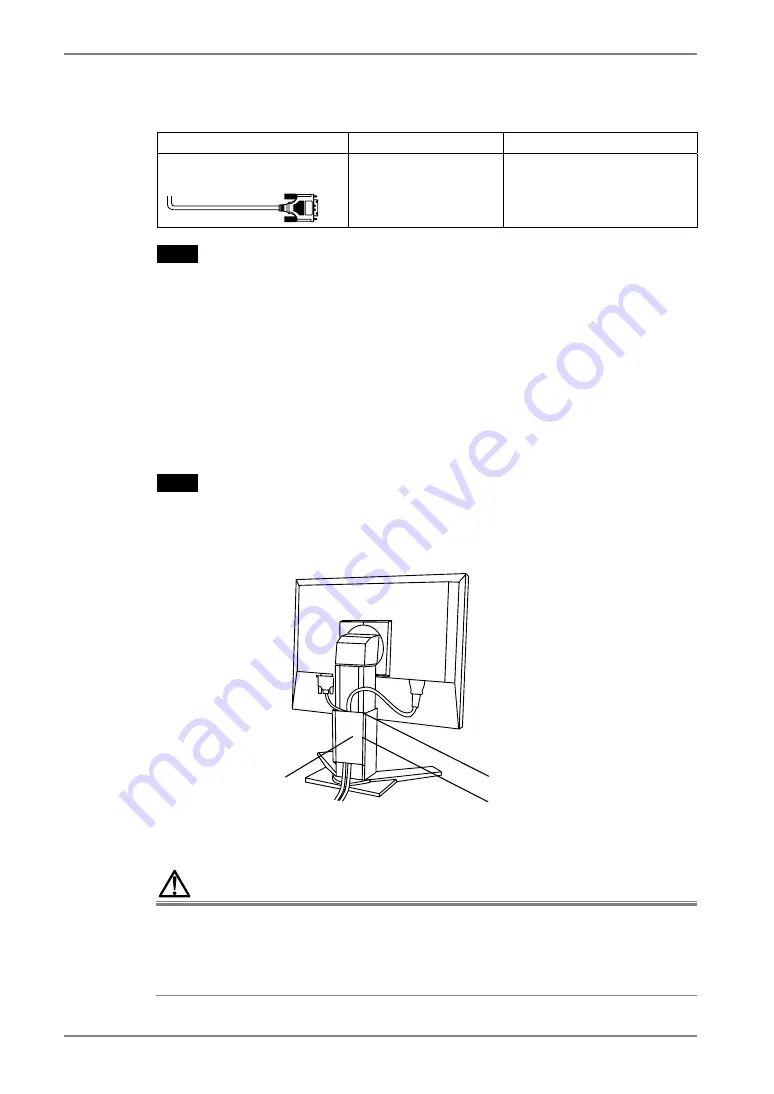
Lead the power cord and signal cable into the cable holder at rear of 
the monitor.

NOTE

• 

When housing the cables into the cable holder, lead them to the cable entrance
side and pinch the projection to open the cable entrance.

• 

The cables are recommended to lead with slight sag for the smooth motion of 
the stand and the Portrait/Landscape display.

4.

Plug the other end of the power cord into a power outlet. 

WARNING

Cable Entrance

Use the enclosed power cord and connect to the standard
power outlet of your country.

Be sure to remain within the rated voltage of the power cord. 
Not doing so may result in fire or electric shock.

Projection

14

2. CABLE CONNECTION

Summary of Contents for FlexScan L985EX

Page 1: ...User s Manual Color LCD Monitor...

Page 2: ...TION s receipt of said information Although every effort has been made to ensure that this manual provides up to date information please note that EIZO monitor specifications are subject to change wit...

Page 3: ...3 FineContrast 20 3 4 Useful Functions 22 4 ADJUSTMENT 24 5 ATTACHING AN ARM 34 6 TROUBLESHOOTING 36 7 CLEANING 40 8 SPECIFICATIONS 41 9 GLOSSARY 44 APPENDIX ANHANG ANNEXE i 2 CABLE CONNECTION 12 2 1...

Page 4: ...aution Statements Refer all servicing to qualified service personnel Do not attempt to service this product yourself as opening or removing covers may result in fire electric shock or equipment damage...

Page 5: ...or a humidifier Use the enclosed power cord and connect to the standard power outlet of your country Be sure to remain within the rated voltage of the power cord Not doing so may result in fire or ele...

Page 6: ...lug and power cord if it begins to thunder Touching them may result in electric shock When attaching an arm stand please refer to the user s manual of the arm stand and install the unit securely with...

Page 7: ...ing the unit Disconnect the power cord and cables when moving the unit Moving the unit with the cord attached is dangerous It may result in injury Do not touch the plug with wet hands Doing so may res...

Page 8: ...xed life span When the screen becomes dark or begins to flicker please contact your dealer Do not press on the panel or edge of the frame strongly as this may result in damage to the screen There will...

Page 9: ...select the most suitable mode for screen display p 20 The utility software ScreenManager Pro for LCD for Windows which can control the monitor from a PC with a mouse or keyboard is included refer to t...

Page 10: ...Flashing yellow slowly Power is off Main power is on Off Power off 1 Directly pressing the left or right button allows you to select a FineContrast mode see page 20 The ScreenManager Main Menu and th...

Page 11: ...Landscape display The panel pivots in the clockwise direction 90 For the Portrait display use the software for the portrait The LCD monitor can be used with an optional arm stand by removing the stan...

Page 12: ...put Resolution Frequency Dot Clock Remarks 640 480 67 Hz Apple Macintosh 640 480 85 Hz VGA VESA 720 400 70 Hz VGA TEXT 800 600 85 Hz VESA 832 624 75 Hz Apple Macintosh 1024 768 85 Hz VESA 1152 864 75...

Page 13: ...ector D Sub mini 15 pin Input Connector monitor D Sub mini 15 pin Standard graphics card Power Macintosh G3 Blue White Power Mac G4 VGA Signal Cable MD C87 enclosed Adapter Video Output Connector D Su...

Page 14: ...holder at rear of the monitor NOTE When housing the cables into the cable holder lead them to the cable entrance side and pinch the projection to open the cable entrance The cables are recommended to...

Page 15: ...of the input signal Signal1 or 2 Analog or Digital is displayed for a few seconds on the right top corner of the screen Adjust brightness of the screen depending on the brightness of your environment...

Page 16: ...rong connection causes no picture problem Selecting the Active Input The Input Signal Selection Button on the control panel can be used to select either SIGNAL 1 or SIGNAL 2 as the active input at any...

Page 17: ...ut Connector If signals from both inputs are present the monitor gives preference to Signal 1 in the following cases When the power of the monitor is turned ON When the signal input to Signal 1 is cha...

Page 18: ...ton The sub menu appears 2 Use the Control buttons to select the desired setting icon and press the Enter Button The setting menu appears 3 Use the Control buttons to make all required adjustments and...

Page 19: ...ions p 28 Input Priority Select the priority input signal p 17 Off Timer Set the monitor s off timer to on or off p 22 Beep Set the monitor s beeper to on or off p 42 Menu Size Change the size of the...

Page 20: ...isplay from 6 FineContrast modes Text Picture Movie sRGB Custom and External Color settings each mode can be adjusted by using the Color menu of the ScreenManager NOTE When the main menu of ScreenMana...

Page 21: ...Contrast Menu Select the desired function icon with the Up Down control buttons and adjust with the Left Right buttons Setting s of Temperature and or Gamma is defined as standard default in some mode...

Page 22: ...is function was created to reduce afterimage p 44 characteristics that are particular to LCD monitors when the monitor screen is left on for a long period without use Procedure 1 Select Off Timer in t...

Page 23: ...hing on the Power Button on the control panel the EIZO logo is displayed for a while If you desire to display or undisplay this logo use this function Default is logo appearing To undisplay Turn off t...

Page 24: ...the screen for 5 seconds While the message is on the screen press the Auto Adjustment Button again to automatically adjust the clock phase screen position and resolution If you do not wish to do adju...

Page 25: ...and left of the control buttons Do not continuously press the control buttons as the adjustment value will change quickly and make it difficult to locate the most suitable adjustment point If the hori...

Page 26: ...he Position adjustment return to Clock adjustment and repeat the previously explained adjustment procedure Clock Phase Position Smaller than the actual screen images Larger than the actual screen imag...

Page 27: ...a moment and adjusts the color range to display the whole color gradation of the current output signal Digital Input The monitor displays the digital input image correctly based on its pre setting dat...

Page 28: ...menu and select the screen size by using the up and down buttons Menu Function Full Displays the picture on the screen in full irrespective of the picture s resolution Since the vertical resolution an...

Page 29: ...the black area surrounding the displayed image Set the Border Intensity In the Enlarge mode or Full Screen mode the outer area border is usually black Select Border Intensity in the Others menu and ad...

Page 30: ...colors Settable Adjustable Fixed at the factory FineContrast Modes Icons Functions Gain External Brightness Reset Temperature These settings can be also adjusted on the FineContrast menu p 20 NOTE Gam...

Page 31: ...the default settings Select the Reset To set the brightness of the screen 0 100 To set the color temperature Temperature p 45 NOTE If setting the gamma value the using the monitor in the digital sign...

Page 32: ...Therefore power consumption of the monitor will change according to the connected devices even if the monitor is in a power saving mode Analog Input This monitor complies with the VESA DPMS p 45 stan...

Page 33: ...reen NOTE EIZO MPMS should be used with Macintosh EnergySaver Digital Input This monitor complies with the DVI DMPM p 44 Procedure 1 Set the PC s power saving settings 2 Select DVI DMPM in the PowerMa...

Page 34: ...hem rightward or leftward to remove the mounting cover 2 Lay the LCD monitor down Do not scratch the panel 3 Remove the tilt stand by loosening the screws 4 pcs of M4 x 15 BZn Fe Stand mounting cover...

Page 35: ...English 5 ATTACHING AN ARM 35 4 Attach an arm stand to the LCD monitor securely M4 Mounting Screws M4 x 15 mm BZn Fe Arm stand...

Page 36: ...gnal Selection Button on the front control panel Try pressing a key on the keyboard or clicking the mouse p 32 Try pressing the Power Button Try turning the PC on 2 Error messages shown below will rem...

Page 37: ...G 37 Problems Points to check with Possible Solutions If using the monitor in the analog input signal try setting the gamma value from 1 8 to 2 2 p 31 7 Horizontal bars of distortion appear Decrease t...

Page 38: ...een is displayed in the 1600 x1200 The image size is doubled both in horizontally and vertically to i e 1600 x 1200 enlarged from 800 x 600 provide clear focus which does not require this function 16...

Page 39: ...ns 20 USB function cannot be setup Check that the USB cable is correctly connected Check that the PC and OS are USB compliant For verification of USB support consult the manufacturer of each system Ch...

Page 40: ...as these may cause damage to the cabinet or LCD panel Cabinet To remove stains wipe the cabinet with a soft lightly moistened cloth using a mild detergent Do not spray wax or cleaner directly into th...

Page 41: ...ositive Negative Analog Input Signal Video 0 7Vp p 75 Positive Input Signal Digital TMDS Single Link Signal registration 45 Factory preset 27 Plug Play VESA DDC 2B Dimensions 472 mm W x 459 541 mm H x...

Page 42: ...beeps every 15 sec Monitor is in the advance notice mode of the Off Timer The power will be off within fifteen minutes Dimensions mm inches Default settings Analog input Digital input Brightness 100...

Page 43: ...Sync 5 No pin 10 Ground Shorted 15 Clock SCL 4 Ground Cable Ground Upstream Series B Pin Assignment DVI I Connector TMDS Data0 C4 Analog Horizontal Sync USB Port Pin No Signal Pin No 9 TMDS Data1 19...

Page 44: ...itor Power Management The Power management system for the digital interface The Monitor ON status operation mode and the Active Off status power saving mode are indispensable for the DVI DMPM as the m...

Page 45: ...devices such as monitors scanners printers and digital cameras As a standard default space sRGB allows Internet users to closely match colors Temperature Color temperature is a method to measure the w...

Page 46: ...sed on the signal diagram shown below 27 factory presets have been registered in the monitor s microprocessor Der integrierte Mikroprozessor des Monitors unterst tzt 27 werkseitige Standardeinstellung...

Page 47: ...4 76 Nega Nega 43 27 85 01 VESA 800 600 56 Hz 36 0 Posi Posi 35 16 56 25 VESA Posi Posi 48 08 72 19 VESA 800 600 75 Hz 49 5 Posi Posi 46 88 75 00 Posi 53 674 85 061 78 75 Posi Posi 60 02 75 03 VESA 10...

Page 48: ...ements in the world This makes for a high performance product designed with the user in focus that also minimizes the Impact on our natural environment Noise emissions Ecology The products must be pre...

Page 49: ...al labelling of personal computers The labelling scheme was developed as a joint effort by the TCO The Swedish Confederation of Professional Employees Svenska Naturskyddsforeningen The Swedish Society...

Page 50: ...ous system and is toxic in high doses The relevant TCO 99 requirement states that batteries the colour generating layers of display screens and the electrical or electronics components must not contai...

Page 51: ...erence to radio communications However there is no guarantee that interference will not occur in a particular installation If this equipment does cause harmful interference to radio or television rece...

Page 52: ...cycling information is placed in the SWICO s website http www swico ch Recycling Information f r Kunden in der Schweiz Alle Informationen zum Thema Recycling finden Sie auf der Homepage des Branchever...

Reviews: