background image

- 16 -

Chapter 2 

  Basic Adjustments/Settings

2-2.  Switching Input Signals

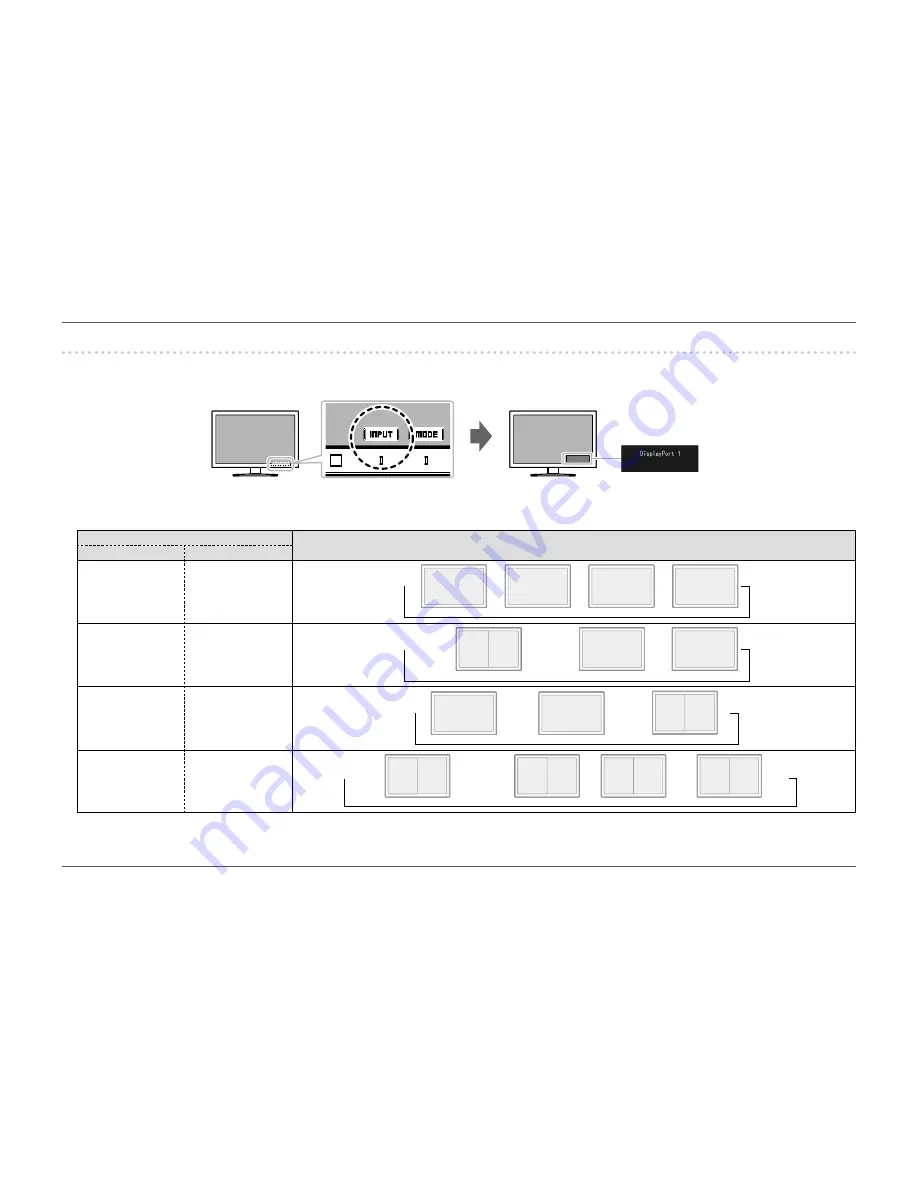
When a monitor has multiple signal inputs, the signal to display on-screen can be changed.
When the input signal is switched, the connector name of the displayed signal appears at the bottom right of the screen.

The combination of input signals that you can select differs depending on “Picture Setup” (

page 39)

 in the “Administrator Settings” menu.

Picture Setup

Input Signal

DisplayPort

HDMI

Single

Single

DisplayPort

1

DisplayPort

2

HDMI

1

HDMI

2

Dual

Single

DisplayPort

1

DisplayPort

2

HDMI

1

HDMI

2

Single

Dual

DisplayPort

1

DisplayPort

2

HDMI

1

HDMI

2

Dual

Dual

DisplayPort

1

DisplayPort

2

DisplayPort

1

HDMI

2

HDMI

1

HDMI

1

HDMI

2

DisplayPort

2

Summary of Contents for ColorEdge CG318-4K

Page 1: ...ourself with safe and effective usage Please refer to the Setup Guide for basic information ranging from connection of the monitor to a PC or external device to using the monitor The latest User s Man...

Page 2: ...ransmitted in any form or by any means electronic mechanical or otherwise without the prior written permission of EIZO Corporation EIZO Corporation is under no obligation to hold any submitted materia...

Page 3: ...urned on and then adjust the monitor It is necessary to wait at least 30 minutes after turning on the power in order to obtain correct measurement results Monitors should be set to a lower brightness...

Page 4: ...on may occur on the interior and exterior surfaces of the monitor In that case do not turn the monitor on Instead wait until the dew condensation disappears otherwise it may cause some damage to the m...

Page 5: ...Input Signals 16 2 3 Switching the display mode color mode 17 Display Modes 17 2 4 Enlarging Images 18 2 5 Setting the display method for colors outside the defined color gamut 19 Chapter 3 Advanced...

Page 6: ...e Setup of USB Function 50 6 5 Specifications 51 Dimensions 53 Main Default Settings 55 Accessories 56 Chapter 7 Glossary 57 Appendix 60 Trademark 60 License Copyright 61 FCC Declaration of Conformity...

Page 7: ...to EIZO measurement conditions However if performing SelfCalibration page 27 it is necessary to wait at least 30 minutes after turning on the power in order to obtain correct measurement results Fram...

Page 8: ...the reflection of external lighting such as the reflected glare of a fluorescent light Displays HDCP High Bandwidth Digital Protection 5 protected contents 5 Supports HDCP Version 1 2 Attention Be car...

Page 9: ...to the operation guide The switch indicator is lit white when you turn the power on 4 Power switch Turns the power on or off The switch indicator is lit when you turn the power on The indicator color...

Page 10: ...recharging page 35 10 Handle This handle is used for transportation Attention Firmly grasp and hold the monitor by the bottom while grabbing the handle and carefully convey the monitor so as not to dr...

Page 11: ...r 6 An application software for measuring and calibrating monitor characteristics and generating ICC profiles for Windows and Apple ColorSync profiles for Macintosh A PC must be connected to the monit...

Page 12: ...Progressive 1920 1080 59 96 Hz Progressive 1920 1200 59 89 Hz Progressive 1920 1200 59 95 Hz Progressive 2048 1080 24 00 Hz 48 00 Hz Progressive 2560 1440 59 95 Hz Progressive 3840 2160 60 00 Hz Prog...

Page 13: ...Interlace 720 576 576p 50 00 Hz Progressive 720 576 576i 50 00 Hz Interlace 1280 720 720p 50 00 Hz 60 00 Hz Progressive 1920 1080 1080p 24 00 Hz 25 00 Hz 30 00 Hz 50 00 Hz 60 00 Hz Progressive 1920 1...

Page 14: ...lect System Preferences from the Apple menu 2 When the System Preferences dialog box is displayed click Displays If using Mac OS X 10 8 click Displays in Hardware 3 In the displayed dialog box select...

Page 15: ...1 Touch any switch except The operation guide appears on the screen 2 Adjusting setting 1 Touch a switch for adjustment setting The Adjustment Setting menu appears A submenu may also be displayed In...

Page 16: ...m right of the screen The combination of input signals that you can select differs depending on Picture Setup page 39 in the Administrator Settings menu Picture Setup Input Signal DisplayPort HDMI Sin...

Page 17: ...pean Broadcasting Union standards REC709 Suitable for reproducing the color gamut and gamma as defined in the ITU R Rec 709 standard SMPTE C Suitable for reproducing the color gamut and gamma as defin...

Page 18: ...area can be expanded by 2x in the display This is convenient when checking the fine detail of photos Attention This function cannot be used when Picture Setup page 39 is set to Dual in the Administra...

Page 19: ...This function can only be configured if Color Gamut page 22 is set in REC2020 Setting Description On The colors outside the REC709 color gamut are displayed in gray Color gamut defined by REC2020 stan...

Page 20: ...except The operation guide appears 2 Select The Setting menu appears 2 Adjusting setting 1 Choose a menu to adjust set with and then select The Sub menu appears 2 Choose an item to adjust set with and...

Page 21: ...ors on multiple monitors due to their monitor specific characteristics Make fine color adjustment visually when matching colors on multiple monitors Note Use the values shown in cd m2 K and as a guide...

Page 22: ...Set the color reproduction area color gamut Color gamut is the range of colors that devices such as monitors digital cameras and printers can express Various standards are defined When you select Nat...

Page 23: ...ignals for Digital cinema are converted into RGB signals for display on the monitor This function can only be configures if Color Gamut page 22 is set to DCI When you select On the Color Gamut setting...

Page 24: ...cription Note Color Mode Custom Adobe RGB sRGB EBU REC709 SMPTE C DCI REC2020 CAL1 CAL2 Select the desired mode according to the monitor application For more information on the adjustment status of ea...

Page 25: ...SMPTE C DCI Color Gamut Native Adobe RGB sRGB EBU REC709 REC1886 REC2020 SMPTE C DCI Set the color gamut that will be used as a calibration target for SelfCalibration In Color Gamut the color gamut d...

Page 26: ...level of ambient light when SelfCalibration was executed and is not reflected in the SelfCalibration results If the environment in which the product is used is significantly different to the previous...

Page 27: ...section the settings for executing SelfCalibration on the monitor as a standalone unit are explained Attention It is necessary to wait at least 30 minutes after turning on the power in order to obtain...

Page 28: ...the timing to execute SelfCalibration upon reaching the time set in the schedule Power Save To be executed under any of the following conditions When the monitor is in Power Save mode or power is off...

Page 29: ...May Aug Nov Mar Jun Sep Dec Biannually Jan Jul Feb Aug Mar Sep Apr Oct May Nov Jun Dec Annually Jan to Dec Usage Time Every 50 hours to Every 500 hours Week 1st week to 5th week When the execution cy...

Page 30: ...s Manual stored on the CD ROM Standard Mode SelfCalibration On Off Switch between enabling disabling the SelfCalibration function Result Ambient Light You can check the current illuminance in compari...

Page 31: ...will be displayed in full screen while maintaining the 16 9 aspect ratio Aspect Ratio Displays an image in full screen However since aspect ratios are maintained part of an image may not be visible i...

Page 32: ...t ratio of the monitor Auto recommended The monitor automatically recognizes the brightness range of input signals and displays images appropriately On The brightness range of the signal is extended t...

Page 33: ...ons are automatically identified and the most suitable images are displayed If distorted images are displayed when Film Detec tion is On set it to Off Film Detection is only enabled during 1080i signa...

Page 34: ...power is turned on off the signal is detected automatically regardless of the setting for this function When the Picture Setup setting in the Administrator Settings menu is set to Dual we recommend th...

Page 35: ...exits power saving mode and returns to the normal display mode At the time of shifting to power saving mode a message that indicates the transition is displayed 5 seconds in advance Turning off the m...

Page 36: ...an be selected Adjustable range English Deutsch Fran ais Espa ol Italiano Svenska Japanese Simplified Chinese Traditional Chinese Information You can check the monitor information model name serial nu...

Page 37: ...ministrator Settings menu 1 Menu display 1 Touch to turn off the monitor 2 While touching the leftmost switch touch for more than 2 seconds to turn on the monitor The Administrator Settings menu appea...

Page 38: ...ting Enable all switches Menu Lock the switch All Lock all switches except the power switch DUE Priority Brightness Uniformity This product is equipped with a Digital Uniformity Equalizer DUE function...

Page 39: ...48 2160 When using Dual display the signal input from DisplayPort 1 or HDMI1 is displayed on the left side of the screen and the signal input from DisplayPort 2 or HDMI 2 is displayed on the right sid...

Page 40: ...the DisplayPort connector the DisplayPort version may differ depending on the PC and the screen may not displayed In this case try changing the following settings HDMI 1 HDMI 2 Standard Extra When an...

Page 41: ...ears 3 Select Signal Format 4 Switch the DisplayPort version 5 Select Apply and then select Power indicator is flashing orange and white The device that is connected using DisplayPort HDMI has a probl...

Page 42: ...e over the entire screen The symptom may disappear 5 Noise appears on the screen When inputting HDCP system signals normal images may not be displayed immediately Depending on the graphics board the 4...

Page 43: ...the USB CHARGE Port setting see USB CHARGE Port page 35 If it is set to Charging Only the peripheral device will not work Try changing to a different USB port If the PC or peripheral devices works co...

Page 44: ...xecuting correlation using ColorNavigator 0014 The target brightness may be too high Change the target value and then execute SelfCalibration again The measurement accuracy of the built in calibration...

Page 45: ...sensor and then execute SelfCalibration again Communication with the built in calibration sensor may have failed Turn off the main power wait for a few minutes before turning the power back on and the...

Page 46: ...ttachments such as cables When using an arm or stand attach it to meet the following tilt angles of the monitor Up 45 down 45 Connect the cables after attaching an arm or stand Do not move the removed...

Page 47: ...able holder is supplied with this product Use the cable holder to organize the cables connected to the monitor Attachment procedure 1 Pass the cables through the cable holder 2 Close the cable holder...

Page 48: ...be inserted either perpendicular or parallel to the stand Change the orientation of the cable holder in line with the direction of the cables Detachment procedure 1 Close the cable holder 2 While hold...

Page 49: ...layPort Thunderbolt connector Digital HDMI Digital DisplayPort Signal cable PM200 Signal cable HH200HS Optional Signal cable HH200HS Note The input signal changes each time the operation switch on the...

Page 50: ...ream port will still work Therefore power consumption of the monitor varies depending on the connected devices even in the power saving mode When the main power of the monitor is off a device connecte...

Page 51: ...2 Digital Scanning Frequency H V 24 5 kHz to 137 5 kHz DisplayPort 14 5 kHz to 135 5 kHz HDMI 22 5 Hz to 71 5 Hz DisplayPort 22 5 Hz to 71 5 Hz HDMI Frame Synchronization Mode 23 75 Hz to 30 25 Hz 47...

Page 52: ...11 3 kg Net Weight Without Stand Approx 8 3 kg Height adjustment 149 mm Tilt 0 141mm Tilt 35 Tilt Up 35 down 5 Swivel 344 Operating Environment Requirements Temperature 0 C to 35 C 32 F to 95 F Humidi...

Page 53: ...53 Chapter 6 Reference Dimensions Unit mm 591 450 289 281 225 84 32 9 370 20 1 434 583 423 17 5 700 17 5 735 100 155 168 317 5 100 317 5 11 57 245 65 5 344 6 2 30 5 3 5 5 3 5...

Page 54: ...54 Chapter 6 Reference 754 4 432 7 592 6 429 172 4 191 4 237 9 298 7 361...

Page 55: ...Auto Range Extension DisplayPort input Auto HDMI PC signal input Off HDMI video signal input Auto Super White Off Noise Reduction Off Film Detection Off Safe Area Marker Off Safe Area Size 80 Border...

Page 56: ...Reference Accessories Signal cable HH200HS HDMI HDMI PP200 DisplayPort DisplayPort PM200 DisplayPort Mini DisplayPort For the latest information about the accessories refer to our web site http www e...

Page 57: ...This is the interface standard for image signals standardized in accordance with VESA It was developed with the aim of replacing the conventional DVI and analog interfaces and it can transmit high res...

Page 58: ...tal contents such as video music etc This helps to transmit the digital contents safely by coding the digital contents sent via the DVI or HDMI connector on the output side and decoding them on the in...

Page 59: ...ational standard for color reproduction and color space among peripheral devices such as monitors printers digital cameras scanners As a form of simple color matching for the Internet colors can be di...

Page 60: ...he United States Environmental Protection Agency in the United States and other countries GRACoL and IDEAlliance are registered trademarks of International Digital Enterprise Alliance NEC is a registe...

Page 61: ...ZO Corporation in Japan and other countries ColorNavigator EcoView NET EIZO EasyPIX EIZO Monitor Configurator EIZO ScreenSlicer G Ignition i Sound Re Vue Screen Administrator and UniColor are trademar...

Page 62: ...n a residential installation This equipment generates uses and can radiate radio frequency energy and if not installed and used in accordance with the instructions may cause harmful interference to ra...

Page 63: ...this monitor so as to keep interference within the limits of a Class B digital device AC Cord Shielded Signal Cable enclosed Canadian Notice This Class B digital apparatus complies with Canadian ICES...

Page 64: ...folgen da die H he der Bildschirmmitte ber dem Boden zwischen 135 150 cm betr gt d Der Standfu mu die M glichkeit zur Neigung des Bildschirmger tes besitzen max vorw rts 5 min nach hinten 5 e Der Stan...

Page 65: ...Distributors b Any incompatibility of the Product due to possible technical innovations and or regulations c Any deterioration of the sensor d Any deterioration of display performance caused by the de...

Page 66: ...Verschlei teile wie das LCD Panel und oder die Hintergrundbeleuchtung usw hervorgerufen werden z B Ver nderungen von Helligkeitsverteilung Ver nderungen von Farbe oder Farbverteilung Pixeldefekte ein...

Page 67: ...ion des performances d affichage caus e par la d t rioration des l ments consommables tels que le panneau LCD et ou le r tro clairage etc par exemple des changements de l uniformit de la luminosit des...

Page 68: ...to de la visualizaci n causado por fallos en las piezas consumibles como el panel LCD y o la Backlight etc p ej cambios de uniformidad del brillo cambios de color cambios de uniformidad del color defe...

Page 69: ...alsiasi deterioramento del sensore d Qualsiasi deterioramento delle prestazioni dello schermo causato dal deterioramento delle parti consumabili come il pannello LCD e o la retroilluminazione ecc per...

Page 70: ...lar s som LCD panel och eller bakgrundsbelysning etc t ex ndringar i j mnhet i ljusstyrka f rg f rgj mnhet defekta pixlar och eller fast lysande pixlar etc e Alla f rs mringar av Produkten orsakat av...

Page 71: ...71 Appendix EIZO Corporation EIZO EIZO EIZO EIZO i 5 ii 30 000 5 10 000 EIZO EIZO 7 EIZO EIZO EIZO LCD pixel pixel LCD EIZO EIZO EIZO EIZO EIZO EIZO...

Page 72: ...72 Appendix EIZO Corporation EIZO EIZO EIZO EIZO i 5 ii 30 000 5 10 000 EIZO EIZO 7 EIZO QC EIZO EIZO EIZO EIZO EIZO EIZO EIZO EIZO...

Page 73: ...73 Appendix EIZO Corporation EIZO EIZO EIZO EIZO i 5 ii 3 10000 10000 5 EIZO 7 EIZO EIZO EIZO a EIZO b c d LCD e f g h i LCD EIZO EIZO EIZO EIZO EIZO EIZO...

Page 74: ...hrt http www eizoglobal com Kunden in der Schweiz entnehmen Informationen zum Recycling der folgenden Website http www swico ch Informations sur le recyclage Ce produit doit tre jet aux points de col...

Page 75: ...n N r denna produkt kasseras ska den hanteras och tervinnas enligt landets f reskrifter f r att reducera milj p verkan N r du kasserar produkten ska du kontakta en distribut r eller representant i dit...

Page 76: ...myyj n tai tyt ryhti n maassasi Yhteystiedot l ytyv t EIZOn Internet sivustolta http www eizoglobal com Wykorzystanie surowc w wt rnych Ten produkt po zu yciu powinien by zbierany i przetwarzany zgodn...

Page 77: ...lovan v s lade s legislat vou va ej krajiny aby sa zn ilo za a enie ivotn ho prostredia Ke sa chcete zbavi tohto v robku kontaktujte pros m distrib tora alebo pobo ku vo va ej krajine Zoznam kontaktn...

Page 78: ...distribuitor sau un afiliat al rii respective Adresele de contact le g si i pe pagina de web al EIZO http www eizoglobal com Geri D n m Bilgisi Bu r n n at laca zaman lkenizin evre kirlili inin azalt...

Page 79: ...79 Appendix China Measures for RoHS Compliance in ChinaRoHS Pb Hg Cd Cr VI PBB PBDE SJ T 11363 2006 SJ T 11363 2006...

Page 80: ...03V25351A1 U M CG318 4K 1st Edition March 2015 Copyright 2015 EIZO Corporation All rights reserved...

Reviews: