background image


G L A D I U S

®  

1 8 0 0


THE  MULTIFUNCTIONAL  GRINDING  SWORD

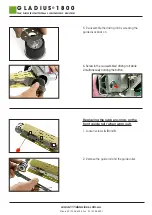
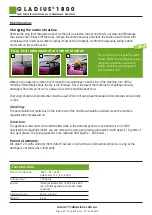
5. Re-assemble the driving roll by screwing the

guide discs back on.

6. Screw in the re

-

assembled driving roll while

simultaneously holding the button.

º

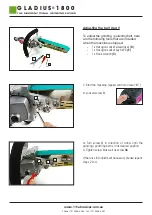
Replacing the rubber o-rings on the 

front guide roll (when worn out)

1. Loosen screws 

A

B

 and 

C

.

2. Remove the guide rail and the guide roller.

A

B

C

www.

111abrasives.com.au

Phone 

(07) 5546 6026

  Fax: 

(07) 5546 6381

www.

111abrasives.com.au

Phone 

(07) 5546 6026

  Fax: 

(07) 5546 6381

Summary of Contents for Gladius 1800

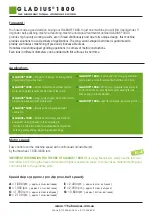
Page 1: ...Manual G L A D I U S 1 8 0 0 THE MULTIFUNCTIONAL GRINDING SWORD ...

Page 2: ... guidance plate Speed steps approx rpm approx belt speed E 2 400 rpm approx 8 m sec belt speed F 2 900 rpm approx 9 m sec belt speed G 3 800 rpm approx 12 m sec belt speed A 1 000 rpm approx 3 m sec belt speed B 1 300 rpm approx 4 m sec belt speed C 1 900 rpm approx 6 m sec belt speed D 2 100 rpm approx 7 m sec belt speed Application Foreword G L A D I U S 1 8 0 0 THE MULTIFUNCTIONAL GRINDING SWOR...

Page 3: ...larly with compressed air Gear box The gearbox screws must not be dismantled while in the warranty period or our warranty is void With unscrewing the bearing bracket you can remove the worn gear grease and replace it with approx 16 grams of new gear grease The gear grease has to be replaced after approx 1 500 hours Period of warranty We grant 12 months warranty from date of invoice on all technica...

Page 4: ...nge for optional connection to all standard industrial vacuum cleaners Innovative stop button enables lightning fast replacement of belt without using tools Very compact well balanced design with bow handle for fatigue free working in every position Exclusive at Eisenblätter Rubberised grip for non slip handling G L A D I U S 1 8 0 0 THE MULTIFUNCTIONAL GRINDING SWORD www 111abrasives com au Phone...

Page 5: ...Still hold the locking pin and release the pressure from the machine head Release the pin Now the gripping mechanism is activated 2 Add the desired grinding polishing belt first on the driving roller and then on the guidance roller Application Operation G L A D I U S 1 8 0 0 THE MULTIFUNCTIONAL GRINDING SWORD º º 1 www 111abrasives com au Phone 07 5546 6026 Fax 07 5546 6381 ...

Page 6: ...8 0 0 THE MULTIFUNCTIONAL GRINDING SWORD 3 Again raise the machine upright and apply light pressure on its tip until the locking pin releases automatically º www 111abrasives com au Phone 07 5546 6026 Fax 07 5546 6381 ...

Page 7: ...socket screwdriver D 1 x Hexagon socket key SW 5 E 1 x Hook wrench C 1 Start the machine speed control on level C 2 Loosen screw 3 3 Turn screw 4 in direction of arrow until the grinding polishing belt is in its desired position 4 Tighten screw 3 as well as screw 3a If there is still adjustment necessary please repeat steps 2 to 4 E C D 3 4 3 3a www 111abrasives com au Phone 07 5546 6026 Fax 07 55...

Page 8: ...usting the belt front 1 Loosen screw 2 slightly open 2 Turn screw 1 until you reach your desired position 3 Tighten screw 2 again If there is still adjustment necessary please repeat steps 1 to 3 2 2 1 www 111abrasives com au Phone 07 5546 6026 Fax 07 5546 6381 ...

Page 9: ...ORD An example of a grinding polishing belt sitting incorrectly on the machine Re adjustment is necessary An example of a grinding polishing belt that is perfectly positioned onto the machine º º www 111abrasives com au Phone 07 5546 6026 Fax 07 5546 6381 ...

Page 10: ...e screw to bend the guiding rail downwards to enable curved and on the spot grinding for example to deal with spot welds Flat grinding As shown in the picture turn the screw to straighten the rail to grind flat and with a consistent grinding pattern TIP Ideal alignment of GLADIUS 1800 To create a flawless grinding pattern the machine should be held in an angle of approx 20 degree to the centre of ...

Page 11: ...ear box and simultaneously loosen the driving roll with the special wrench C Now unscrew the driving roll 2 Unscrew 3 3 Slit the rubber ring carefully with a box cutter or other sharp blade and remove it from the driving roll 4 Simply mount a new ring on the roll 1 C C 3 3 3 www 111abrasives com au Phone 07 5546 6026 Fax 07 5546 6381 ...

Page 12: ...guide discs back on 6 Screw in the re assembled driving roll while simultaneously holding the button º Replacing the rubber o rings on the front guide roll when worn out 1 Loosen screws A B and C 2 Remove the guide rail and the guide roller A B C www 111abrasives com au Phone 07 5546 6026 Fax 07 5546 6381 ...

Page 13: ...The diameter of the rings from other sources vary so the machine may not function properly and perfect functionality of the machine is not guaranteed You can order spare parts from us at any time Connection for industrial vacuum cleaners GLADIUS 1800 is fitted with a dust protection cover including an extraction connector for industrial vacuum cleaners The connector is compatible with all standard...

Page 14: ...45 EN 55014 1 EN 55014 2 EN 61000 3 2 EN 61000 3 3 i samsvar med bestemmelsene i direktivene 2006 42 EG 2004 108 EG ITALIANO SVENSKA DICHIARAZIONE DI CONFORMITÀ CE Assumendone la piena responsabilità dichiariamo che il prodotto è con forme alle seguenti normative ed ai relativi documenti EN 60745 EN 55014 1 EN 55014 2 EN 61000 3 2 EN 61000 3 3 in base alle prescrizi oni delle direttive 2006 42 EG ...

Page 15: ......

Page 16: ......
Reviews: