


6.0 Operation
6.1
Follow all pre-operating instructions in section 5.0.
6.2
Turn handle counterclockwise until jack assembly upper arm is above the highest depth slot. See
Figure 13. This will allow proper clearance between the work surface and the blade tip.
WARNING
WARNING: Never attempt to start the engine with the diamond blade inserted in a joint or previous cut. The
blade will turn as soon as the JS is started. This could damage the blade or cause the JS to jump
backwards.
6.3
Turn on the vacuum system.
6.4
Move the Honda engine fuel valve lever to the ON position.
6.5
To start a cold engine, move the choke lever to the CLOSED position. To restart a warm engine,
leave the choke lever in the OPEN position.
6.6
Move the throttle lever away from the SLOW position, about 1/3 of the way toward the fast position.
6.7
Turn the engine switch to the ON position.
6.8
Stand on the side of the JS opposite the blade guard. Engage or squeeze the deadman lever with
the right hand.
6.9
With the left hand, pull the starter cord grip lightly until you feel resistance, then pull briskly. Return
the starter grip gently. Repeat until engine starts. If engine does not start, see section 8.5 for
maintenance.
6.10
If the choke lever has been moved to the CLOSED position to start the engine, gradually move it to
the OPEN position as the engine warms up.
6.11
Verify that the deadman device is functioning properly. Release or disengage the deadman lever
while firmly holding on to both handle grips. This will stop the Honda engine. Maintain control of the
machine until the blade completely stops. Go back to 6.5 and restart the engine.
WARNING
WARNING: Do not operate a JS if the deadman lever is not functioning. This could lead to serious injury or
death.
6.12
While continuing to squeeze the deadman lever, switch the right hand with the left hand. In other
words, your left hand will now be on the left handle grip and squeezing the deadman lever. This will
free your right hand.
6.13
With your right hand, gently turn the handle clockwise to lower the blade into the work surface. Do
not force the blade into the work surface.
6.14
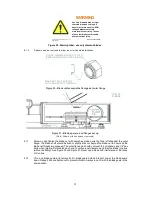
Now place your right hand on the right handle grip. Slowly walk in a straight line forward. Do not pull
the machine in a backwards direction. See Figure 17.
WARNING
WARNING: Do not twist the blade in the cut. Never attempt to cut any pattern or follow any joint that is not a
straight line. Do not force the blade forward. These actions could damage the blade and JS unit.
17
Summary of Contents for JS SERIES
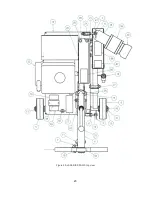
Page 20: ...7 3 Figure 18 to Figure 23 of JS SERIES SAWS Figure 18 JS SERIES SAWS top front right view 21 ...
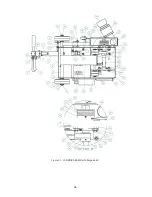
Page 21: ...Figure 19 JS SERIES SAWS top rear left view 22 ...
Page 22: ...Figure 20 JS SERIES SAWS top view 23 0 ...
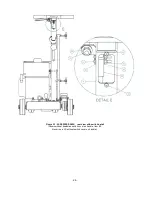
Page 23: ...Figure 21 JS SERIES SAWS with flange detail 24 2 ...
Page 28: ......


