GB
- 14 -
2. Layout and items supplied
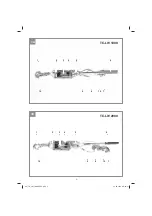
2.1 Layout (Fig. 1a/1b)
1. Fastening
hook
2. Stop
lever
3. Pulley
4. Retaining
catch
5. Tensioning
spring
6. Clamping
lever
7. Load
hook
8. Guide
roller
9. Wire
cable
10. Snap lock
2.2 Items supplied
•
Open the packaging and take out the equip-
ment with care.
•
Remove the packaging material and any
packaging and/or transportation braces (if
available).
•
Check to see if all items are supplied.
•
Inspect the equipment and accessories for
transport damage.
•
If possible, please keep the packaging until
the end of the guarantee period.
Danger!
The equipment and packaging material are
not toys. Do not let children play with plastic
bags, foils or small parts. There is a danger of
swallowing or su
ff
ocating!
•
Original operating instructions
3. Proper use
The hand lever hoist is a device for moving loads
horizontally.
The equipment is to be used only for its prescri-
bed purpose. Any other use is deemed to be a
case of misuse. The user / operator and not the
manufacturer will be liable for any damage or inju-
ries of any kind caused as a result of this.
Please note that our equipment has not been de-
signed for use in commercial, trade or industrial
applications. Our warranty will be voided if the
machine is used in commercial, trade or industrial
businesses or for equivalent purposes.
4. Technical data
4.1 TC-LW 1000
Max. tensile load in kg: ............................... 1000
Cable length in m: ......................................... 2.2
Cable diameter in mm: .................................. 4.8
Max. e
ff
ective distance in m: ......................... 1.2
4.2 TC-LW 2000
Max. tensile load in kg: ............................... 2000
Cable length in m: ......................................... 3.3
Cable diameter in mm: ..................................... 6
Max. e
ff
ective distance in m: ......................... 1.6
5. Before using the equipment
•
Before you use the equipment to pull a load,
you must familiarize yourself with the way in
which the equipment works “without a load”.
•
Make sure the equipment is fastened secu-
rely. Be particularly critical when choosing
a fastening point, as the fastening point you
choose must be capable of withstanding
double the load. If you are unsure whether the
point you have chosen is the right one, select
an alternative point instead.
•
Fasten the equipment in such a way that it
cannot change its position during use.
•
The snap lock (10) on the fastening hook
(1) and on the load hook (7) must always be
closed during operation, to prevent the load
being released abruptly.
6. Operation
Warning:
Only pull loads horizontally.
Caution:
Wear gloves to protect your hands.
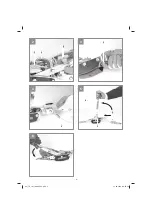
6.1 Fastening the hoist to the load (Figs. 1a,
1b, 2, 3, 4)
•
Attach the load hook (7), which is fastened to
the cable (9) by the guide roller (8), securely
to the load you intend to pull.
•
Check that the snap lock (10) is closed.
•
Push the tensioning spring (5) up and into the
release position, which releases the retaining
catch (4) from the pulley (3).
•
By holding the stop lever (2) in the released
position, the cable can be unwound and the
hoist can be pulled for attaching at the se-
Anl_TC_LW_1000_SPK9.indb 14
Anl_TC_LW_1000_SPK9.indb 14
31.05.2019 09:59:54
31.05.2019 09:59:54


