that you do not remove more than 4 cm of grass
length in any one pass.
Switch off the motor before you carry out any
inspections of the blade. Remember than the blade
will continue to turn for a few seconds after the motor
has been switched off. Never attempt to stop the
blade.
Check regularly that the blade is correctly secured, in
good condition and well ground. If not, grind or
replace the blade. If the moving blade strikes an
object, stop the mower and wait until the blade has
come to a complete standstill. Then check the
condition of the blade and the blade holder. If they
are damaged, they must be replaced.
Place the mains lead in loops on the ground in front
of the socket. Mow away from the socket and cable
and ensure that the mains lead is always on the
section of lawn that you have already mowed so that
you do not run over the mains lead with the mower.
8. Mowing
As soon as you see mown grass on the lawn whilst
you are mowing, the grass bag will need emptying.
Important. Before you remove the grass bag
switch off the motor and wait until the cutting
tool reaches a standstill.
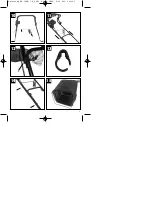
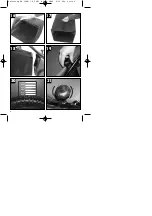
To remove the grass bag, raise the discharge flap
with one hand and remove the grass bag using its
handle with your other hand.
To maintain safety, the discharge flap will close when
you remove the grass back to seal the rear discharge
opening. If any grass residues are caught in the
opening, it is a good idea to pull the mower
backwards around 1 m to make it easier to start the
motor.
Do not remove grass cuttings in the mower casing or
on the cutter by hand or with your feet. Instead use
suitable tools such as a brush or broom.
To ensure that it can collect the grass correctly the
grass bag and in particular the net must be cleaned
from the inside after use.
Only attach the grass bag after switching off the
motor and the cutting tool has reached a standstill.
Raise the discharge flap with one hand and, holding
the grass bag by its handle in your other hand, attach
it from the top.
9. Servicing and storage
Servicing and cleaning work on the lawn mower and
the removal of the guards may only be carried out
after the motor has been switched off and the plug
disconnected from the power supply.
Worn or damaged blades, blade holders and bolts
must be replaced together by an authorized
specialist to maintain the balance of the mower.
Do not clean the lawn mower with running water,
particularly not if it is at high pressure.
Ensure that all the fastening elements (screws, nuts,
etc.) are tight at all times so that you can work with
the mower in safety.
Check the grass collection device frequently for signs
of wear.
Replace worn or damaged parts.
Store your lawn mower in a dry place. To ensure it
has a long life all the screw parts and the wheels and
axles should be cleaned and then oiled.
Providing your lawn mower with regular care will not
only extend its life and performance but will also help
you to mow your lawn properly and easily.
Clean the lawn mower with a brush or cloth. Do not
use any solvents or water to remove dirt. The
component that is subject to most wear is the blade.
You should therefore check the condition of the
blade and its mounting at regular intervals. If the
blade is worn it must be replaced or ground
immediately. If the mower starts to suffer from
excessive vibrations, this means that the blade has
not been balanced correctly or has suffered
deformation due to impacts. In this case it must be
repaired or replaced.
10. Changing the knives
For safety reasons we recommend that the knives
will only be changed by persons qualified and
authorized to do so.
Caution! Wear work gloves!
Only use genuine knives, otherwise proper
functioning and safety may not be guaranteed.
Change the knife as follows:
앬
Unscrew the fastening screw with the ring wrench
included in delivery.
앬
Remove the knife and replace with a new one.
앬
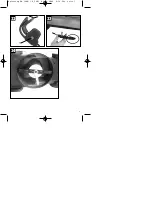
Make sure the new knife faces the right direction
when you fit it. The fly regulators of the knife
must project into the motor compartment (see
Fig. 23). The dome mounts must be correctly
aligned with the holes in the knife (see Fig. 24).
앬
Finally, tighten the fastening screw again with the
ring wrench (see Fig. 24). The tightening torque
should be approx. 25 Nm.
At the end of the mowing season you should give the
lawn mower an overall inspection and remove all
residue which has collected.
19
GB
Anleitung EM 1600-1 Z_SPK1 09.08.2006 9:14 Uhr Seite 19
Summary of Contents for 01045
Page 3: ...3 1 햲 햳 햴 햵 햶 햷 2 3 Anleitung EM 1600 1 Z_SPK1 09 08 2006 9 14 Uhr Seite 3 ...
Page 4: ...4 4 5 7 9 6 8 Anleitung EM 1600 1 Z_SPK1 09 08 2006 9 14 Uhr Seite 4 ...
Page 5: ...5 10 11 12 13 14 햲 햳 A 15 Anleitung EM 1600 1 Z_SPK1 09 08 2006 9 14 Uhr Seite 5 ...
Page 7: ...7 22 23 24 햳 햲 Anleitung EM 1600 1 Z_SPK1 09 08 2006 9 14 Uhr Seite 7 ...
Page 82: ...82 Anleitung EM 1600 1 Z_SPK1 09 08 2006 9 14 Uhr Seite 82 ...
Page 83: ...83 Anleitung EM 1600 1 Z_SPK1 09 08 2006 9 14 Uhr Seite 83 ...

