background image

EN-11

Using the Product

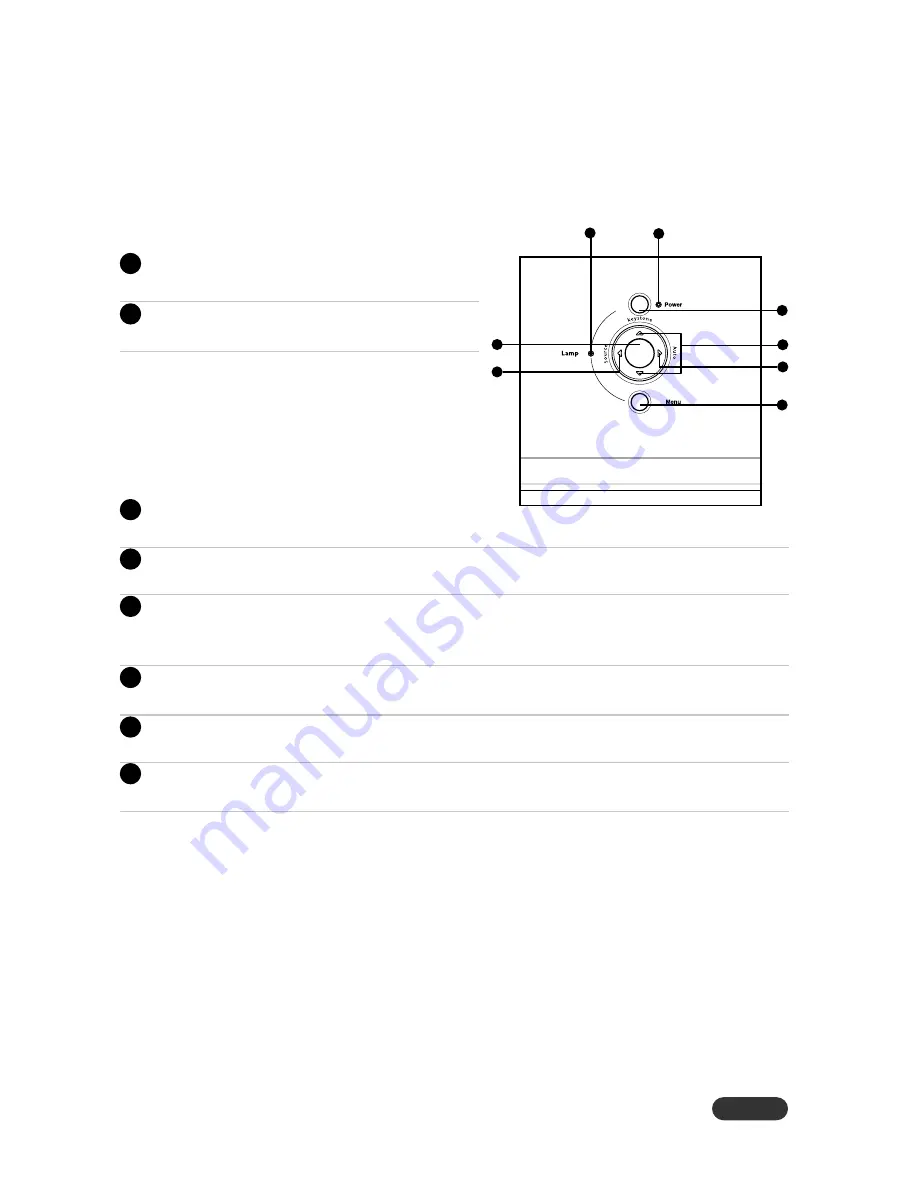
Control Panel

LED

 1

Lamp LED indicator
Refer to “LED Indicator Messages”. (p.30)

 2

Power LED indicator
Refer to “LED Indicator Messages”. (p.30)

Button Function
 

3

Power

Refer to “Powering On/Off the Projector”.


4

Keystone 

S

S

S

S

S

/

T

T

T

T

T

Adjusts image distortion caused by tilting the projector.


5

Auto 

X

X

X

X

X

Automatically adjusts frequency, total dots. This function is available for computer
mode only.

 6

Menu

Displays or exits the on-screen display menus.


7

Source 

W

W

W

W

W

Manually selects an input source.


8

Four directional buttons

Use four directional buttons to select items or make adjustments to your selection.

1

8

7

2

3

4

5

6

Summary of Contents for EIP-S200

Page 1: ...MULTIMEDIAPROJECTOR MODEL EIP S200 OWNER S MANUAL...

Page 2: ...turning the equipment off and on the user is encouraged to try to correct the interference by one or more of the following measures Reorient or relocate the receiving antenna Increase the separation b...

Page 3: ...RATING AND MAINTENANCE INSTRUCTIONS IN THE OWNER S MANUAL WITH THIS UNIT CAUTION RISK OF ELECTRIC SHOCK DO NOT OPEN 0 7 20cm 1 5 50cm 3 1m 1 5 50cm SIDE and TOP REAR An appliance and cart combination...

Page 4: ...tripping hazards 8 Never look into the projector lens when the lamp is switched on as the bright light can damage your eyes Never let children look into the lens when it is on 9 Do not place your han...

Page 5: ...p never touch the new bulb with your bare hands The invisible residue left by the oil on your hands may shorten the bulb life Use lint free gloves or finger cots are recommended 16 The product should...

Page 6: ...ied AC Power Cord does not match your AC outlet contact your sales dealer This projector is equipped with a grounding type AC line plug Make sure that your outlet fits the plug Do not defeat the safet...

Page 7: ...ring On Off the Projector 17 Adjusting the Projected Image 18 Menu Operation 21 Image Computer Video Mode 23 Video Video Mode 24 Display Computer Mode 24 Language Computer Video Mode 25 Advanced Compu...

Page 8: ...nstruments DLP technology SVGA 800 x 600 pixels true resolution 1 07x manual zoom lens Auto image re sizing Auto Sync to 800 x 600 full screen with scaling compression compatibility for VGA SVGA XGA a...

Page 9: ...al they will come in handy if you ever to ship your unit For maximum protection repack your unit as it was originally packed at the factory Projector with Lens Cap AC Power Cord VGACable D Sub to D Su...

Page 10: ...rojector Overview Front View 1 Ventilation holes 2 Projection lens 3 Front IR remote control sensor 4 Lens cap 5 Elevator foot 9 7 8 1 1 2 3 4 5 6 6 Elevator button 7 Zoom ring 8 Focus ring 9 Control...

Page 11: ...3 Terminals 4 Elevator button 5 Elevator foot 6 Speaker 7 AC power socket 8 Kensington lock 1 2 3 2 6 5 4 7 8 1 2 2 2 This projector can be used with a ceiling mount for support The ceiling mount is...

Page 12: ...ystone S S S S S T T T T T Adjusts image distortion caused by tilting the projector 5 Auto X X X X X Automatically adjusts frequency total dots This function is available for computer mode only 6 Menu...

Page 13: ...COMPUTER This connector is for firmware update 3 COMPUTER IN Connects image input signal analog to this jack 4 S VIDEO Connects S Video output from video equipment to this jack 5 VIDEO Connects compos...

Page 14: ...ojector p 11 23 6 Volume c d Press the Volume c button to increase the volume press the Volume d button to reduce the volume p 25 7 Source Manually selects an input source p 11 17 25 8 Mute Cuts off t...

Page 15: ...e reach of children There is a danger of death by accidentally swallowing the battery Do not recharge the used battery or expose the battery to fire or water Do not dispose of the used battery along w...

Page 16: ...sunlight or other strong light such as a fluorescent lamp shining on the remote sensor Operate the remote control from a position where the remote sensor is visible Do not drop the remote control or...

Page 17: ...on This does not mean that all of these devices can or must be connected simultaneously The cables that come with the projector may differ from the above illustration The included cables are based on...

Page 18: ...r look into the lens when the lamp is on This can damage your eyes It is especially important that children are not allowed to look into the lens Powering Off the Projector 1 Press button on the contr...

Page 19: ...the image to the desired height angle then release the button to lock the elevator foot into position To lower the image 1 Press the elevator button 2 Lower the image then release the button to lock...

Page 20: ...Focus 1 Focus the image by rotating the focus ring Astill image is recommended for focusing 2 Adjust the image by rotating the zoom ring Rotate to the right to reduce the image Rotate to the left to...

Page 21: ...tical parts 33 34 Min 55 56 83 35 138 9 277 8 Max 259 62 129 81 77 89 51 93 31 1 1 2m 3 0m 5 0m 10 0m 2 0m A B A B 8 3 1 2 PROJECTION DISTANCE METER 4 3 SCREEN SIZE DIAGONAL INCH Wide Tele 1 2 33 34 3...

Page 22: ...EN 21 Menu Operation The projector has multilingual On Screen Display menus that allow you to make image adjustments and change a variety of settings...

Page 23: ...ure in the main menu After selecting the desired main menu feature press T button to enter sub menu for feature setting 3 Adjust the settings with W X buttons 4 To return to the main menu press Menu b...

Page 24: ...scaled to fit the width of the screen Q 4 3 The input source will be scaled to fit the projection screen Blank Screen Blanks the screen temporarily and selects the screen color when this function is a...

Page 25: ...harpness of the image Q Press W to decrease the image Q Press X to increase the image Display Computer Mode Phase Phase synchronizes the signal timing of the display with that of the graphic card If y...

Page 26: ...lt Mode Use this function to dim the projector lamp light output which will lower power consumption and increase lamp life or and turning on High Altitude mode operates the fans at full speed continuo...

Page 27: ...s product yourself Refer all servicing to qualified service personnel Cleaning the Lens Gently wipe the lens with lens cleaning paper Do not touch the lens with your hands or fingers Cleaning the Proj...

Page 28: ...tion shock or degradation as a result of hours of use as its lifetime draws to an end Risk of explosion may differ according to the environment or conditions in which the projector and lamp are being...

Page 29: ...rews on the lamp cover J Dispose of the used lamp according to local regulations J Ensure that screws are tightened properly Screws not tightened fully may result in injury or accidents J Since the la...

Page 30: ...rce D Sub15pin S Video CompositeVideo StereoPhone Jack RS232 USB Scanning Frequency Horizontal Frequency 31 79 KHz Vertical Frequency 50 85 Hz Digital Keystone Correction Vertical 15 Integrated Speake...

Page 31: ...he projector system has some problems with its fan so the projector cannot start up The projector is operating normally The lamp has reached its end of life and must be changed soon The lamp will cont...

Page 32: ...600 46 8 75 0 75Hz XGA 1024 x 768 48 3 60 0 60Hz XGA 1024 x 768 56 4 70 0 70Hz XGA 1024 x 768 60 0 75 0 75Hz XGA 1024 x 768 68 8 84 9 85Hz Mac16 832 x 624 49 7 74 5 60Hz SXGA 1280 x 1024 63 98 60 0 6...

Page 33: ...does not synchronize with the graphic card The display data frequency does not match the frequency of your computer s graphic card The lens focus is not adjusted optimally The projection distance is...

Page 34: ...the remote control and projector Check that there are not any fluorescent or other bright lights shining at the projector s infrared remote sensor Terminal D sub 9 pin SERVICE PORT CONNECTOR RX1A TX1...

Page 35: ...86 21 5396 0088 Fax 86 21 5396 031 E Mail info eikichina com cn Canada EIKICANADA EikiInternational Inc P O Box 156 310 First St Unit 2 Midland ON L4R 4K8 Canada Tel 800 563 3454 705 527 4084 Fax 800...

Reviews: