background image

6


3. Setting up the projector 


3.1 How to connect the projector 

Depending on your purpose, you can select any of the following connection 
methods. 

1) For displaying data only 

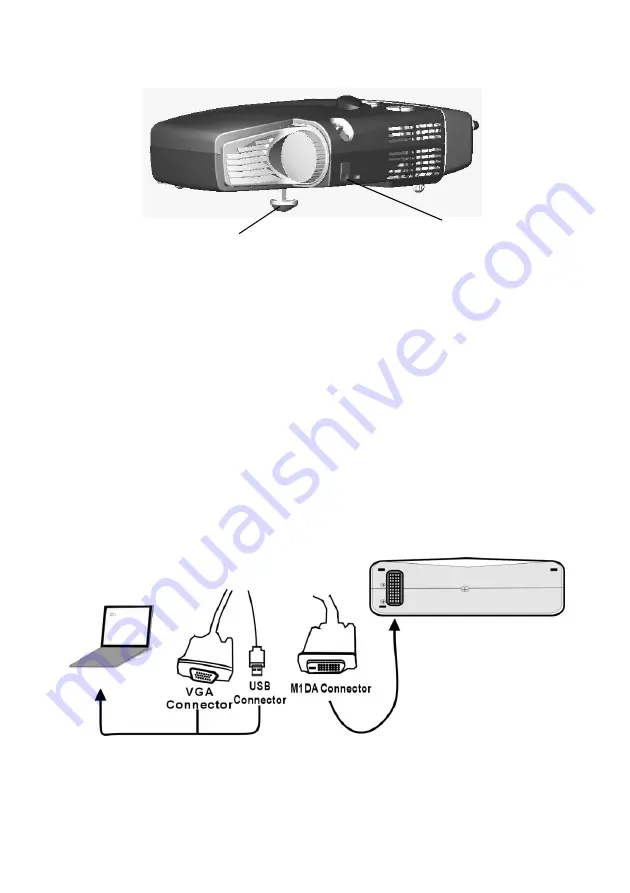
Find the M1DA-VGA+USB cable; connect M1DA connector to the main body; 
and connect VGA and USB connectors to the computer. Then you can start 
presentation. Under such circumstance,


video and audio function won’t be 

available.  


Foot Adjuster button 

Foot Adjuster

Summary of Contents for EIP-1

Page 1: ......

Page 2: ...4 Adjusting the focus and zoom 10 3 5 Projected image size 11 4 How to use the Projector 12 4 1 Initial image adjustment 12 4 2 Control panel and remote controller 12 5 Menu 16 5 1 Image VGA mode 16...

Page 3: ...lace the lamp please turn off and unplug the projector first then wait for 1 hour before replacing the lamp Please refer to page 25 Replacing the lamp for the operation procedure Warning Please use th...

Page 4: ...mputer display card to be less than or equal to 1280 x 1024 Compact size only 3 5 lbs Incorporated TI single chip 0 7 DLPTM technology Users may replace 150W VIP R150 E20 lamp easily Compatible with M...

Page 5: ...the box If any items are missing please contact your dealer immediately Projector with lens cap Power cord M1DA VGA USB cable Video Audio cable PC Audio in out cable S video cable VGA cable USB mouse...

Page 6: ...5 2 3 Appearance Control panel Speaker Video Enhanced Adaptor Lens cover Focus Ring Zoom Ring Screw Main Body Infra Red Remote Receiver Outlet Grille Warning Do keep the flow out of Outlet Grille free...

Page 7: ...e following connection methods 1 For displaying data only Find the M1DA VGA USB cable connect M1DA connector to the main body and connect VGA and USB connectors to the computer Then you can start pres...

Page 8: ...mposite Video signal in port 7 8 PC Audio In Out port Notes 1 Please make sure that both projector and computer are shutdown 2 Plug USB cable into computer 3 Plug one end of the VGA cable into the pro...

Page 9: ...e projector will automatically detect if the projector is overheated internally If yes the LED indicator flashes rapidly and the fan cools down automatically after 8 seconds The Power key does not fun...

Page 10: ...ector Higher 1 Hold the foot adjuster button 2 Raise the projector to the height you like and then release the foot adjuster to fix the projector Lower 1 Hold the foot adjuster 2 Lower projector to th...

Page 11: ...arge the image size please turn the zoom ring counter clockwise To reduce the image size please turn the zoom ring clockwise To adjust the focus of the image please turn the focus ring until the image...

Page 12: ...11 3 5 Projected Image Size Projection Distance 1 45M 2 0M 4M 6M 10 M Tele Screen size 42 49 99 148 247 Wide Screen Size 48 57 113 170 283...

Page 13: ...he zoom ring to adjust the size of the image 3 Turn the focus ring to adjust the focus of the image 4 Use the foot adjuster to adjust the altitude of the image 5 Use either the control panel or remote...

Page 14: ...ckly when you start the shutdown process Power Please refer to page 8 Turning on off the projector Auto Enter This key works as Auto key in normal condition This key works as an Enter key in the menu...

Page 15: ...uit the menu if the menu is on the screen In the remote control mouse mode this key works as the left key of mouse Enter R Please check page 13 Auto Enter of Control panel for the use of this key on t...

Page 16: ...remote control mode press this key to zoom in the image When mouse is in use press this key to turn to previous page Pg Dn On the remote control mode press this key to zoom out the image When mouse i...

Page 17: ...mage You can change the amount of black and white by adjusting contrast Press key to decrease contrast Press to increase contrast Keystone To modify the biased image resulted from the improper angle o...

Page 18: ...ss key to increase contrast Hue To adjust the balance between red and green colors in the image Press key to increase the green proportion Press key to increase the red proportion Saturation To change...

Page 19: ...the image Press key for adjustment Phase To synchronize the signals of images and display cards Use this function to correct inconsistent or flickering images Press key for adjustment V Position To ad...

Page 20: ...Red color Press key to increase amount of Red color User Green To adjust the Green color Press key to decrease amount of Green color Press key to increase amount of Green color User Blue To adjust the...

Page 21: ...of screen 16 9 or 4 3 Press key for selection User Color For end users to adjust red green and blue colors on their own Choose Yes User Red User Green and User Blue options appear Choose No Only Color...

Page 22: ...olor Press key to increase amount of Blue color Color Temp To adjust the color temp in the range between 6100K and 9300K Press key to lower color temp and the image looks warmer Press to increase colo...

Page 23: ...key to turn up the volume Treble Press key to decrease the volume of treble Press key to increase volume of treble Bass To adjust the medium low frequency of audio Press key to decrease bass Press key...

Page 24: ...u select this function the projector will reverse images from left to right or vice versa Thus the image can be projected from behind onto the semi transparent screen Press key for selection Lamp Remi...

Page 25: ...e Choose Yes The values of brightness and contrast vary each time when pressing Auto key Choose No The values of brightness and contrast remain the same Reset All To return to the factory default Pres...

Page 26: ...s 7 Replace the lamp bay access panel and then replace the access panel screw 6 2 Cleaning lens Please follow these steps to clean the projector lens 1 Pour an adequate amount of cleanser to a piece o...

Page 27: ...ave removed the lens cap and turned on the projector Q Incorrect resolution Please check if the video card of your computer has been set at a resolution less than 1280 X 1024 Q Unsteady or flickering...

Page 28: ...nnected to a DVD player playing a film with the ratio 16 9 the image is reshaped Adjust the aspect ratio of the projector to 4 3 Q Up side down image Open the menu and then select Management to adjust...

Page 29: ...hrow Ratio 1 34 1 1 6 1 Distance Diagonal Zoom Ratio 1 2 1 Manual Zoom Focus Uniformity 85 Aspect Ratio 4 3 16 9 screen selectable Contrast Ratio 900 1 Horizontal Frequency 31 5 80 kHz Vertical Scan R...

Page 30: ...ck Output Terminal 1 watt speaker All specifications are subject to change without notice This device complies with Part 15 of the FCC Rules Operation is subject to the following two conditions 1 the...

Page 31: ......

Reviews: