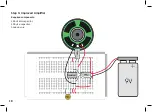


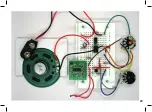


The antenna consists of a wire loop
as big as possible and is attached
between A and GND. Use a wire with
a length of 1 m. Thread it through
the designated holes so that the
antenna loop remains outside the
housing. Twist the wire at both
ends so that the antenna remains
stable and does not slip out of the
breadboard.
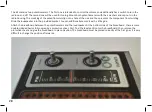
Finally, screw the rotary knobs on
the potentiometer axes. Put in the
battery and test the completed
radio.
You should be able to receive the
more powerful stations clearly. First,
test the radio at low or medium vol-
ume. At full volume, clipping at the
amplifier might already occur and
cause audible distortions. Depending
on the battery state, the volume has
to be slightly reduced in such a case.
Sometimes, fainter stations can only
be received with audible noise. In
such a case you can try and turn
the radio or the antenna in order
to improve reception. You should also test various locations of the radio. Sometimes, the walls of a building attenuate the FM
signals. Locating the radio near a window can produce better results. Also, test the reception outside.
32
Summary of Contents for RETRO RADIO
Page 1: ......
Page 14: ...14...
Page 15: ...Step 2 Sound Generator Required components 10 k resistor brown black orange 15...
Page 17: ...17...
Page 20: ...20...
Page 24: ...Step 5 Tuning Required components Hook up wire 24...
Page 29: ...29...
Page 35: ...Measured voltages 35...