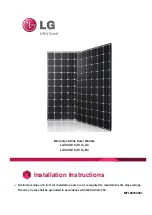
background image

Smart. Solar

. Box

www.pleion.it

17

Fijación con contrapesos

I

EGO PRIME

 solar collector with integrated storage cannot be anchored to the roof structure 

because the supporting surface cannot be drilled (e.g. because of waterproof coating) and if 

the supporting structure is strong enough (ask a structural expert for confirmation), the system 

can be anchored to ballasts that are sized according to the wind and snow, as well as to the 

weight of the collector when both full and empty.

In particularly windy areas, an additional safety system should be added to the ballasts, with 
a suitably-sized steel cable anchored to a solid part of the building that can hold the system.

The ballasts and cable must be sized by a structural technician who is authorised 

to work in the installation area, as indicated by Eurocodes (EN 1991) or NTC 2008 

(Decree 14 February 2008) if in Italy. The structural technician must also verify the 

resistance of the building. 

Installation on a sloped roof


Never remove the protective sheet if you have not finished installing the panel, and if the 

collector has not been filled. The 

EGO PRIME

 solar collector with integrated storage was not 

designed to be exposed to sunlight when empty.

Do not move or force the system using the threaded connections or the caps

Place and position

Carefully check the state of the cover and the supporting structure. Get a structural 

technician to check the maximum loads of the building, considering the weight of 

the system when full as a permanent load, as per the UNI EN 1991 (Eurocode) 

verifications.

Prefer the slope that faces south. Alternatively, the system works in a satisfactory manner 
when positioned on a roof slope that is positioned slightly to the south-east/south-west.
Choose an installation area where the panel remains in the sunlight for as long as possible. 
Nearby obstacles (trees, buildings, etc...) can temporarily shade the system and reduce (even 
greatly) its yield.

For correct operation, install the collector at an angle of no less than 15°; the collector must, 

in any case, be against the slope, therefore follow the angle of the roof.

The collector must always have its longest side parallel to the roof eaves. Do not install the collector with 
its short side parallel to the eaves.
Do not turn the collector upside down. The outflow side should be positioned at the top, and can be iden-
tified by its red cap (inflow at the bottom, identified by a blue cap).
Correct operation cannot be guaranteed if the system is installed upside down.

Examples of ballast

DANGER! 

The screws for fixing the supports to the roof are not supplied. They must be obtained 

by the installer, following the indications of the structural technician.


Necessary items

  n.2 spanners 13 mm; 

Individual PPE (helmet, gloves, goggles, etc...)

SI

NO

Summary of Contents for PRIME 110

Page 1: ...www pleion it EGO PRIME 110 150 180 220 260 INSTALLATION AND USER HANDBOOK EGO PRIME solar collector with integrated storage Senza titolo 2 1 12 03 18 16 32 ENG REV1 1...

Page 2: ...Smart Solar Box Installation and user handbook rev 1 1 of 13 09 2018 2 The key to a cleaner planet is in your hands...

Page 3: ...uality product EGO PRIME solar collector with integrated storage was designed by an Italian company and all its components are produced 100 in Italy After its simple installation you can enjoy the bea...

Page 4: ...on 15 Necessary items 15 Installation phases 16 Anchoring with ballasts 18 Installation on a sloped roof 18 Place and position 18 Necessary items 18 Installation phases 19 HYDRAULIC CONNECTION 21 Gene...

Page 5: ...d Before starting to install the product make sure all the components are present LETTER COMPONENT QUANTITY PIECES EGO solar collector with integrated storage 1 a b BASIC SUPPORT pair of galvanised sh...

Page 6: ...wer 1 000W 230V ELECTRICAL RESISTOR FOR INTEGRATION 2 kW Article code 4400234102 power 2 000W 240V SAFETY AND ONE WAY UNIT with MF connections Article code 4400223301 PRESSURE REDUCER with MF connecti...

Page 7: ...ESSARY QUALIFIED ELECTRICIAN QUALIFIED DESIGNER RISK OF BURNS RISK OF FALLING MATERIAL FROMABOVE TIGHTEN LOOSEN MANUALLY TIGHTENWITH SPANNER PERFORATEWITH DRILL DANGER OF OVERPRESSURE DANGER OF ELECTR...

Page 8: ...connection and regulate the pressure see STARTING chapter y y Should faults occur or if the system does not operate correctly do not attempt to repair the product Instead disable it and con tact a spe...

Page 9: ...the product warranty The electrical resistors antifreeze and integration can be used with chlorine levels up to twice the limit imposed by Directive 98 38 EC and subse quent amendments Hardness It is...

Page 10: ...tank is not subject to CE marking but the producer guarantees it as established in the directive because designed and produced following a correct construction procedure the accumulation system does n...

Page 11: ...m2 1 48 m2 1 86 m2 2 25 m2 2 64 m2 absorption surface area 0 85 m2 1 13 m2 1 41 m2 1 69 m2 1 98 m2 effectiveACS content 105 liters 140 liters 175 liters 210 liters 245 liters cover requirements 1 2 2...

Page 12: ...ositioned in the lower part of the system it heats up as it pas ses from the lower cylinders to the upper ones and finally exits from the highest cylinder and goes into the system directly to the user...

Page 13: ...things that are of a suitable capacity and size Structural check The EGO PRIME solar collector with integrated storage can be placed on the ground or on a structure attic covering balcony etc that ca...

Page 14: ...n the collector at least 1 2 metres from any obstacles that are present Direct the transparent surface as close to the south as possible If deviated slightly towards the east or the west the system st...

Page 15: ...www pleion it 15 Installation phases FLAT ROOF 1 1a 1b 1c CARICO NEVE CARICO VENTO 1 2 kN m2 100 km h 2 4 DETTAGLIO A A 3 13 MAX 20 Nm DETTAGLIOA 3c 3d 3b 3a DETTAGLIOA...

Page 16: ...nd user handbook rev 1 1 of 13 09 2018 16 5 8 DETTAGLIO A A DETTAGLIO A A 5a 5b 5c 5d 5a 6 6a 5d 5c 8b 8b 8a DETTAGLIOA DETTAGLIOA 5b 7 7b 7a 7b 7a EGO PRIME A B 110 150 2050 150 250 2050 180 400 2050...

Page 17: ...nections or the caps Place and position Carefully check the state of the cover and the supporting structure Get a structural technician to check the maximum loads of the building considering the weigh...

Page 18: ...olar Box Smart Solar Box Installation and user handbook rev 1 1 of 13 09 2018 18 Installation phase SLOPED ROOF 1 CARICO NEVE CARICO VENTO 1 2 kN m2 100 km h 5 25 cm 5 25 cm 5 25 cm 5 25 cm 4 2 3 DETT...

Page 19: ...www pleion it 19 6 8 7 DETTAGLIOA DETTAGLIO A A 5 13 A A 9 13 A Installation phase...

Page 20: ...t is indicated in this manual complies with laws and regulations in force at the installation place The manufacturer is not liable for any damage caused to things and injury to people as a result of i...

Page 21: ...line from the water system B water filter X C pressure reducer adjusted at 3 bar OPZ D interception valve X E safety and one way valve setting 4 5 0 5 bar F discharge tap X G flexible hose X LETTER C...

Page 22: ...he solar collector connections This compensates the thermal expansion of the lines caused by temperatu re oscillations and makes disconnecting and repositioning the solar collec tor easier if it has t...

Page 23: ...r heaters these devices must be connected to the domestic water system using a hydraulic safety unit This unit must include at least one interception tap a one way valve a control device for the one w...

Page 24: ...reate a 90 angle as to the horizontal surface Before tightening the valve to the outflow connection connect between the valve and the user supply line To do this keep the plastic connection still usin...

Page 25: ...as required within the range of 35 55 C Use the adjustment knob to do this Connecting more than one collector mod 110 180 260 If it is necessary to use several collectors parallel connection is stron...

Page 26: ...ated solar collector is supplied with a plasticizer free PVC covering she et which serves the purpose of blacking out the surface that captures the solar irradiation This will prevent the product from...

Page 27: ...Allow the water to flow inside the system for a certain period of time in order to rinse out any deposits or residues that could have entered the tank during installation Convey the exiting water down...

Page 28: ...the users and allow a sufficient amount of water to flow in for lowering the temperature and rinsing out the system b Close the shut off valve at the inlet c Disconnect the return line from the by pas...

Page 29: ...SHOCK Do not connect the electric resistors at current values that are different from those given on the plate Indications on using electric resistors Should the risk of the temperature falling below...

Page 30: ...currents condensation aggres sive or acid water incorrect descaling treatments lack of water deposits of lime stone and sludge i force majeure such as fire theft freezing overheating whirlwinds bolts...

Page 31: ...e integrity of the accumulation tank In this case it will be necessary to install a softening or filtration device upstream from the system carry out adequate cleaning and if necessary replace the val...

Page 32: ...Be the change that you want to see in the world M GANDHI PLEION Srl Via Venezia 11 Cerea Verona infoline 39 0442 320295 info pleion it www pleion it cod 4400994018...

Reviews: