background image


12 


SPECIFICATIONS 

TIME

-----------------------------------------------------------------------------------------0:00-99:59 MINUTES 

COUNT (CNT)

------------------------------------------------------------------------------0-9999 TIMES 

CALORIES (CAL)

---------------------------------------------------------------------------0-999.9 CAL 

TOTAL COUNT (TC)

-----------------------------------------------------------------------0-9999 TIMES 

RPM (C/M)

---------------------------------------------------------------------------------0-9999 COUNT/MIN


KEY FUNCTION 

MODE: 

This key lets you to select and lock on to a particular function you want. 

CLEAR: 

Pressing and hold the MODE key with 3 seconds to reset the value to zero. But total count can only be 

reset by changing battery.


OPERATION PROCEDURES 

1. AUTO ON / OFF: 

The  system  turns  on  when  the  MODE  key  is  depressed  or  when  the  system  sensed  a  signal  input  from  the 

speed sensor. 

The  system  turns  off  automatically  when  the  speed  sensor  has  no  signal  input  or  no  key  are  pressed  for 

approximately 4 minutes. 

2. FUNCTION: 

SCAN: Automatically scan through all the functions played on the bottom of the meter. 

TIME: The total working time will be shown when starting exercise. 

CAL (CALORIES): The Computer will display total calories burns when starting to exercise. 

RPM(C/M):


Counts each strokes within a minute. 

COUNT: Counts the number of rowing strokes from your current workout. 

TC (TOTAL COUNT): Counts the total amount of strokes from the first use. 

SELECT 

 You  can  operate  the  MODE  key  to  select  and  lock  on  function  in  second  rank  of  LCD  screen  for  following 
sequence: 

TIME

 COUNT

 CALORIES 

TOTAL COUNT

 RPM

SCAN 

BATTERY:


This monitor uses 2pcs “AAA” batteries

. You can replace the battery through the back of the unit. If there is a 

problem with the display, try changing the batteries first. Do not mix old and new battery. Do  not mix battery 
types. Dispose old battery according to your regional guidelines. 

EXERCISE COMPUTER


V 4 

Summary of Contents for RW032

Page 1: ...G MACHINE MODEL NO RW032 IMPORTANT Read all instructions carefully before using this product Save this manual for future reference EXERCISE EQUIPMENT QUESTIONS Contact customer service at service zoov...

Page 2: ...ult use only Keep children and pets away from the machine DO NOT leave children unattended in the same room with the equipment 4 Use the equipment on a solid flat level surface with a protective cover...

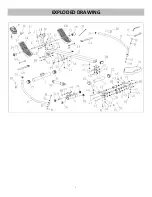
Page 3: ...3 EXPLODED DRAWING...

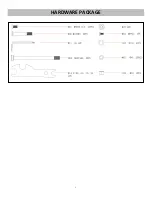
Page 4: ...4 HARDWARE PACKAGE...

Page 5: ...12 Refer to No 55 41 Bolt M8 115 20 S 5 2 13 Refer to No 57 42 Bolt M8 120 20 S 5 1 14 Spanner S 10 13 17 19 1 43 Screw M8 15 S 5 13 15 Cir Clip 12 2 44 Screw M6 15 2 16 Adjusting Screw M6 45 2 45 Was...

Page 6: ...th an Allen Wrench No 11 STEP 2 Attach the Seat No 19 to the Seat Supporting Boards No 7 8 using 4 Screws No 43 and 4 Washers No 45 Tighten and secure with an Allen Wrench No 11 Then Insert the Seat N...

Page 7: ...ort No 3 onto the Main Frame No 2 using 4 Screws No 43 and 4 Washers No 45 Tighten and secure with an Allen Wrench No 11 Note To prevent tipping rocking and swaying on uneven surface simply turn Rear...

Page 8: ...er Support No 56 using 2 Screws No 47 and 2 Washers No 48 that were removed then tighten with an Allen Wrench No 11 STEP 6 Connect part E with part F Attach the Meter Support No 56 onto the Main Frame...

Page 9: ...ough the Pedals No 23 and into the Meter Support No 56 NOTE The Pedals No 23 should rest on the Bolts No 53 STEP 8 Attach the 2 Handlebars No 6 into the Rotating Armrest No 4 using 2 Bolts No 55 4 Was...

Page 10: ...inder No 10 NOTE Please do not adjust the resistance of the Hydraulic Cylinder No 10 during operation to avoid injury and damage to the machine WARNING The Hydraulic Cylinder No 10 on this rower is de...

Page 11: ...49 remove the velcro end of the strap from the mesh side by pulling it upward then to the left Once removed you may increase the opening of the Pedal Strap No 49 by pulling the mesh end up and to the...

Page 12: ...lly scan through all the functions played on the bottom of the meter TIME The total working time will be shown when starting exercise CAL CALORIES The Computer will display total calories burns when s...

Reviews: