Edirol UM-2 Owner'S Manual Download Page 80

80

Installation et configuration du pilote

4

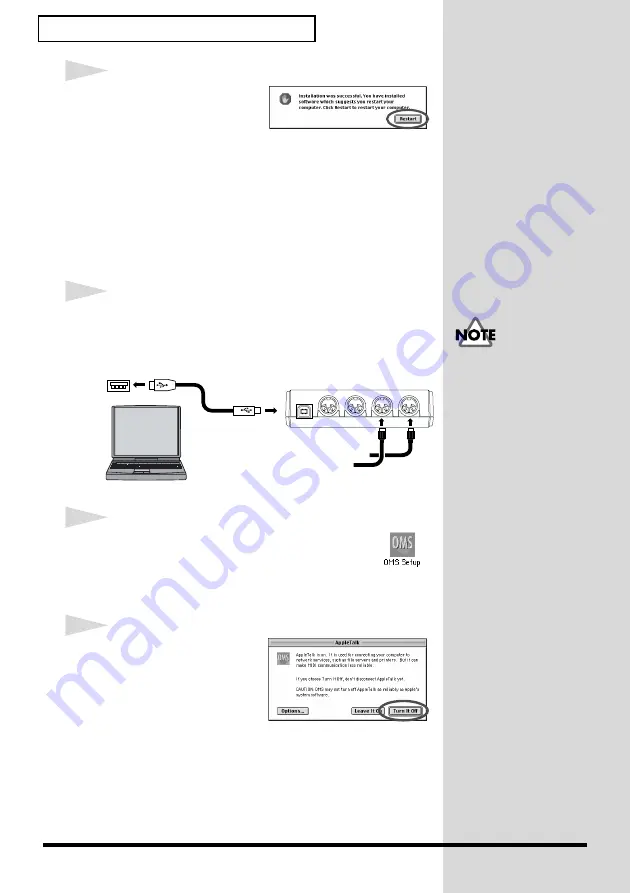
Lorsque l'installation est 
terminée, la boîte de 
dialogue suivante 
s'affiche. Cliquez sur 

[Redémarrer] 

 pour redémarrer le Macintosh.

Paramètres OMS

* Si d'autres appareils MIDI sont connectés, vous devez tous les 

éteindre, puis ajuster leurs paramètres en suivant la procédure ci-
après.

1

Utilisez le câble USB pour connecter l'UM-2 à 

l’ordinateur.

2

Dans le dossier 

“Opcode”

 à l'emplacement 

où OMS est installé, ouvrez le dossier 

“OMS Applications”

 et cliquez deux fois 

sur l'icône 

“OMS Setup”

.

3

Si la boîte de dialogue 

“Apple Talk”

 s'affiche, 

cliquez sur 

[Turn It Off]

.


Puis, dans la boîte de 
dialogue qui s'affiche, 
cliquez sur 

[OK]

.

Si vous utilisez l'UM-2 avec 
un séquenceur, ne 
déconnectez pas le câble 
MIDI relié à l'UM-2 pendant 
la lecture d'un morceau.

USB Connector
of your Computer

Computer

USB Cable

UM-2

MIDI Cable

Summary of Contents for UM-2

Page 1: ...s on the front cover to left or right Before using this unit carefully read the sections entitled USING THE UNIT SAFELY p 3 and IMPORTANT NOTES p 5 These sections provide important information concerning the proper operation of the unit Additionally in order to feel assured that you have gained a good grasp of every feature provided by your new unit this manual should be read in its entirety The m...

Page 2: ...ause harmful interference to radio or television reception which can be determined by turning the equipment off and on the user is encouraged to try to correct the interference by one or more of the following measures Reorient or relocate the receiving antenna Increase the separation between the equipment and receiver Connect the equipment into an outlet on a circuit different from that to which t...

Page 3: ...ain or are Dusty or are Subject to high levels of vibration 007 Make sure you always have the unit placed so it is level and sure to remain stable Never place it on stands that could wobble or on inclined surfaces 011 Do not allow any objects e g flammable material coins pins or liquids of any kind water soft drinks etc to penetrate the unit 012d Immediately turn the power off and request servicin...

Page 4: ...t 108c Disconnect all cords coming from external devices before moving the unit 204 Microsoft and Windows are registered trade marks of Microsoft Corporation Windows is known officially as Microsoft Windows operating system 206e Screen shots in this documents are reprinted with permission from Microsoft Corporation 207 Apple and Macintosh are registered trademark of Apple Computer Inc 209 MacOS is...

Page 5: ...oth 402 Never use benzine thinners alcohol or solvents of any kind to avoid the possibility of discoloration and or deformation Additional Precautions 553 Use a reasonable amount of care when using the unit s jacks and connectors Rough handling can lead to malfunctions 556 When connecting disconnecting all cables grasp the connector itself never pull on the cable This way you will avoid causing sh...

Page 6: ...NIT SAFELY 3 IMPORTANT NOTES 5 Introduction 7 Installing Setup the Driver 9 Installation Einrichtung des Treibers 34 Installation et configuration du pilote 61 Installazione e configurazione del driver 86 Troubleshooting 112 ...

Page 7: ...t the dealer where you purchased the package UM 2 USB MIDI Interface fig 01 01 UM 2 Driver CD ROM one disk Be sure to read the Readme_E txt file that is found in the UM 2 Driver CD ROM Any changes that occurred after the owner s manual was printed or additional information will be given in the Readme_E txt file fig cd rom USB Cable one cable fig 01 03 UM 2 Owner s Manual this document fig 01 04 ...

Page 8: ...other devices that you wish to play from your computer MIDI IN Indicators 1 2 These indicators will blink when MIDI messages are received at the MIDI IN connectors MIDI OUT Indicators 1 2 These indicators will blink when MIDI messages are transmitted from the MIDI OUT connectors USB Indicator This indicator will light when the unit is connected to your computer and is ready to operate USB Connecto...

Page 9: ...encer software etc that is running on the USB connected computer The UM 2 Driver sends data from the application to the UM 2 and passes data from the UM 2 to the application fig 03 00 e The explanation about installing and setup the driver is organized according to the computer and MIDI driver that you are using Please proceed to the following pages Windows XP Users P 10 Windows 98 Me Users P 16 W...

Page 10: ...K If it is not set to Ignore make a note of the current setting Warn or Block Then change the setting to Ignore and click OK After installing the driver restore the original setting If you changed What action do you want Windows to take p 14 If you are using Windows XP Professional you must log on using a user name with an administrative account type e g Administrator For details on user accounts ...

Page 11: ...rt button From the menu that appears select Run Open the Run dialog box fig 2 3_30 9 In the dialog box that appears input the following into the Open field and click OK D WINXP_2K Setupinf exe The drive name D may be different for your system Specify the drive name of your CD ROM drive fig 2 4_30 10 The SetupInf dialog box will appear You are now ready to install the driver In this manual the loca...

Page 12: ...m a list or specific location Advanced and click Next fig 2 7 13 The screen will indicate Please choose your search and installation options Select Don t search I will choose the driver to install and click Next fig 2 8_20 14 Make sure that the Model field indicates EDIROL UM 2 and click Next Driver installation will begin This unit is equipped with a protection circuit A brief interval a few seco...

Page 13: ...ive name D may be different for your system Specify the drive name of your CD ROM drive fig 2 11_20 17 The Found New Hardware Wizard will appear Verify that EDIROL UM 2 is displayed and click Finish Wait until Found New Hardware appears near the taskbar 18 When driver installation has been completed the System Settings Change dialog box will appear Click Yes Windows will restart automatically The ...

Page 14: ... Panel 3 In Pick a category click Performance and Maintenance Depending on how your system is set up the System icon may be displayed directly in the Control Panel classic view In this case double click the System icon 4 In or pick a Control Panel icon click the System icon The System Properties dialog box will appear 5 Click the Hardware tab and then click Driver Signing The Driver Signing Option...

Page 15: ...n or pick a Control Panel icon click the Sounds and Audio Devices icon 3 Click the Audio tab fig 2 28_30 4 For MIDI music playback click the located at the right of Default device and select the following from the list that appears EDIROL UM 2 MIDI1 5 Close the Sounds and Audio Devices Properties dialog box Click OK to complete the settings Depending on how your system is set up the Sounds and Aud...

Page 16: ... drive If the UM 2 is already connected to your computer and a message of Add New Hardware Wizard is displayed go to the UM 2 Driver CD ROM folder named Win98_Me open the file Readme_e htm and read the Troubleshooting section entitled You attempted to install using the above procedure but were not able to The UM 2 cannot be used with Windows95 or Windows NT If you wish to use the UM 2 at the same ...

Page 17: ...our CD ROM drive is named D you would input D Win98_Me Q WIN98_ME If the display indicates The driver is already installed you can connect the UM 2 s USB cable to the computer and use it If the Ready to install the driver dialog box does not appear go to the UM 2 Driver CD ROM folder named Win98_Me open the Reademe_e htm file and read the section entitled Installation If the display indicates The ...

Page 18: ... OK button in the SETUPINF dialog box Then refer to Specifying the Output Destination for MIDI Data the section that follows and make settings for the UM 2 to be used from your computer The UM 2 cannot be used unless you make these settings ...

Page 19: ...erties click the MIDI tab In the MIDI Output field select 1 EDIROL UM 2 MIDI 1 MIDI devices correspond to MIDI ports as follows 4 Click OK 5 Use a MIDI cable to connect the MIDI OUT 1 connector of the UM 2 to a MIDI sound module 6 Start up Windows Media Player or Media Player select a MIDI file and play back MIDI Output Device MIDI Output Port EDIROL UM 2 MIDI 1 MIDI OUT 1 EDIROL UM 2 MIDI 2 MIDI ...

Page 20: ...onnect the MIDI OUT 1 connector of the UM 2 to a MIDI sound module 6 Start up Windows Media Player or Media Player select a MIDI file and play back MIDI Output Device MIDI Output Port EDIROL UM 2 MIDI 1 MIDI OUT 1 EDIROL UM 2 MIDI 2 MIDI OUT 2 If you are using the UM 2 with a sequencer do not disconnect the MIDI cable connected to the UM 2 while a song is playing back Depending on your settings So...

Page 21: ...e tab and then click the Driver Signing button The Driver Signing Options dialog box will appear 5 Make sure that File signature verification is set to Ignore If it is set to Ignore click OK If not make a note of the current setting then change it to Ignore and click the OK button If the UM 2 is already connected to your computer and a message of Found New Hardware Wizard is displayed go to the UM...

Page 22: ...will appear and the display will indicate Ready to install the driver To check the drive name of your CD ROM drive double click the My Computer icon Q If the display indicates The driver is already installed you can connect the UM 2 s USB cable to the computer and use it If the Ready to install the driver dialog box does not appear go to the UM 2 Driver CD ROM folder named WinXP_2K open the Readem...

Page 23: ...lation will be completed Change the drive name Q to match the drive name of your CD ROM drive For example if your CD ROM drive is named D you would input D WinXP_2K 14 The Found New Hardware Wizard will appear Make sure that EDIROL UM 2 is displayed and click the Finish button USB Connector of your Computer Computer USB Cable UM 2 MIDI Cable To prevent malfunction and or damage to speakers or othe...

Page 24: ...e signature in step 5 set it back to the previous setting To restore the setting the Administrator or user belonging to the Administrators group must log on to Windows Then refer to Specifying the Output Destination for MIDI Data the section that follows and make settings for the UM 2 to be used from your computer The UM 2 cannot be used unless you make these settings ...

Page 25: ...Audio tab and in MIDI Music Playback select 1 EDIROL UM 2 MIDI 1 MIDI devices correspond to MIDI ports as follows 4 Click OK 5 Use a MIDI cable to connect the MIDI OUT 1 connector of the UM 2 to a MIDI sound module 6 Start up Windows Media Player or Media Player select a MIDI file and play back MIDI Output Device MIDI Output Port EDIROL UM 2 MIDI 1 MIDI OUT 1 EDIROL UM 2 MIDI 2 MIDI O UT 2 If you ...

Page 26: ...e driver use the procedure described in Installing Setup the Driver P 9 to re install the driver For details on how to delete the driver refer to the explanation provided in the on line manual within the UM 2 Driver CD ROM Windows 98 Me users In the UM 2 Driver CD ROM folder Win98_Me open the Readme_e htm file and read To uninstall Windows XP 2000 users In the UM 2 Driver CD ROM folder WinXP_2K op...

Page 27: ...art up hard disk 1 In the UM 2 Driver E folder of the CD ROM double click the UM2 OMS Driver E Installer icon 2 Make sure that OMS is already installed in the location where the driver will be installed and click Install 3 If the following message appears click Continue and all other currently running applications will be exited and installation will continue To learn more about OMS If you would l...

Page 28: ...dure 1 Use the USB cable to connect the UM 2 and your computer 2 In the Opcode folder in the location where OMS is installed open the OMS Applications folder and double click the OMS Setup icon 3 If the Apple Talk dialog box appears click Turn It Off Then in the dialog box that appears next click OK If you are using the UM 2 with a sequencer do not disconnect the MIDI cable connected to the UM 2 w...

Page 29: ...g box and click OK 7 After making sure that the UM 2 is listed in the OMS MIDI Device Setup dialog box click each check box for Port1 through Port2 to check them all and click OK 8 The Save dialog box will appear Input the desired file name and click Save If an error dialog box is displayed during the setup disconnect all MIDI cables connected to the UM 2 and make the OMS settings once again If th...

Page 30: ...ick the keyboard icon When you move the mouse cursor near the keyboard icon the cursor will change to the shape of an eighth note Verify that you can hear sound from your sound module Port 1 is MIDI IN OUT 1 of the UM 2 Port 2 is MIDI IN OUT 2 of the UM 2 12 After you have finished the above check exit OMS Setup This completes driver settings The following step will cause a relatively loud sound t...

Page 31: ...lick the UM2 FreeMIDI Driver E Installer icon to start up the installer 3 Click Install If the dialog box that all other currently running applications will be exited appears click Continue 4 When installation is completed click Restart to restart your computer This completes installation of the UM 2 Driver Next you will make FreeMIDI settings The UM 2 FreeMIDI Driver included on the disc is provi...

Page 32: ...t which is located below UM 2 Driver in MIDI Configuration and click OK 4 The About Quick Setup dialog box will appear Click Continue There will be a version number following FreeMIDI Setup as the actual icon name If you are using the UM 2 with a sequencer do not disconnect the MIDI cable connected to the UM 2 while a song is playing back If the dialog box does not show UM 2 Driver check whether t...

Page 33: ...ocation Select UM 2 and for Cable that appears below it select the port to which your MIDI equipment is connected 6 If two units of MIDI equipment are connect repeat step 5 7 When settings are complete click Done A setting window like the following will appear 8 If you selected Other for Model double click the appropriate icon in the setting window to make settings for your MIDI equipment For deta...

Page 34: ...ittstelle angeschlossenen Computer ausgeführt wird Der UM 2 Treiber sendet die Daten der der Anwendung an das UM2 und überträgt die Daten des UM 2 an die Anwendung fig 03 00 e Die Beschreibung der Installation und Einrichtung des Treibers wurde entsprechend dem Computer und MIDI Treiber organisiert den Sie benutzen Bitte lesen Sie deshalb auf den nachfolgend genannten Seiten weiter WindowsXP Anwen...

Page 35: ...cken Sie einfach auf OK Wenn Ignorieren nicht eingestellt ist notieren Sie sich die aktuelle Einstellung Warnen oder Sperren Anschließend ändern Sie die Einstellung auf Ignorieren und klicken auf OK Nachdem Sie den Treiber installiert haben stellen Sie die ursprünglichen Einstellungen wieder her Wenn Sie Wie soll Windows vorgehen geändert haben S 39 Wenn Sie Windows XP Professional verwenden müsse...

Page 36: ... 8 Klicken Sie auf die Windows Schaltfläche Start Wählen Sie im daraufhin angezeigten Menü die Option Ausführen Öffnen Sie das Dialogfeld Ausführen fig 2 3_30 9 Geben Sie im angezeigten Dialogfeld Folgendes in das Feld Öffnen ein und klicken Sie auf OK D WinXP_2K Setupinf exe Der Laufwerknamen D kann auf Ihrem System anders lauten Geben Sie statt dessen den Laufwerknamen Ihres CD ROM Laufwerks an ...

Page 37: ...Hardware erscheint Prüfen Sie ob der Bildschirm EDIROL UM 2 anzeigt wählen Sie Software von einer Liste oder bestimmten Quelle installieren für fortgeschrittene Benutzer und klicken Sie auf Weiter fig 2 7 13 Im Bildschirm wird folgende Meldung angezeigt Wählen Sie die Such und Installationsoptionen Wählen Sie Nicht suchen sondern den zu installierenden Treiber selbst wählen und klicken Sie auf Wei...

Page 38: ... Folgendes in das Feld Dateien kopieren von ein und klicken Sie auf OK D WinXP_2K Der Laufwerknamen D kann auf Ihrem System anders lauten Geben Sie statt dessen den Laufwerknamen Ihres CD ROM Laufwerks an fig 2 11_20 17 Der Assistent für das Suchen neuer Hardware erscheint Prüfen Sie ob EDIROL UM 2 angezeigt wird und klicken Sie auf Beenden Warten Sie bis die Meldung Neue Hardware gefunden in der ...

Page 39: ...und wählen Sie im daraufhin angezeigten Menü Systemsteuerung 3 Klicken Sie in Wählen Sie eine Kategorie auf Leistung und Wartung Abhängig von der Konfiguration Ihres Systems kann es vorkommen dass das Symbol System sofort in der Systemsteuerung in der klassischen Anzeige angezeigt wird Doppelklicken Sie in diesem Fall auf das System Symbol 4 Klicken Sie in oder wählen Sie ein Systemsteuerungssymbo...

Page 40: ... auf das Symbol Sounds und Audiogeräte 3 Klicken Sie auf die Registerkarte Audio fig 2 28_30 4 Klicken Sie bei MIDI Musikwiedergabe auf das das sich rechts von Standardgerät befindet und wählen Sie folgende Option aus der angezeigten Liste aus EDIROL UM 2 MIDI1 5 Schließen Sie das Dialogfeld Eigenschaften von Sounds und Audiogeräte Klicken Sie auf OK um die Konfiguration abzuschließen Abhängig von...

Page 41: ...hrem Computer verbunden ist und die Meldung Neue Hardware gefunden angezeigt wird wechseln Sie in den Ordner UM 2 Driver CD ROM UM 2 Treiber CD mit dem Namen Win98_Me öffnen die Datei Readme_e htm und lesen den Abschnitt Troubleshooting Fehlerbehebung mit dem Titel You attempted to install using the above procedure but were not able to Ein Installationsversuch mit oben beschriebenem Verfahren ist ...

Page 42: ...Anzeige die Meldung The driver is already installed Der Treiber wurde bereits installiert ausgibt können Sie das USB Kabel des UM 2 mit dem Computer verbinden und das Gerät verwenden Wenn das Dialogfeld Ready to install the driver Der neue Treiber kann jetzt installiert werden nicht erscheint wechseln Sie auf der UM 2 Driver CD ROM UM 2 Treiber CD in den Ordner mit dem Namen Win98_Me öffnen die Da...

Page 43: ...ungen vorgenommen haben Angabe des Ausgabeziels für die MIDI Daten Hier können Sie Einstellungen für den UM 2 Treiber mit Anwendungen wie z B den Media Player vornehmen der mit Windows mitgeliefert wird Windows 98 Benutzer 1 Klicken Sie auf die Windows Schaltfläche Start wählen Sie Einstellungen im daraufhin angezeigten Menü und wählen Sie Systemsteuerung 2 Doppelklicken Sie anschließend in der Sy...

Page 44: ...n Sie auf OK 5 Verwenden Sie ein MIDI Kabel um den MIDI OUT 1 Anschluss des UM 2 mit einem MIDI Soundmodul zu verbinden 6 Starten Sie den Windows Media Player oder Media Player wählen Sie eine MIDI Datei aus und spielen Sie sie ab MIDI Ausgabegerät MIDI Ausgabe Anschluss EDIROL UM 2 MIDI 1 MIDI OUT 1 EDIROL UM 2 MIDI 2 MIDI OUT 2 Der Windows Media Player befindet sich im Startmenü Programme Zubehö...

Page 45: ... OUT 1 Anschluss des UM 2 mit einem MIDI Soundmodul zu verbinden 6 Starten Sie den Windows Media Player oder Media Player wählen Sie eine MIDI Datei aus und spielen Sie sie ab MIDI Ausgabegerät MIDI Ausgabe Anschluss EDIROL UM 2 MIDI 1 MIDI OUT 1 EDIROL UM 2 MIDI 2 MIDI OUT 2 Wenn Sie das UM 2 mit einem Sequenzer verwenden sollten Sie das MIDI Kabel das an das UM 2 angeschlossen ist nicht aussteck...

Page 46: ...e auf System Klicken Sie auf die Registerkarte Hardware und klicken Sie anschließend auf Treibersignierung Daraufhin wird das Dialogfeld Treibersignaturoptionen angezeigt Wenn das UM 2 bereits mit Ihrem Computer verbunden ist und die Meldung Neue Hardware gefunden angezeigt wird wechseln Sie in den Ordner UM 2 Driver CD ROM UM 2 Treiber CD mit dem Namen WinXP_2K öffnen die Datei Readme_e htm und l...

Page 47: ... Schaltfläche OK 6 Klicken Sie auf die Schaltfläche OK um die Systemeigenschaften zu schließen 7 Legen Sie die UM 2 Driver CD ROM UM 2 Treiber CD in das CD ROM Laufwerk ein 8 Wählen Sie im Windowsmenü Start Ausführen 9 Geben Sie im Feld Öffnen des angezeigten Dialogfelds Folgendes ein Q WinXP_2K Setupinf exe und klicken Sie auf OK Geben Sie anstatt des Laufwerknamens Q den Laufwerknamen Ihres CD R...

Page 48: ...driver Der neue Treiber kann jetzt installiert werden nicht erscheint wechseln Sie auf der UM 2 Driver CD ROM UM 2 Treiber CD in den Ordner mit dem Namen WinXP_2K öffnen die Datei Reademe_e htm und lesen den Abschnitt mit dem Titel Installation Wenn in der Anzeige die Meldung The driver was not deleted completely Der Treiber wurde nicht vollständig gelöscht erscheint lesen Sie bitte Löschen des UM...

Page 49: ...d klicken Sie auf die Schaltfläche OK Die Installation wird abgeschlossen Ändern Sie den Laufwerknamen Q auf den Laufwerknamen Ihres CD ROM Laufwerks Wenn z B D der Namen Ihres CD ROM Laufwerks ist geben Sie D WinXP_2K ein 14 Der Assistent Neue Hardware gefunden wird angezeigt PrüfenSie ob EDIROLUM 2 angezeigt wird und klicken Sie auf die Schaltfläche Beenden 15 Das Dialogfeld Geänderte Systemeins...

Page 50: ...von Ihrem Computer aus benutzen zu können Das UM 2 kann erst benutzt werden nachdem Sie diese Einstellungen vorgenommen haben Angabe des Ausgabeziels für die MIDI Daten Hier können Sie Einstellungen für den UM 2 Treiber mit Anwendungen wie z B den Media Player vornehmen der mit Windows mitgeliefert wird 1 Klicken Sie auf die Windows Schaltfläche Start wählen Sie Einstellungen im daraufhin angezeig...

Page 51: ... Klicken Sie auf OK 5 Verwenden Sie ein MIDI Kabel um den MIDI OUT 1 Anschluss des UM 2 mit einem MIDI Soundmodul zu verbinden 6 Starten Sie den Windows Media Player oder Media Player wählen Sie eine MIDI Datei aus und spielen Sie sie ab MIDI Ausgabegerät MIDI Ausgabe Anschluss EDIROL UM 2 MIDI 1 MIDI OUT 1 EDIROL UM 2 MIDI 2 MIDI OUT 2 Der Windows Media Player befindet sich im Startmenü Programme...

Page 52: ...Treibers S 34 beschrieben vor um den Treiber neu zu installieren Einzelheiten zum Löschen des Treibers finden Sie in der Erläuterung im Online Handbuch auf der UM 2 Driver CD ROM UM 2 Treiber CD Windows 98 Me Anwender Öffnen Sie auf der UM 2 Driver CD ROM UM 2 Treiber CD den Ordner Win98_Meund öffnen Sie die Datei Readme_e htm Lesen Sie anschließend To uninstall Windows XP 2000 Benutzer Öffnen Sie...

Page 53: ...ein 1 Doppelklicken Sie im Ordner UM 2 Driver E auf der CD ROM auf das Symbol UM2 OMS Driver E Installer 2 Vergewissern Sie sich dass OMS bereits an dem Ort installiert ist wo der Treiber installiert werden wird und klicken Sie auf Install 3 Wenn die folgende Meldung angezeigt wird klicken Sie auf Continue alle anderen aktuell ausgeführten Anwendungen werden geschlossen und die Installation wird f...

Page 54: ...nden Sie das USB Kabel für den Anschluss des UM 2 an Ihren Computer 2 Öffnen Sie im Ordner Opcode am Installationsort von OMS den Ordner OMS Applications OMS Anwendungen und doppelklicken Sie auf das Symbol OMS Setup 3 Wenn das Dialogfeld Apple Talk angezeigt wird klicken Sie auf Turn It Off Klicken Sie im daraufhin angezeigten Dialogfeld auf OK Wenn Sie das UM 2 mit einem Sequenzer verwenden soll...

Page 55: ... ist Klicken Sie anschließend auf OK 7 Nachdem Sie überprüft haben ob das UM 2 im Dialogfeld OMS MIDI Device Setup aufgelistet wird klicken Sie in jedes Kontrollkästchen für Port1 bis Port2 um alle Kästchen zu aktivieren und klicken Sie anschließend auf OK Wenn ein Fehlerdialog während der Einrichtung angezeigt wird sollten Sie alle MIDI Kabel die mit dem UM 2 verbunden sind ausstecken und die OMS...

Page 56: ... Window auf das Tastatur Symbol Wenn Sie den Mauszeiger in die Nähe des Tastatursymbols verschieben nimmt der Mauszeiger die Form einer Achtelnote an Prüfen Sie ob aus Ihrem Soundmodul Sound ertönt Port 1 ist MIDI IN OUT 1 des UM 2 Port 2 ist MIDI IN OUT 2 des UM 2 12 Nachdem Sie die oben beschriebene Prüfung abgeschlossen haben verlassen Sie das OMS Setup Damit sind die Treibereinstellungen abges...

Page 57: ...schluss des UM 2 an Ihren Computer 2 Doppelklicken Sie im Ordner UM 2 Driver E auf der CD ROM auf das Symbol UM2 FreeMIDI Driver E Installer um den Installer zu starten 3 Klicken Sie auf Install Wenn das Dialogfeld erscheint das Sie darüber informiert dass alle aktuell ausgeführten Anwendungen verlassen werden klicken Sie auf Continue Der UM 2 FreeMIDI Treiber auf der CD ROM wird als zusätzliches ...

Page 58: ... FreeMIDI Preferences Benutzereinstellungen 3 Aktivieren Sie im Dialogfeld FreeMIDI Preferences die Option UM 2 Port unterhalb von UM 2 Driver in MIDI Configuration und klicken Sie anschließend auf OK 4 Daraufhin wird das Dialogfeld About Quick Setup Über Quick Setup angezeigt Klicken Sie auf Continue Weiter Sie werden eine Versionsnummer sehen die nach dem Symbolnamen FreeMIDI Setup angegeben wir...

Page 59: ...f Other Studio Location Wählen Sie UM 2 und wählen Sie für Cable Kabel das unterhalb davon angezeigt wird den Anschluss aus mit dem Ihr MIDI Gerät verbunden ist 6 Wenn zwei MIDI Geräte angeschlossen sind wiederholen Sie Schritt 5 7 Nachdem diese Einstellungen vorgenommen wurden klicken Sie auf Done Fertig Ein Konfigurationsfenster ähnlich dem Abgebildeten wird angezeigt 8 Wenn Sie als Modell Other...

Page 60: ...60 Installation Einrichtung des Treibers 9 Wählen Sie im Menü File Datei die Option Save Speichern und speichern Sie Ihre Einstellungen Damit sind die Treibereinstellungen abgeschlossen ...

Page 61: ... l UM 2 et les applications séquenceur etc qui tournent sur l ordinateur connecté par USB Le pilote UM 2 transmet les données de l application à l UM 2 et vice versa fig 03 00 e Les explications concernant l installation du pilote et sa configuration sont structurées en fonction de l ordinateur et du pilote MIDI que vous utilisez Reportez vous à la section qui vous concerne Windows XP P 62 Windows...

Page 62: ...ini sur Ignorer Si ce paramètre est réglé sur Ignorer cliquez sur OK S il n est pas défini sur Ignorer notez le paramètre indiqué Avertir ou Bloquer Choisissez ensuite Ignorer et cliquez sur OK Après avoir installé le pilote restaurez le paramètre d origine Si vous avez modifié Que voulez vous faire p 66 Si vous utilisez Windows XP Professional vous devez ouvrir une session avec un nom d utilisate...

Page 63: ...onnez Exécuter Ouvrez la boîte de dialogue Exécuter voir ci dessous fig 2 3_30 9 Dans la boîte de dialogue qui s affiche tapez ce qui suit dans le champ Ouvrir puis cliquez sur OK D WinXP_2K Setupinf exe La lettre du lecteur D n est pas forcément celle de votre ordinateur Tapez la lettre affectée au lecteur de CD de votre ordinateur par exemple E ou F fig 2 4_30 10 La boîte de dialogue SetupInf s ...

Page 64: ...nstaller à partir d une liste ou d un emplacement spécifique Avancé puis cliquez sur Suivant fig 2 7 13 L écran indiquera Veuillez choisir vos options de recherche et d installation Sélectionnez Ne pas rechercher Je vais choisir le pilote à installer puis cliquez sur Suivant fig 2 8_20 14 Vérifiez que le champ Modèle indique EDIROL UM 2 puis cliquez sur Suivant L installation du pilote commence Ce...

Page 65: ...tre ordinateur Tapez la lettre affectée au lecteur de CD de votre ordinateur par exemple E ou F fig 2 11_20 17 La boîte de dialogue Assistant ajout de nouveau matériel s affiche Vérifiez que EDIROL UM 2 est affiché puis cliquez sur Terminer Attendez que Nouveau matériel détecté s affiche près de la barre des tâches 18 Une fois l installation du pilote terminée la boîte de dialogue Modification des...

Page 66: ...issez une catégorie cliquez sur Performances et maintenance Selon la configuration de votre ordinateur l icône Système s affiche peut être dans le Panneau de configuration Vue classique Dans ce cas cliquez deux fois sur l icône Système 4 Dans ou choisissez une icône du Panneau de configuration cliquez sur l icône Système La boîte de dialogue Propriétés système s affiche 5 Cliquez sur l onglet Maté...

Page 67: ...choisissez une icône du Panneau de configuration cliquez sur l icône Sons et périphériques audio 3 Cliquez sur l onglet Audio fig 2 28_30 4 Pour Lecture MIDI cliquez sur le situé à droite de Périphérique par défaut puis sélectionnez ce qui suit dans la liste qui s affiche EDIROL UM 2 MIDI1 5 Fermez la boîte de dialogue Propriétés Son et périphériques multimédia Cliquez sur OK pour terminer les rég...

Page 68: ...orrespondant au nom de votre lecteur de CD ROM par exemple D ou E Si l UM 2 est déjà connecté à votre ordinateur et que le message Assistant ajout de nouveau matériel est affiché accédez au dossier UM 2 Driver CD ROM appelé Win98_Me ouvrez le fichier Readme_e htm et lisez la section Troubleshooting You attempted to install using the above procedure but were not able to L UM 2 ne peut être utilisé ...

Page 69: ...tre lecteur de CD ROM s appelle D vous taperez D Win98_Me Q WIN98_ME Si le message suivant s affiche The driver is already installed vous pouvez connecter le câble USB de l UM 2 à l ordinateur et utiliser l appareil Si la boîte de dialogue Ready to install the driver ne s affiche pas accédez au dossier UM 2 Driver CD ROM appelé Win98_Me ouvrez le fichier Reademe_e htm et lisez la section intitulée...

Page 70: ... d utiliser l UM 2 Destination de sortie des données MIDI Cette section explique comment paramétrer le pilote UM 2 avec des applications comme Media Player compris dans Windows Windows 98 1 Cliquez sur le bouton Démarrer de Windows sélectionnez Paramètres et dans le menu qui s affiche Panneau de configuration 2 Dans le Panneau de configuration cliquez deux fois sur l icône Multimédia Si vous utili...

Page 71: ...s MIDI est indiquée ci après 4 Cliquez sur OK 5 Utilisez un câble MIDI pour relier le connecteur MIDI OUT 1 de l UM 2 à un module de sons MIDI 6 Démarrez Windows Media Player ou Media Player sélectionnez un fichier MIDI et jouez le Périphérique de sortie MIDI Port de sortie MIDI EDIROL UM 2 MIDI 1 MIDI OUT 1 EDIROL UM 2 MIDI 2 MIDI OUT 2 Windows Media Player se trouve dans Démarrer Programmes Acce...

Page 72: ...er le connecteur MIDI OUT 1 de l UM 2 à un module de sons MIDI 6 Démarrez Windows Media Player ou Media Player sélectionnez un fichier MIDI et jouez le Périphérique de sortie MIDI Port de sortie MIDI EDIROL UM 2 MIDI 1 MIDI OUT 1 EDIROL UM 2 MIDI 2 MIDI OUT 2 Si vous utilisez l UM 2 avec un séquenceur ne déconnectez pas le câble MIDI relié à l UM 2 pendant la lecture d un morceau Selon vos réglage...

Page 73: ...er à l installation 4 Réglez les paramètres de Driver Signing Ouvrez le Panneau de configuration et cliquez deux fois sur l icône Système Cliquez sur l onglet Profils matériel puis sur Options de signature du pilote La boîte de dialogue Options de signature du pilote s affiche Si l UM 2 est déjà connecté à votre ordinateur et que le message Assistant ajout de nouveau matériel est affiché accédez a...

Page 74: ...bouton OK pour fermer Propriétés système 7 Insérez le CD ROM du pilote UM 2 dans le lecteur de CD ROM 8 Dans le menu Windows Démarrer sélectionnez Exécuter 9 Dans le champ Ouvrir de la boîte de dialogue qui s affiche tapez Q WinXP_2K Setupinf exe et cliquez sur OK Tapez la lettre du lecteur Q correspondant au nom de votre lecteur de CD ROM par exemple D ou E Pour vérifier le nom de votre lecteur d...

Page 75: ...iliser l appareil Si la boîte de dialogue Ready to install the driver ne s affiche pas accédez au dossier UM 2 Driver CD ROM appelé WinXP_2K ouvrez le fichier Reademe_e htm et lisez la section intitulée Installation Si l affichage indique The driver was not deleted completely reportez vous à Suppression du pilote UM 2 p 78 pour réinstaller le pilote USB Connector of your Computer Computer USB Cabl...

Page 76: ... affiche Vérifiez que EDIROL UM 2 est bien affiché puis cliquez sur Terminer 15 La boîte de dialogue Modifier les paramètres système s affiche Cliquez sur Oui pour redémarrer Windows 16 Si vous avez changé le réglage de Vérification des signatures de fichiers à l étape 5 revenez au réglage précédent Pour restaurer le réglage vous devez vous connecter à Windows en tant qu Administrateur ou utilisat...

Page 77: ...Audio et dans Lecture MIDI sélectionnez 1 EDIROL UM 2 MIDI 1 La correspondance entre appareils et ports MIDI est expliquée ci après 4 Cliquez sur OK 5 Utilisez un câble MIDI pour relier le connecteur MIDI OUT 1 de l UM 2 à un module de sons MIDI 6 Démarrez Lecteur Windows Media ou Media Player sélectionnez un fichier MIDI et jouez le Périphérique de sortie MIDI Port de sortie MIDI EDIROL UM 2 MIDI...

Page 78: ...a procédure décrite à la section Installation et configuration du pilote p 61 pour réinstaller le pilote Pour plus d information sur la suppression du pilote reportez vous aux explications comprises dans le manuel en ligne présent sur le CD ROM UM 2 Driver Windows 98 Me Dans le dossier UM 2 Driver CD ROM Win98_Me ouvrez le fichier Readme_e htm et lisez la section To uninstall Windows XP 2000 Dans ...

Page 79: ...disque de démarrage 1 Dans le dossier UM 2 Driver E sur le CD cliquez deux fois sur l icône UM2 OMS Driver E Installer 2 Vérifiez qu OMS est déjà installé au même emplacement que celui prévu pour le pilote et cliquez sur Install 3 Si le message suivant s affiche cliquez sur Continue et toutes les applications actives se fermeront l installation se poursuivant Pour en savoir plus sur OMS Pour plus ...

Page 80: ...s 1 Utilisez le câble USB pour connecter l UM 2 à l ordinateur 2 Dans le dossier Opcode à l emplacement où OMS est installé ouvrez le dossier OMS Applications et cliquez deux fois sur l icône OMS Setup 3 Si la boîte de dialogue Apple Talk s affiche cliquez sur Turn It Off Puis dans la boîte de dialogue qui s affiche cliquez sur OK Si vous utilisez l UM 2 avec un séquenceur ne déconnectez pas le câ...

Page 81: ...s cliquez sur OK 7 Après avoir vérifié que l UM 2 est présent dans la boîte de dialogue OMS MIDI Device Setup cliquez sur les cases Port1 à Port2 pour les activer toutes puis cliquez sur OK 8 La boîte de dialogue Enregistrer s affiche Tapez un nom de fichier et cliquez sur Enregistrer Si une boîte de dialogue s affiche pendant la configuration déconnectez tous les câbles MIDI de l UM 2 et recommen...

Page 82: ...etup cliquez sur l icône du clavier Quand vous déplacez le curseur de la souris sur l icône du clavier il se transforme en 8è de note Vérifiez que le module produit du son Port 1 MIDI IN OUT 1 de l UM 2 Port 2 MIDI IN OUT 2 de l UM 2 12 Cette vérification terminée quittez la configuration d OMS Le paramétrage du pilote est terminé L étape suivante fera intervenir le module de sons qui produira un ...

Page 83: ...ez deux fois sur l icône UM2 FreeMIDI Driver E Installer pour démarrer l installeur 3 Cliquez sur Install Si la boîte de dialogue indiquant que toutes les applications ouvertes seront fermées s affiche cliquez sur Continue 4 Une fois l installation terminée cliquez sur Redémarrer pour redémarrer votre ordinateur L installation du pilote UM 2 est terminée Vous allez maintenant paramétrer FreeMIDI L...

Page 84: ...references cliquez sur la case UM 2 Port en dessous de UM 2 Driver in MIDI Configuration puis cliquez sur OK 4 La boîte de dialogue About Quick Setup s affiche Cliquez sur Continue Un numéro de version est attaché au nom de l icône FreeMIDI Setup Si vous utilisez l UM 2 avec un séquenceur ne déconnectez pas le câble MIDI relié à l UM 2 pendant la lecture d un morceau Si la boîte de dialogue n affi...

Page 85: ...io Sélectionnez UM 2 et pour Cable qui s affiche en dessous sélectionnez le port auquel l appareil MIDI est connecté 6 Si vous devez connecter un autre appareil MIDI répétez l étape 5 7 Quand le paramétrage est terminé cliquez sur Done Une fenêtre de paramétrage semblable à la suivante s affiche 8 Si vous avez sélectionné Other pour Model cliquez deux fois sur l icône appropriée dans la fenêtre de...

Page 86: ... esecuzione sul computer collegato tramite la porta USB Il driver UM 2 trasmette i dati dall applicazione all UM 2 e viceversa fig 03 00 e La procedura di installazione e configurazione del driver è illustrata nella pagine che seguono ed è strutturata in base al sistema operativo e al driver MIDI utilizzato Consultare le pagine corrispondenti al proprio caso Utenti Windows XP Pag 87 Utenti Windows...

Page 87: ...ostata su Ignora prendere nota dell impostazione corrente di avviso o di blocco Modificare quindi l impostazione su Ignora e fare clic su OK Dopo aver installato il driver ripristinare l impostazione d origine Se è stato modificato il parametro Scegliere una delle seguenti opzioni pag 91 Se si utilizza Windows XP Professional è necessario collegarsi come un nome utente dotato di privilegi amminist...

Page 88: ...egui Aprire la finestra di dialogo Esegui fig 2 3_30 9 Nella finestra di dialogo che appare immettere quanto segue nel campo Apri e fare clic su OK D WinXP_2K Setupinf exe L identificativo dell unità D potrebbe essere diverso da quello del sistema utilizzato In questo caso specificare il nome dell unità CD ROM utilizzata fig 2 4_30 10 Appare la finestra di dialogo SetupInf È ora possibile installa...

Page 89: ...o percorso specifico per utenti esperti e fare clic su Avanti fig 2 7 13 La finestra visualizzerà il seguente messaggio Selezionare le opzioni di ricerca e di installazione Selezionare Non effettuare la ricerca La scelta del driver da installare verrà effettuata manualmente e fare clic su Avanti fig 2 8_20 14 Accertarsi che il campo Modello visualizzi EDIROL UM 2 e fare clic su Avanti La procedura...

Page 90: ...sto caso specificare il nome dell unità CD ROM utilizzata fig 2 11_20 17 Verrà visualizzata la finestra di dialogo Installazione guidata nuovo hardware Accertarsi che EDIROL UM 2 sia visualizzato e fare clic su Fine Attendere fino a quando nella barra delle applicazioni non appare il messaggio Trovato nuovo hardware 18 Alla fine dell installazione del driver comparirà la finestra di dialogo Modifi...

Page 91: ...liere una categoria fare clic su Prestazioni e manutenzione A seconda di come il sistema è configurato l icona Sistema potrebbe essere visualizzata direttamente nel Pannello di controllo visualizzazione classica In tal caso fare doppio clic sull icona Sistema 4 In o un icona del Pannello di controllo fare clic sull icona Sistema Viene visualizzata la finestra di dialogo Proprietà del sistema 5 Far...

Page 92: ...trollo fare clic sull icona Suoni e periferiche audio 3 Fare clic sulla scheda Audio fig 2 28_30 4 Per Riproduzione musica MIDI fare clic su a destra di Periferica predefinita e selezionare quanto segue nell elenco visualizzato EDIROL UM 2 MIDI1 5 Chiudere la finestra di dialogo Proprietà Suoni e periferiche audio Fare clic su OK per completare le impostazioni A seconda di come il sistema è config...

Page 93: ...ente all unità CD ROM utilizzata Se l UM 2 è già collegato al computer e appare il messaggio Installazione guidata nuovo hardware aprire sul CD ROM UM 2 Driver CD ROM la cartella denominata Win98_Me aprire il file Readme_e htm e leggere la sezione Troubleshooting intitolata You attempted to install using the above procedure but were not able to Non è possibile utilizzare l UM 2 con Windows 95 o Wi...

Page 94: ...ilizzata è associato l identificativo D si dovrà immettere D Win98_Me Q WIN98_ME Se appare il messaggio Il driver è già installato è possibile collegare il cavo USB dell UM 2 al computer e utilizzarlo Se il messaggio È possibile installare il driver aprire sul CD ROM UM 2 Driver CD ROM la cartella Win98_Me aprire il file Reademe_e htm e leggere la sezione intitolata Installation Se nella finestra ...

Page 95: ...re l UM 2 Specifica del tipo di output per i dati MIDI In questa sezione viene spiegato come effettuare le impostazioni per utilizzare il driver UM 2 con applicazioni come il Lettore multimediale fornito con Windows Utenti Windows 98 1 Fare clic sul pulsante Start di Windows selezionare Impostazioni nel menu che appare e selezionare Pannello di controllo 2 Successivamente nel Pannello di controllo...

Page 96: ...nte 4 Fare clic su OK 5 Utilizzare un cavo MIDI per collegare il connettore MIDI OUT 1 dell UM 2 al modulo sonoro MIDI 6 Avviare il Windows Media Player o Lettore multimediale selezionare un file MIDI e avviare la riproduzione Periferica di uscita MIDI Porta di uscita MIDI EDIROL UM 2 MIDI 1 MIDI OUT 1 EDIROL UM 2 MIDI 2 MIDI OUT 2 Windows Media Player si trova nel menu Start Programmi Accessori S...

Page 97: ...are un cavo MIDI per collegare il connettore MIDI OUT 1 dell UM 2 al modulo sonoro MIDI 6 Avviare Windows Media Player o il Lettore multimediale selezionare un file MIDI e avviare la riproduzione Periferica di uscita MIDI Porta di uscita MIDI EDIROL UM 2 MIDI 1 MIDI OUT 1 EDIROL UM 2 MIDI 2 MIDI OUT 2 Se l UM 2 viene utilizzato con un sequencer non scollegare il cavo MIDI collegato all UM 2 mentre...

Page 98: ...gurare le impostazioni Firma driver Nel Pannello di controllo fare doppio clic sull icona Sistema Fare clic sulla scheda Hardware e poi sul pulsante Firma driver Verrà visualizzata la finestra di dialogo Opzioni firma driver Se l UM 2 è già collegato al computer e appare il messaggio Installazione guidata nuovo hardware aprire sul CD ROM UM 2 Driver CD ROM la cartella denominata WinXP_2K aprire il...

Page 99: ...nora quindi fare clic sul pulsante OK 6 Fare clic su OK per chiudere Proprietà Sistema 7 Inserire il CD ROM UM 2 Driver CD ROM nell unità CD ROM 8 Nel menu Start di Windows selezionare Esegui 9 Nel campo Apri della finestra visualizzata immettere Q WinXP_2K Setupinf ex e e fare clic su OK Immettere l identificativo di unità Q corrispondente all unità CD ROM utilizzata Per verificare l identificati...

Page 100: ...M 2 al computer e utilizzarlo Se il messaggio È possibile installare il driver aprire sul CD ROM UM 2 Driver CD ROM la cartella WinXP_2K aprire il file Reademe_e htm e leggere la sezione intitolata Installation Se nella finestra appare il messaggio Il driver non è stato eliminato completamente fare riferimento alla sezione Eliminazione del driver UM 2 pag 104 per reinstallarlo USB Connector of you...

Page 101: ...ata nuovo hardware Accertarsi che sia visualizzato EDIROL UM 2 e fare clic sul pulsante Fine 15 Viene visualizzata la finestra di dialogo Modifica delle impostazioni del sistema Fare clic sul pulsante Sì e riavviare Windows 16 Se è stata modificata l impostazione di Verifica firma file al passo 5 ripristinare l impostazione precedente Per ripristinare l impostazione l Amministratore o l utente che...

Page 102: ...nnello di controllo fare doppio clic sull icona Suoni e multimedia 3 Fare clic sulla scheda Audio e nella sezione Riproduzione musica MIDI selezionare 1 EDIROL UM 2 MIDI 1 La corrispondenza tra i dispositivi MIDI e le porte MIDI è la seguente 4 Fare clic su OK 5 Utilizzare un cavo MIDI per collegare il connettore MIDI OUT 1 dell UM 2 al modulo sonoro MIDI Periferica di uscita MIDI Porta di uscita ...

Page 103: ...driver Italiano Français Deutsch English 6 Avviare Windows Media Player o il Lettore multimediale selezionare un file MIDI e avviare la riproduzione Windows Media Player si trova nel menu Start Programmi Accessori Svago Windows Media Player ...

Page 104: ... Installazione e configurazione del driver Pag 86 per reinstallarlo Per maggiori informazioni sul come eliminare il driver fare riferimento alle spiegazioni fornite nella guida in linea che si trova sul CD ROM UM 2 Driver CD ROM Utenti Windows 98 Me Sul CD ROM UM 2 Driver CD ROM nella cartella Win98_Me aprire il file Readme_e htm e leggere la sezione To uninstall Utenti Windows XP 2000 Sul CD ROM ...

Page 105: ...allato sul disco rigido di avvio 1 Nella cartella UM 2 Driver E del CD ROM fare doppio clic sull icona UM2 OMS Driver E Installer 2 Accertarsi che OMS sia già installato dove verrà installato il driver e fare clic su Install 3 Se compare il seguente messaggio fare clic su Continue per chiudere tutte le applicazioni in esecuzione in quel momento e continuare l installazione Per maggiori informazion...

Page 106: ...ta 1 Utilizzare il cavo USB per collegare l UM 2 e il computer 2 Nella cartella Opcode nella posizione dove deve essere installato OMS aprire la cartella OMS Applications e fare doppio clic sull icona OMS Setup 3 Se appare la finestra di dialogo Apple Talk fare clic su Turn It Off Nella successiva finestra di dialogo fare clic su OK Se l UM 2 viene utilizzato con un sequencer non scollegare il cav...

Page 107: ... fare clic su OK 7 Dopo aver verificato che l UM 2 è elencato nella finestra di dialogo OMS MIDI Device Setup selezionare ogni casella da Port1 a Port2 per selezionarle tutte e fare clic su OK 8 Viene visualizzata la finestra di dialogo Save Immettere il nome file desiderato e fare clic su Save Se durante la configurazione viene visualizzato un messaggio di errore scollegare tutti i cavi MIDI coll...

Page 108: ...uando viene avvicinato all icona della tastiera il cursore del mouse assume la forma di un ottava Accertarsi che il modulo sonoro produca dei suoni La porta 1 corrisponde a MIDI IN OUT 1 sull UM 2 La porta 2 corrisponde a MIDI IN OUT 2 sull UM 2 12 Alla fine della procedura di controllo uscire da OMS Setup La procedura di configurazione del driver è giunta al termine L operazione che segue provoch...

Page 109: ...fare doppio clic sull icona UM2 FreeMIDI Driver E Installer 3 Fare clic su Install Nella finestra di dialogo indicante che tutte le applicazioni correntemente aperte verranno chiuse fare clic su Continue 4 Alla fine dell installazione fare clic su Restart per riavviare il computer La procedura d installazione del driver UM 2 è giunta al termine Configurare quindi FreeMIDI Il driver FreeMIDI UM 2 p...

Page 110: ...to UM 2 Driver nella sezione MIDI Configuration e fare clic su OK 4 Viene visualizzata la finestra di dialogo About Quick Setup Fare clic su Continue Comparirà un numero di versione dopo il nome dell icona FreeMIDI Setup Se l UM 2 viene utilizzato con un sequencer non scollegare il cavo MIDI collegato all UM 2 mentre è in corso la riproduzione di un brano Se nella finestra di dialogo non appare UM...

Page 111: ...elezionare la porta alla quale è collegato l apparecchio MIDI 6 Se sono collegati due apparecchi MIDI ripetere la procedura illustrata al passo 5 7 Alla fine delle impostazioni fare clic su Done Verrà visualizzata una finestra come quella sotto illustrata 8 Se si è selezionato Other per Model fare doppio clic sull icona opportuna nella finestra per configurare l apparecchio MIDI Per maggiori infor...

Page 112: ...omputer or USB hub refer to the owner s manual for your equipment If you have questions please contact the manufacturer or dealer for your computer or USB hub The UM 2 cannot be used with a hub that contains no power supply What is USB hub A USB hub is a device that expands the number of USB connectors Broadly speaking there are two types of USB hubs Self powered hubs USB hubs containing a power s...

Page 113: ...to use the UM 2 make sure that the computer has resumed correctly from the suspend state and then connect the USB cable to the UM 2 Case 5 No sound Are the USB cable MIDI cables and audio cables connected correctly Connect the cables correctly Are the volume controls of your sound module audio system and application raised Check each of the volume controls Are the sound module settings correct Set...

Page 114: ...ction Cannot install uninstall use the driver Cannot select the UM 2 device Cannot playback record Part of the playback is wrong e g notes are broken off prematurely or some notes are lost Windows XP 2000 users The latest information is provided in the Troubleshooting section of the file Readme_e htm located in the WinXP_2K folder of the UM 2 Driver CD ROM Please refer to the appropriate section C...

Page 115: ...ther USB device is connected try connecting only the UM 2 It is possible that the computer did not correctly recognize or initialize the UM 2 Leave the USB cable connected to the UM 2 and restart your Macintosh If the connection is still not achieved exit your Macintosh and turn off the power of the computer Then turn on the power of the computer once again and start up your Macintosh The computer...

Page 116: ...make Energy saving settings in the Control panel so that your computer does not enter sleep mode What is USB hub A USB hub is a device that expands the number of USB connectors Broadly speaking there are two types of USB hubs Self powered hubs USB hubs containing a power supply The USB hub itself has an AC adapter which supplies power normally 500 mA to the added USB connectors Bus powered hubs US...

Page 117: ...Supplied from Computer or USB Hub Current Draw 120 mA during operation Dimensions 4 13 16 W x 2 15 16 D x 1 1 4 H inches 121 W x 74 D x 30 5 H mm Weight 120g 5 oz Accessories UM 2 Driver CD ROM USB Cable 2 m x 1 Owner s Manual In the interest of product improvement the specifications and or appearance of this unit are subject to change without prior notice ...

Page 118: ...ANCE TEL 01 600 73 500 FINLAND Roland Scandinavia As Filial Finland Lauttasaarentie 54 B Fin 00201 Helsinki FINLAND TEL 9 682 4020 GERMANY Roland Elektronische Musikinstrumente HmbH Oststrasse 96 22844 Norderstedt GERMANY TEL 040 52 60090 HUNGARY Roland East Europe Ltd Warehouse Area DEPO Pf 83 H 2046 Torokbalint HUNGARY TEL 23 511011 AUSTRIA Roland Austria GES M B H Siemensstrasse 4 P O Box 74 A ...

Page 119: ...ause harmful interference to radio or television reception which can be determined by turning the equipment off and on the user is encouraged to try to correct the interference by one or more of the following measures Reorient or relocate the receiving antenna Increase the separation between the equipment and receiver Connect the equipment into an outlet on a circuit different from that to which t...

Page 120: ...s on the front cover to left or right Before using this unit carefully read the sections entitled USING THE UNIT SAFELY p 3 and IMPORTANT NOTES p 5 These sections provide important information concerning the proper operation of the unit Additionally in order to feel assured that you have gained a good grasp of every feature provided by your new unit this manual should be read in its entirety The m...

Reviews: