background image

72 


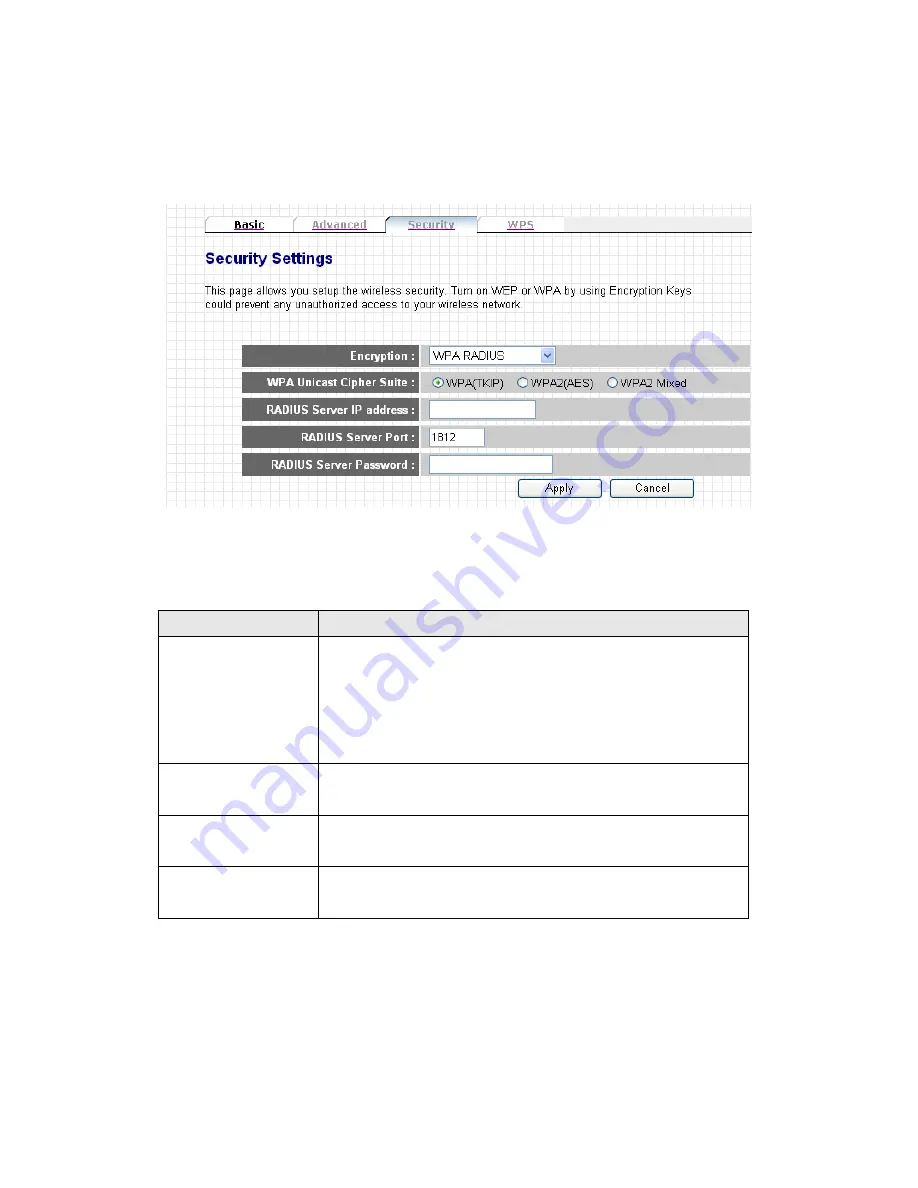
3-5-3-4 Encryption: WPA RADIUS 


Enable WPA RADIUS key encryption. 


The description of every setting item will be described below: 


Item 

Description 

WPA Unicast 

Cipher Suite 

Please select a type of WPA cipher suite. 

Available options are: WPA (TKIP), WPA2 (AES), and 

WPA2 Mixed. You can select one of them, but you have 

to make sure your wireless client support the cipher you 

selected. 

RADIUS Server IP 

address 

Please input the IP address of your Radius 

authentication server here. 

RADIUS Server 

Port 

Please input the port number of your Radius 

authentication server here. 

Default setting is 1812.


RADIUS Server 

Password 

Please input the password of your Radius 

authentication server here. 


When you finish, please click ‘Apply’ button to save changes you made; to 

discard changes, click ‘Cancel’ button. If you click ‘Apply’, you’ll see the 

following message: 


Summary of Contents for WP-S1100

Page 1: ...1...

Page 2: ...r 25 2 3 1 Windows XP IP address setup 25 2 3 2 Windows Vista IP address setup 26 2 4 Download and Install Client Software 29 2 5 Launch Client Software 36 2 6 Using Client Software 42 2 6 1 Projector...

Page 3: ...pre shared key 70 3 5 3 4 Encryption WPA RADIUS 72 3 5 4 WPS Settings 74 3 9 Configuration Tools 80 3 9 1 Configuration Tools 80 3 9 2 Firmware Upgrade 82 3 9 3 Reset 84 4 1 Hardware Specification 85...

Page 4: ...e in the contents hereof without obligation to notify any person of such revision or changes The product you have purchased and the setup screen may appear slightly different from those shown in this...

Page 5: ...ur local telephone company to determine the maximum REN for your calling area If the modem causes harm to the telephone network the telephone company may discontinue your service temporarily If possib...

Page 6: ...nce by one or more of the following measures 1 Reorient or relocate the receiving antenna 2 Increase the separation between the equipment and receiver 3 Connect the equipment into an outlet on a circu...

Page 7: ...t However special attention must be paid to the dangers of electric shock and static electricity when working with electrical equipment All guidelines of this and of the computer manufacture must ther...

Page 8: ...package If any of them is missing please ask your dealer of purchase for a new package Packaging List Item No Name Quantity 1 Wireless Projector Server 1 2 Antenna 2 2 Power Adapter 1 3 Ethernet Cable...

Page 9: ...ver into your body 5 If any part or any component is dropped into water return it to your dealer of purchase and ask for an examination never use it again before it has been properly processed by cert...

Page 10: ...less projector server with cloth or any material the projector server will become overheat and cause malfunction even cause fire 13 When the projector server is powered on do not connect or disconnect...

Page 11: ...1680 x 1050 1920 x 1200 1920 x 1440 Audio amplifier or speaker that accepts 3 5 audio connector Computers support wired or wireless Ethernet connectivity Windows XP Vista32 64 operating system with In...

Page 12: ...n protects the content of presentation from theft Presenter needs to input a random 4 digit projector server access code as 2nd level security check WPS Wi Fi Protected Setup function provides fast ea...

Page 13: ...Indicated that wireless projector server is in Blackout mode no display output When this LED lights nothing will be displayed on external display Ready When this LED lights indicates wireless project...

Page 14: ...button WPS Wi Fi Protected Setup button press this button to start WPS pairing Power Press this button to switch this projector server on off Heat Sink Heat generated by this projector server will be...

Page 15: ...Transmits wireless signal Please keep both antennas perpendicular to the ground for best signal reception HDMI HDMI audio video output Connects to any HDMI compatible display VGA VGA D sub 15 pin vid...

Page 16: ...o the project server can be steadily placed on the desk or other horizontal places You don t have to stick foot pads here if you plan to mount the projector server on the wall MAC Address Label Indica...

Page 17: ...erver s configuration menu Page down button Equivalent to Left key on your computer s keyboard Page up button Equivalent to Right key on your computer s keyboard Prev button Select previous user prese...

Page 18: ...frared signal transmitter When using the remote controller point the IR transmitter to the front of the projector server DO NOT use your finger or other object to block the IR transmitter or your comm...

Page 19: ...19 Remote Controller Back Name Description Battery Lid Press battery lid and push it out to open battery compartment to install or remove CR 2032 lithium battery Battery Lid...

Page 20: ...n the desk or other horizontal places You can skip this step if you plan to hang the projector server on the wall and use the 2 wall mounting holes located at the bottom of the projector server to do...

Page 21: ...external video display to HDMI VGA port located at the back of this projector server You can only connect to HDMI or VGA port at the same time 6 Adjust the antennas located at the back of the projecto...

Page 22: ...5V at the back of projector server 9 Press Power button located at the front of projector server 10 Please check the status of the Power LED located at the front of the projector server If it does no...

Page 23: ...jector server You should be able to see the following image displayed on external display if not please make sure the external display you used with projector server accepts input video resolution 102...

Page 24: ...to connect to projector server when there s no DHCP server available The IP address of projector server can be found on the connected external display like following picture The IP address of the WLA...

Page 25: ...nect to project server If the operating system of your computer is Windows XP please go to section 2 3 1 Windows Vista please go to section 2 3 2 2 3 1 Windows XP IP address setup 1 Click Start button...

Page 26: ...should use an unique number Subnet Mask 255 255 255 0 click OK when finish 2 3 2 Windows Vista IP address setup 1 Click Start button it should be located at lower left corner of your computer then cl...

Page 27: ...ngs in respective field IP address 192 168 2 x where x is an integer greater or less than 200 if there s more than one computer need to use this projector server on the same network every computer sho...

Page 28: ...28...

Page 29: ...er WLAN LAN IP address Projector server s IP address can be found at the lower left corner of projector server s display refer to chapter 2 1 Please note that the IP address of projector server will v...

Page 30: ...30...

Page 31: ...31 2 Click Start button to download client software 3 When you re prompted to download the software click Run...

Page 32: ...32 4 Click Run to start software installation 5 Click Next to continue...

Page 33: ...button here In most cases you can just click Next button to accept default installation destination folder to continue 7 Click Install button to start software installation If you wish to change any...

Page 34: ...in progress If you want to abort due to any reason click Cancel button 9 If you see this message click Continue Anyway to continue installation You may see this message more than once please click Co...

Page 35: ...35 10 Software installation is complete when you see this message click Finish button to continue...

Page 36: ...his icon to launch projector server s client software If you have personal firewall software installed or you re using Windows XP Vista operating system you may see similar message windows appear Clic...

Page 37: ...ease select the projector server you wish to connect from Projector SSID dropdown menu If the projector server you wish to connect does not appear click icon to search again PS The Projector will get...

Page 38: ...r and should not be the same with other user in User Name field and input the login code as shown on projector server s display When you re ready click icon to continue Note The Projector will get Use...

Page 39: ...r If you see this message click OK to input correct login code If you entered correct login code you ll be connected to projector server as one of users and the client software will be look like this...

Page 40: ...content of your computer s display will be transmitted to projector server and being displayed on projector server s display If you see this message it means there s already a progressing presentation...

Page 41: ...ust be able to support the resolution or click NO button to keep your computer s display resolution setting unchanged No matter you click YES or NO button your computer s display content will be trans...

Page 42: ...function of client software will be given below 2 6 1 Projector Server You can click Projector Server to recall projector server client software In this window you can Click Stop button to stop presen...

Page 43: ...mpg1 2 4 and mpeg file extension While video is playing you can use these buttons to control the progress of video playing Volume control Drag the volume control bar to adjust volume Play Pause Click...

Page 44: ...ou can use this keyboard to type characters by mouse click just like using your keyboard 2 6 3 About You can get the version number and other information about the client software you re using this is...

Page 45: ...splay contents displayed on external display Press this button again to resume Menu Press this button to switch the display output of projector server between presenter s computer display content and...

Page 46: ...in progress Select user in projector server s configuration menu 2 8 Select User When there re more than one connected client software project server can select one of them to display its display cont...

Page 47: ...emote controller Skip this step if there s no progressing presentation 2 Press Prev or Next button to select the user you wish projector server to display its display content selected user will have a...

Page 48: ...this chapter you ll be instructed to user web configuration menu to setup the projector server Please follow the following steps to connect to the web configuration menu of projector server 1 Use the...

Page 49: ...49 2 Click Admin Login link on the left 3 You ll be prompted to input administrator s username and password Default User Name is admin and Password is 1234 Click OK button when you re ready...

Page 50: ...50 4 After you logged in the status of projector server will be shown on web browser...

Page 51: ...ad You can use this function to download projector server s client software Same as described in chapter 2 4 Click Utility Download link on the left and you ll be prompted to run or save projector ser...

Page 52: ...52 3 3 Basic Setting In this menu you can configure web configuration menu password...

Page 53: ...item will be described below Item Description Current Password Input current password default 1234 here New Password Input new password you wish to use here Confirmed Password Input new password you...

Page 54: ...54 Click Continue to continue on projector server setting or click Apply to reboot projector server and changes you made will take effect after projector server rebooted...

Page 55: ...erver will obtain an IP address from the DHCP server on your local area network automatically If you selected this option but there s no DHCP server on your LAN projector server will use IP address 16...

Page 56: ...an input another DNS server s IP address here so if projector server fails to connect to the DNS server listed above it will use the DNS server s IP address listed in this field instead You can leave...

Page 57: ...57 3 5 Wireless Setting You can configure the settings of the wireless network interface of this projector server from this menu...

Page 58: ...ess network function select Disable to disable wireless network function wireless radio off Mode Select wireless mode Only AP Access Point mode is supported currently Band Select the wireless band Ava...

Page 59: ...ection to connect to projector server Default ESSID is projector Channel Number Select the wireless channel number used by the wireless interface of projector server from dropdown menu The default cha...

Page 60: ...60 Click Continue to continue on projector server setting or click Apply to reboot projector server and changes you made will take effect after projector server rebooted...

Page 61: ...ector server Please note that only experienced user should modify these settings and wrong settings may affect the performance of this projector server This projector server is able to run properly wi...

Page 62: ...ill happen after modification N Data Rate Same as above but only for 802 11n clients Channel Width Set channel width of wireless radio Do not modify default value if you don t know what it is default...

Page 63: ...er performance of multimedia contents when they re being transferred over wireless network If you don t know what it is not sure if you need it it s safe to set this option to Enable however default v...

Page 64: ...Disable wireless encryption This will allow anyone who found the projector server by wireless network able to connect to projector server and download client software Refer to chapter 3 5 3 1 for det...

Page 65: ...WPA RADIUS Enables WPA encryption with RADIUS authentication server support Refer to chapter 3 5 3 4 for detailed settings of WPA RADIUS encryption When you finish please click Apply button to save c...

Page 66: ...iption of every setting item will be described below Item Description Enable 802 1x Authentication Check this box to enable 802 1x authentication RADIUS Server IP address Please input the IP address o...

Page 67: ...67 Click Continue to continue on projector server setting or click Apply to reboot projector server and changes you made will take effect after projector server rebooted...

Page 68: ...There are two types of key format ASCII and Hex When you select a key format the number of characters of key will be displayed For example if you select 64 bit as key length and Hex as key format you...

Page 69: ...nable 802 1x Authentication Check this box to enable 802 1x authentication RADIUS Server IP address Please input the IP address of RADIUS authentication server here RADIUS Server Port Please input the...

Page 70: ...e sure your wireless client support the cipher you selected Pre shared Key Format Select the type of pre shared key you can select Passphrase 8 or more alphanumerical characters up to 63 or Hex 64 cha...

Page 71: ...71 Click Continue to continue on projector server setting or click Apply to reboot projector server and changes you made will take effect after projector server rebooted...

Page 72: ...ure your wireless client support the cipher you selected RADIUS Server IP address Please input the IP address of your Radius authentication server here RADIUS Server Port Please input the port number...

Page 73: ...73 Click Continue to continue on projector server setting or click Apply to reboot projector server and changes you made will take effect after projector server rebooted...

Page 74: ...tem Description WPS Status Displays WPS configuration status Configured WPS ready or Unconfigured Self PinCode Displays WPS self pin code This code will be used when pin style WPS pairing mode is bein...

Page 75: ...enters WPS push button mode in Registrar configuration mode another WPS compatible wireless device must use Enrollee configuration mode if projector server enters WPS push button mode in Enrollee conf...

Page 76: ...rol users Please note that when you change the status of Administrator mode projector server needs to reboot and all connected users must reconnect to projector server You ll be prompted before projec...

Page 77: ...HDMI Resolution Select output video resolution Select Auto and projector server will decide output resolution by the information provided by external display not every display supports this function...

Page 78: ...78 Click Continue to continue on projector server setting or click Apply to reboot projector server and changes you made will take effect after projector server rebooted...

Page 79: ...an suspend video output by this function Click Screen Off button and video will stop displaying on external display Click it again to resume Please note that this function will not stop video signal t...

Page 80: ...s configuration backup upgrade firmware to improve projector server s functionality or reset projector server from this menu 3 9 1 Configuration Tools You can backup and restore configuration of this...

Page 81: ...server s configuration file You can give each configuration file a different name so you can remember the purpose of configuration file Restore Settings Click Browse button to select a configuration...

Page 82: ...me existing problem Please download latest firmware from our website Please click Next button to start firmware upgrade procedure Click Browse button to select a firmware file from your computer and t...

Page 83: ...are upgrade procedure Also please do not remove the network connection during firmware upgrade if firmware upgrade fail the projector server may not be able to function properly and you will need to a...

Page 84: ...server may solve the problem Click Apply to reboot the projector server You ll be prompted before the projector server reboots itself Click OK to reboot the projector server or click Cancel to abort...

Page 85: ...D 1080P y Wired Wireless Presentation y Allow 16 users to login y Various video format support MPEG1 2 4 H 264 y Firmware Upgradeable y USB slot for wired HID mouse and 2 4G RF remote controller 2 4G...

Page 86: ...u used with Power adapter is functioning properly z Press Power button to see if Power LED lights now 2 If Ready LED does not light after you switch the projector server on after more than 2 minutes a...

Page 87: ...f video display you re using supports more than one video mode source make sure you selected correct video mode source 4 Make sure you selected correct video output type HDMI or VGA 5 Make sure the vi...

Page 88: ...88...

Reviews: